KHHsubs
Requests, Commissions, Bounties
Overview List Chapter 5 Chapter 6 Chapter 7 Chapter 8 Chapter 9 Chapter 10 Chapter 11 Final Chapter
Enter Substory No.
Overview
This section provides guides for all the substories you can encounter in the game. This covers the steps involved in the substory, the rewards you can receive, enemies you will encounter, etc. A lot of the substories in this game are easy to miss and, unlike in newer games in the series, cannot be completed later in the game (in other words, there are missable substories in this game). So, this page will serve as a useful reference for anyone trying to complete them all.
For a full list of available substories and when you can do them, see the "Lists" section of this page.
When you complete the substories, you will receive the item below as a reward.
Completion Rewards
| Condition | Reward |
|---|---|
| Finish all Requests, Commissions, and Bounties (1 ~ 140) | Matchless Wakizashi |
| Finish all yujo requests (1 ~ 7) | Immortal Turtle |
Requests
When a request ends, there are two possible outcomes - "Complete" and "Finished". If you "correctly" finish the requests you get the "Complete" outcome, but there are many requests where you can end up with the "Finished" outcome depending on the choices you make.
It's worth emphasising that there are no penalties for ending with the "Finished" outcome, but generally speaking getting the "Complete" outcome will give you the greater reward.
The requests can often have much more of a story to them than the commissions or bounties, some even including their own cutscenes. Some request stories even span over multiple different requests, as a form of story continuity as you progress through the game.

Do not worry if you get any "Finished" outcomes in your requests. This will not prevent you from completing the final request in the game - 100 Justice for All.
Commissions and Bounties
The commissions are work requests made by people in Gion. These requests are often, but not always, delivered by pigeon.
Bounties are subtories in which you track down and capture a wanted man in order to receive a reward. You obtain new bounties by examining the notice board by the police box at the top-left of Rakugai.
Unlike with requests, there is no "Complete" and "Finished" distinction in the outcomes of commissions and bounties - they just end. However, depending on the choices you make during the commission or bounty, you may end up with different rewards.

In order to start a bounty substory, you must first examine the wanted man's picture on the notice board. By doing this, you will also gain information regarding the location and time at which the wanted man will appear.
List
Note: When it says "N/A" under the substories, it means it is not possible to trigger any substories, or make progress in any uncompleted substories, during that part of the story.
Chapter 5
| Story Section | Time of Day | Requests | Commissions | Bounties |
|---|---|---|---|---|
| 5-1 - Speak to Ito | Evening | 1 ~ 7 | 101 | - |
| 5-2 - Return to House of the Dragon | Night | 8 ~ 9 | 102 | - |
| 5-3 ~ 5-4 - Speak to Ito, learn about revelations | Day | - | - | - |
| 5-5 - Return to House of the Dragon, then exit to Rakugai via the secret passage | Day | - | 103 ~ 104 | - |
| 5-6 - Speak to the official at the checkpoint | Day | 10 ~ 13 | - | - |
| 5-7 ~ 5-10 - Get a permit | Day | - | - | - |
| 5-11 - Show the official at the checkpoint your permit | Day | 14 ~ 15 | - | - |
| 5-12 - Speak to the attendant outside the mansion | Day | 16 ~ 17 | - | - |
| 5-13 - Receive the greatsword | Day | 18 | 105 | - |
| 5-14 - Fight: Shishido's Henchmen | Day | N/A | N/A | N/A |
| 5-15 - Enter Shishido's Cave | Day | 19 ~ 20 | - | - |
| 5-16 ~ 5-19 - Battle Shishido Baiken and his men in the cave | Day | N/A | N/A | N/A |
| 5-20 - Enter Koetsu's Mansion | Evening | 21 ~ 22 | - | - |
Chapter 6
| Story Section | Time of Day | Requests | Commissions | Bounties |
|---|---|---|---|---|
| 6-1 - Collect 2 Ryo | Night | 23 ~ 32 | 106 ~ 111 | 121 ~ 122 |
| 6-2 - Speak to Ito, who will bring out Gion Toji | Night | - | - | - |
| 6-3 - Speak to Shibusawa Zankisai and do some training | Day | 33 ~ 43 | - | - |
| 6-4 - Speak to Koetsu | Day | - | - | - |
| 6-5 - Buy mugwort dango | Day | 44 ~ 46 | - | 123 |
| 6-6 ~ 6-7 - Speak to Toji after training | Day | - | - | - |
| 6-8 ~ 6-9 - Battle with Ueda and Seijuro at Yoshioka Dojo | Day | N/A | N/A | N/A |
Chapter 7
| Story Section | Time of Day | Requests | Commissions | Bounties |
|---|---|---|---|---|
| 7-1 ~ 7-3 - Fight Ito and head to Gion | Evening ~ Night | N/A | N/A | N/A |
| 7-4 - Speak to the Tsuruya attendant | Night | 47 ~ 48 | - | 124 |
| 7-5 - Enter Koetsu's Mansion | Day | 49 ~ 60 | 112 ~ 113 | 125 |
| 7-6 - Speak to the Tsuruya attendant | Day | 61 ~ 66 | - | - |
| 7-7 - Go to the back area of Tsuruya | Day | - | - | - |
| 7-8 - Enter Kiryu's house and speak to Ito | Evening | 67 | - | 126 |
| 7-9 ~ 7-17 - Enter Tsuruya / Tsuruya Long Battle | Night | N/A | N/A | N/A |
Chapter 8
| Story Section | Time of Day | Requests | Commissions | Bounties |
|---|---|---|---|---|
| 8-1 - Speak to the Kamenoya employee | Day | 68 | 114 ~ 115 | 127 ~ 129 |
| 8-2 - Enter Koetsu's Mansion | Day | 69 ~ 73 | - | - |
| 8-3 ~ 8-4 - Speak to Yoshino, then speak to Koetsu in Kiryu's house | Day | - | - | - |
| 8-5 - Speak to the gatekeeper at Hozoin | Evening | 74 | - | - |
| 8-6 ~ 8-12 - Hozoin Tournament | Evening | N/A | N/A | N/A |
Chapter 9
| Story Section | Time of Day | Requests | Commissions | Bounties |
|---|---|---|---|---|
| 9-1 - Leave Hozoin and return to Gion | Day | 75 ~ 77 | - | 130 |
| 9-2 - Speak to Gion Toji | Day | 78 | - | - |
| 9-3 - Speak to the Tsuruya employee | Evening | - | 116 | - |
| 9-4 - Rest at Kiryu's house | Night | 79 | - | 131 ~ 132 |
| 9-5 - Go to Rendai Field | Day | 80 ~ 91 | 117 | 133 ~ 134 |
| 9-6 ~ 9-9 - Rendai Field and Sanjusangendo battles | Evening ~ Night | N/A | N/A | N/A |
Chapter 10
| Story Section | Time of Day | Requests | Commissions | Bounties |
|---|---|---|---|---|
| 10-1 ~ 10-8 - Tour with Old Man | Day ~ Evening | N/A | N/A | N/A |
| 10-9 - Return to Kiryu's house, then exit to the gates of Gion | Evening | - | - | - |
| 10-10 - Speak to the Tsuruya employee | Evening | N/A | N/A | N/A |
| 10-11 - Head to Kiyomizudera | Night | 92 ~ 95, 97 | 118 ~ 120 | 135 ~ 138 |
| 10-12 ~ 10-17 - Kiyomizudera Long Battle | Night | N/A | N/A | N/A |
Chapter 11
| Story Section | Time of Day | Requests | Commissions | Bounties |
|---|---|---|---|---|
| 11-1 - Rest at Kiryu's house | Evening | 96 | - | - |
| 11-2 - Head to Yagyu Village | Day | 98 ~ 99 | - | 139 |
| 11-3 ~ 11-4 - Yagyu Village battles | Night | N/A | N/A | N/A |
Final Chapter
| Story Section | Time of Day | Requests | Commissions | Bounties |
|---|---|---|---|---|
| 12-1 - Speak to Tsuruya employee | Evening | 100 | - | 140 |
| 12-2 ~ 12-5 - Speak to Ito, then Koetsu, then the boatman | Night ~ Day | - | - | - |
| 12-6 ~ 12-19 - Ganryu Island Battles | Day | N/A | N/A | N/A |
Note: You cannot return to Gion from 12-4 onwards
Note 2: You can change the time of day by speaking to Koetsu during 12-5
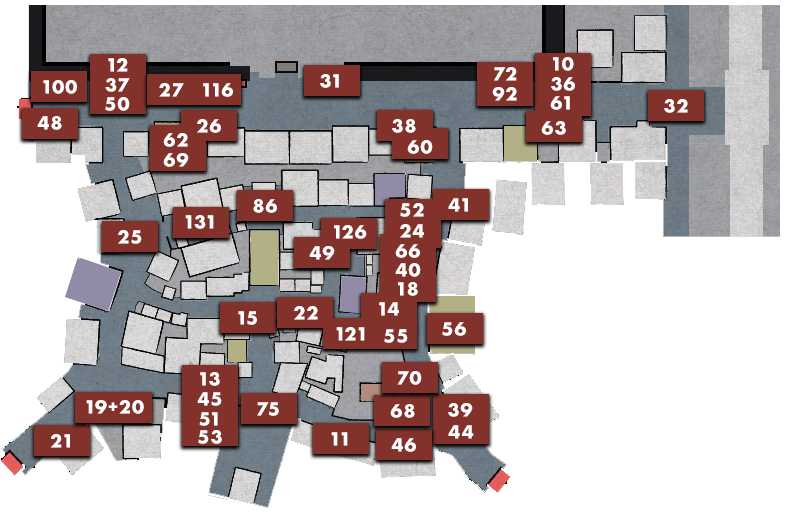
Gion

Rakugai
Kawara Street

Forest Road

Mountain Road
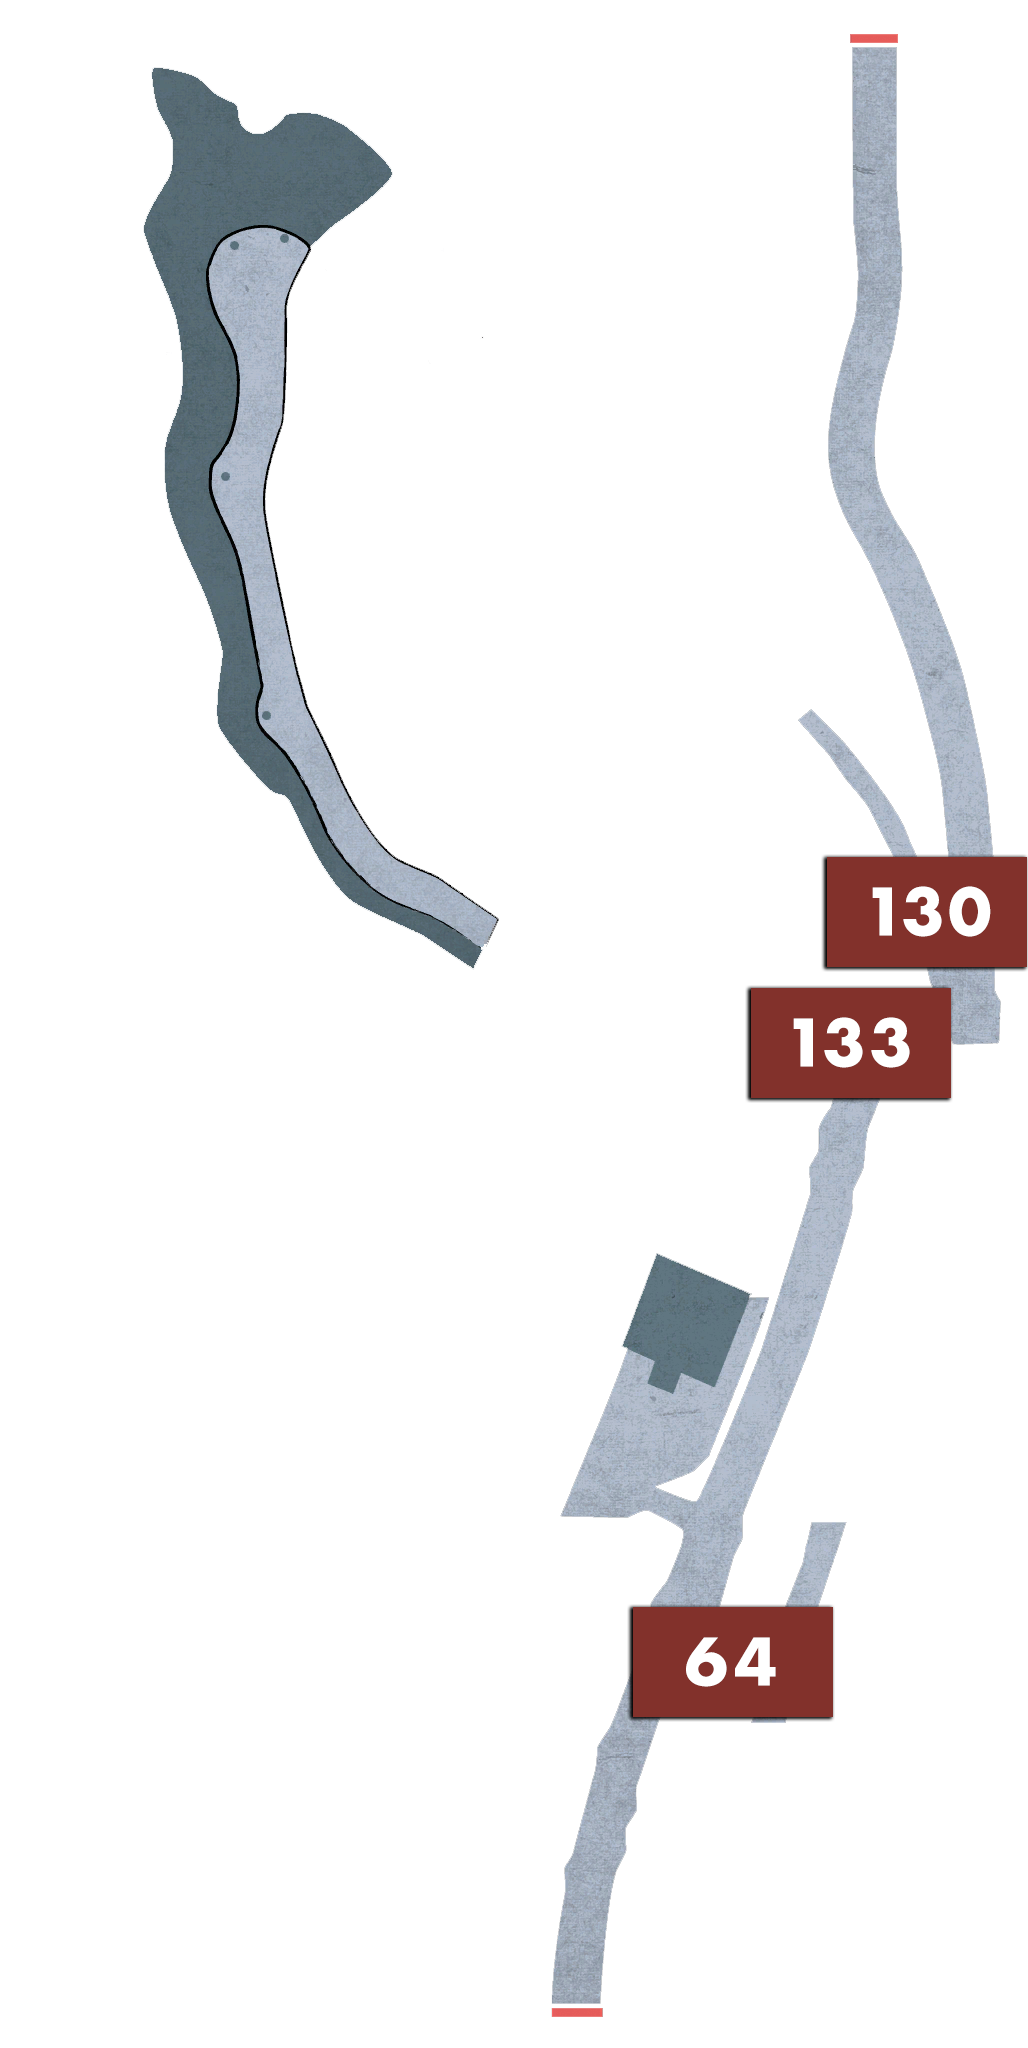
River Road

Riverside Tea House

Yoshioka Dojo

Farms

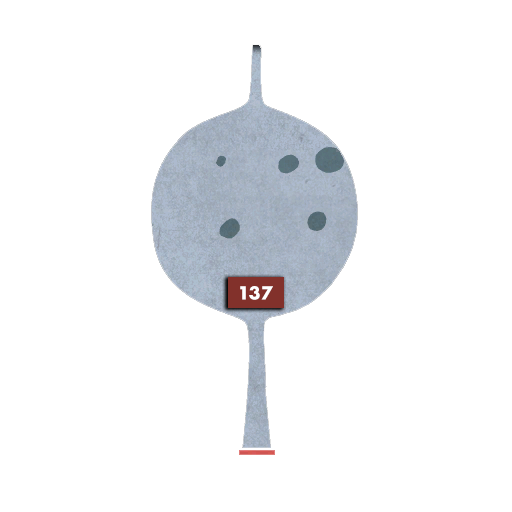
Rendai Field
Cliff Road
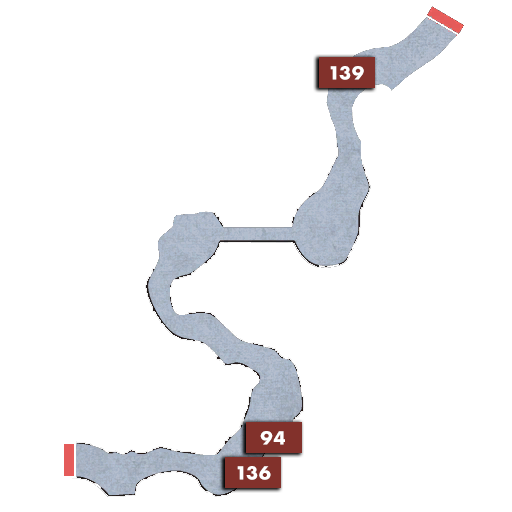
Sanjusangendo

Chapter 5: The One Ryo Request
| 5-1 | 1 | Day / Evening / Night | Kinuyo from Yumejiya | > |
| 5-1 | 2 | Day / Evening / Night | Suzukaze from Yumejiya | > |
| 5-1 | 3 | Day / Evening / Night | Momochika from Yumejiya | > |
| 5-1 | 4 | Day / Evening / Night | Hinagiku from Azamiya | > |
| 5-1 | 5 | Day / Evening / Night | Hanamaru from Azamiya | > |
| 5-1 | 6 | Day / Evening / Night | Shirayuki from Azamiya | > |
| 5-1 | 7 | Day / Evening / Night | Asagiri from Yumejiya | > |
| 5-1 | 101 | Day / Evening / Night | The Ironclad Bill | > |
| 5-2 | 8 | Day / Evening / Night | Gion Guidebook | > |
| 5-2 | 9 | Day / Evening / Night | Stairway to Adulthood | > |
| 5-2 | 102 | Day / Evening / Night | The Man Who Won't Move | > |
| 5-5 | 103 | Day / Evening / Night | Driving Away the Dog | > |
| 5-5 | 104 | Day / Evening / Night | Storage Lockers | > |
| 5-6 | 10 | Day / Evening | The Little Chili Pepper Girl | > |
| 5-6 | 11 | Day / Evening | The Hole in the Door | > |
| 5-6 | 12 | Day / Evening | The Enthusiastic Merchant Tanaka Appears | > |
| 5-6 | 13 | Day / Evening | Temple School Homework (Reading) | > |
| 5-11 | 14 | Day / Evening | The Flavour of Candy #1 | > |
| 5-11 | 15 | Day / Evening | The Flavour of Candy #2 | > |
| 5-12 | 16 | Day / Evening | The Fiance | > |
| 5-12 | 17 | Day / Evening | Kennosuke | > |
| 5-13 | 18 | Day / Evening | Water from the Ladle #1 | > |
| 5-13 | 105 | Day / Evening / Night | The Cry for Help | > |
| 5-15 | 19 | Day / Evening | The Enchanted Swords Man | > |
| 5-15 | 20 | Day / Evening | Enchanted Sword Collection | > |
| 5-20 | 21 | Day / Evening / Night | The Show-Off | > |
| 5-20 | 22 | Day / Evening / Night | The Collection Box | > |
| 1 | Kinuyo from Yumejiya |
| Available At: | 5-1 |
| Time: | Day / Evening / Night |
| Prerequisites: | Max out Kinuyo's heart gauge |
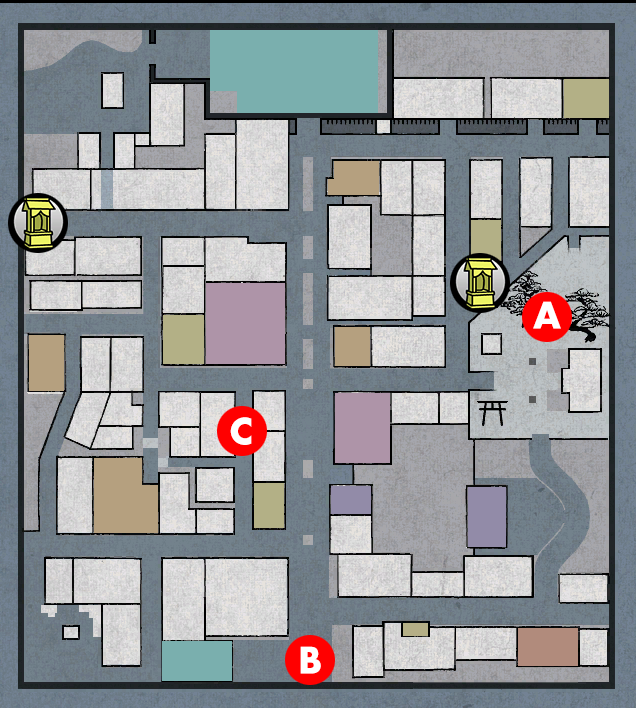
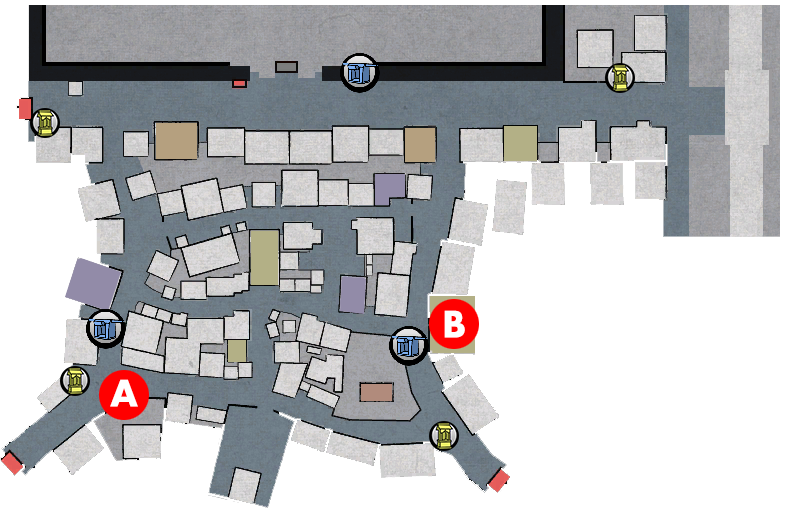
Steps
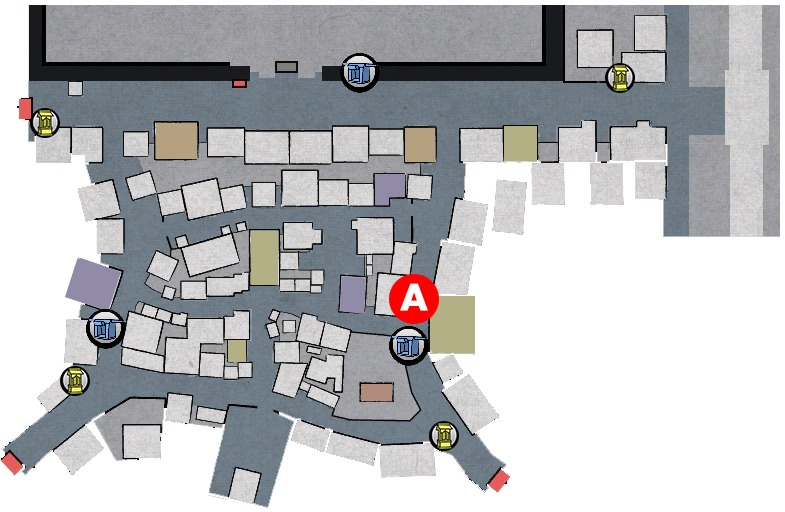
- A - Speak to Kinuyo
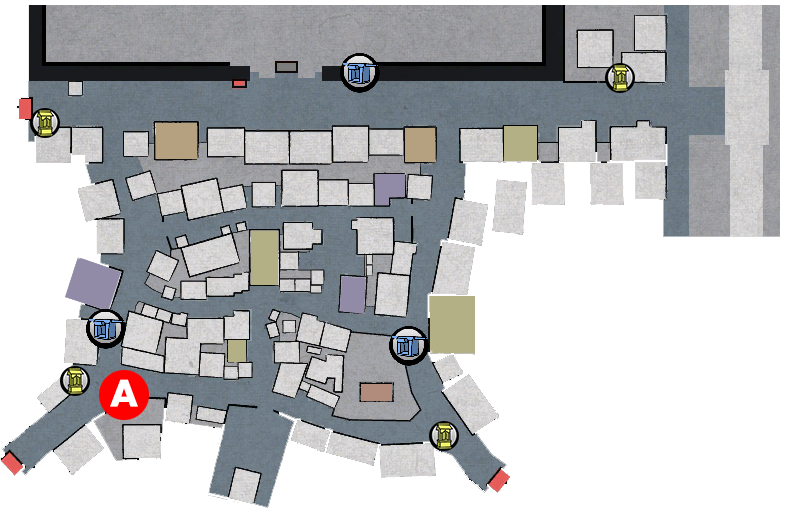
- B - Go near man and yujo by the Gion gates
- A - Speak to Kinuyo again
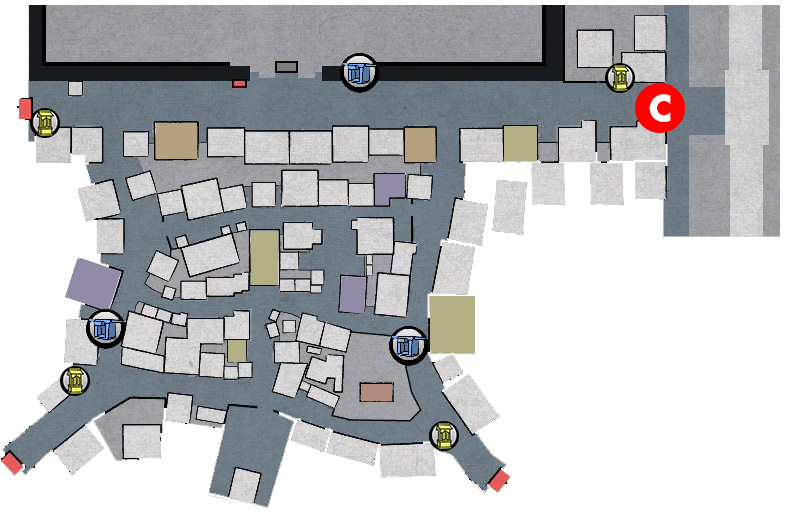
- C - Go near man and yujo, then speak to man after yujo leaves
- Fight man
- A - Speak to Kinuyo again
| 1: Speak to Kinuyo |
A - After maxing out the heart gauge, Kinuyo and Kiryu will agree to meet at the Gion Inari Shrine. When you speak to her there, she will mention that she has heard a rumour that her ex-husband has been seen near the gates of Gion and wants Kiryu to investigate for her.
| 2: Go near man and yujo by the Gion gates |
B - At the gates, Kiryu sees a man called Tsurumaru chatting with a yujo. When Kiryu asks the man about Kinuyo, he heads off
| 3: Speak to Kinuyo again |
A - Speak to Kinuyo again. Kiryu reports what happened at the gates.
| 4: Go near man and yujo, then speak to man after yujo leaves |
C - Tsurumaru appears on a small street in Gion. When you go near him, you see he is speaking with a different yujo from before. Kiryu again asks him about Kinuyo. This leads to a fight against him.
| 5: Fight man |
He is very weak and can be defeated with 2 kicks. There are no special/environmental heat actions Available At this battlefield, so just get the fight over with as soon as possible.
| 6: Speak to Kinuyo again |
A - After the fight, Tsurumaru runs off. Return to Kinuyo to report what happened. After a scene with Kinuyo, the substory ends with the COMPLETE result. You also receive 2000 EXP.
| 2 | Suzukaze from Yumejiya |
| Available At: | 5-1 |
| Time: | Day / Evening / Night |
| Prerequisites: | Max out Suzukaze's heart gauge |
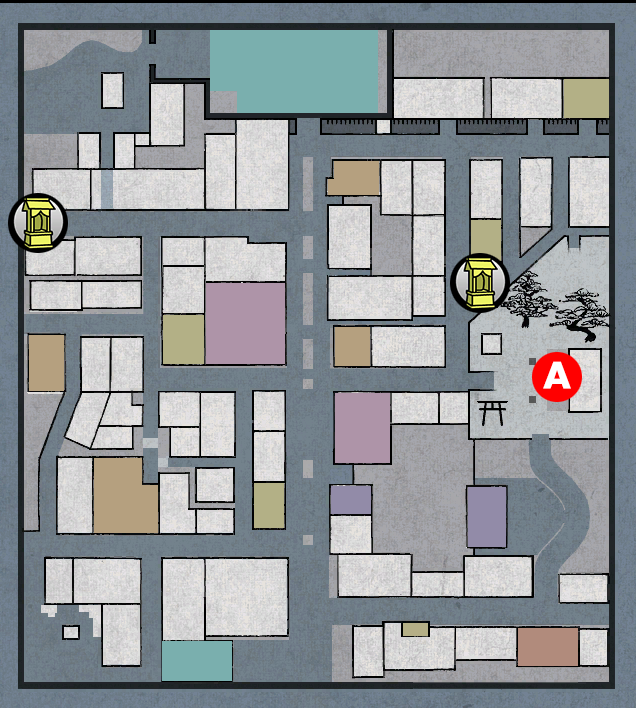
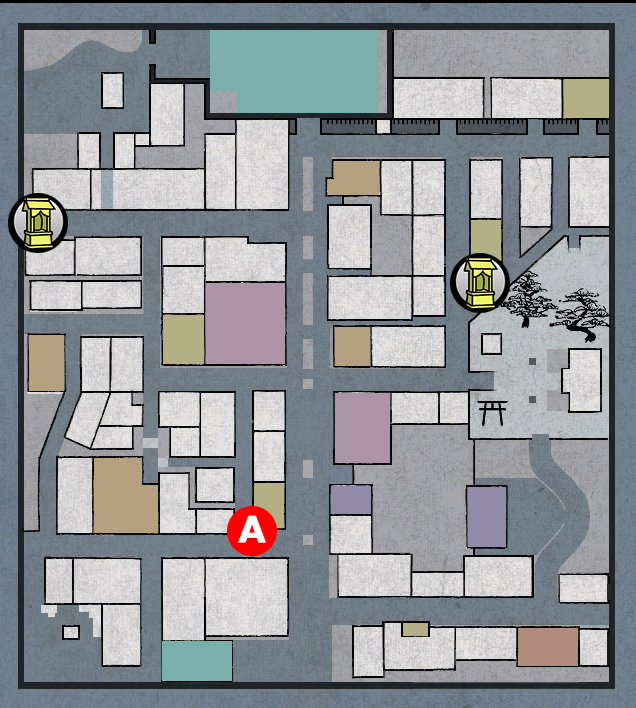
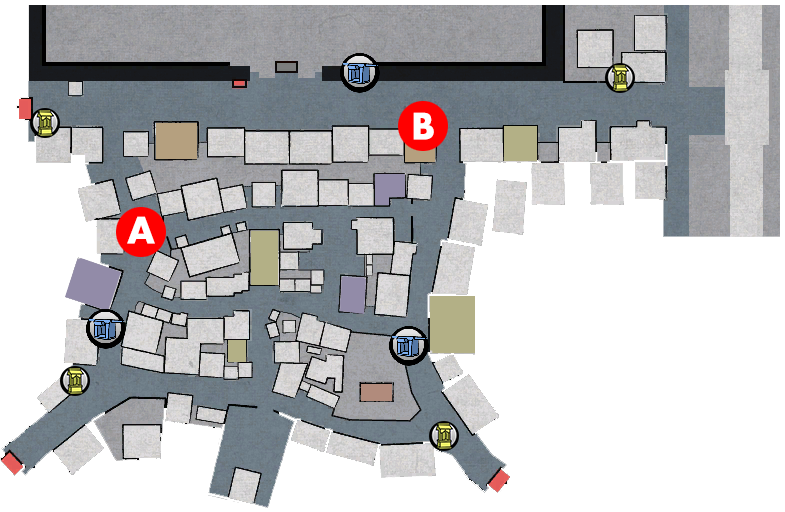
Steps
- A - Speak to the brothel owner in front of Yumejiya
- B - Go near Suzukaze and a man. Speak to Suzukaze after the man leaves
- C - Speak to the man who was talking with Suzukaze
- Fight man
| 1: Speak to the brothel owner in front of Yumejiya |
A - After maxing out Suzukaze's heart gauge, you must speak with the owner of the brothel outside Yumejiya. He tells Kiryu that Suzukaze has been acting strangely recently and would like you to investigate.
| 2: Go near Suzukaze and a man. Speak to Suzukaze after the man leaves |
B - After speaking with the owner, go round the corner and encounter Suzukaze speaking with a man. After he leaves, speak to her. It turns out that man is her father, who has come to Gion to ask his two daughters - Suzukaze and Hinagiku, from Azamiya - for money so he can pay back a debt he owes. He just got money from Suzukaze and is now off to visit her little sister.
| 3: Speak to the man who was talking with Suzukaze |
C - Head to Azamiya, where you encounter the father again. He is demanding to see Hinagiku. He says he must pay back the 100 Ryo he owes by the end of the day of he's a dead man. Eventually, this encounter with the father leads to a fight with him.
| 4: Fight man |
The battlefield is the same as the one from the Kinuyo substory, however this time there are weapons on the battlefield you can pick up and use if you want.
After the fight, there is a scene with Suzukaze back at the brothel. After the scene, the substory ends with the COMPLETE result. You also receive 2000 EXP.

| 3 | Momochika from Yumejiya |
| Available At: | 5-1 |
| Time: | Day / Evening / Night |
| Prerequisites: | Max out Momochika's heart gauge |
Steps
- A - Go near Momochika at the Gion Inari Shrine
- Play the Cee-Lo minigame
- Fight man
| 1: Go near Momochika at the Gion Inari Shrine |
A - After maxing out the heart gauge, meet Momochika at the Gion Inari Shrine, where she is talking with a man. Momochika owes a debt of 100 Ryo to this man and today is the deadline day for repayment. It turns out she loaned money from a loanshark who has extremely high interest rates. After chasing up the money with Momochika, the man leaves, then Kiryu and Momochika head to a gambling den.
| 2: Play the Cee-Lo minigame |
Momochika asks Kiryu to try winning the money she owes in the gambling mini-game, Cee-Lo. She gives you 500,000 chips, which must be doubled to 1,000,000 chips in order to pay back the debt. If you succeed in getting the required money, the debt is paid back and Step 3 of this walkthrough is skipped - you go straight to the ending scene instead. If you lose the money, you proceed to Step 3.
| 3: Fight man |
After losing the 500,000 chips Momochika gave you and leaving the gambling den, the loanshark appears again. After an exchange, it turns out he used a fake contract to trick Momochika. In her anger, she asks Kiryu to teach him a lesson, leading to a fight with the loanshark. The battlefield is very spacious and there are lots of weapons you can pick up. But he is very weak so you probably won't need to use them.
After the fight, there is a scene with Momochika at the brothel. After this, the substory ends with the COMPLETE result. You also receive 2000 EXP.
| ALTERNATE ENDINGS |
As mentioned, at Step 2, if you successfully make enough money to pay back the debt, Step 3 is skipped and you go straight to the ending scene at the brothel. However, you will still end the substory with the COMPLETE result if you skip Step 3. You will also still receive the 2000 EXP reward.
| 4 | Hinagiku from Azamiya |
| Available At: | 5-1 |
| Time: | Day / Evening / Night |
| Prerequisites: | Max out Hinagiku's heart gauge |
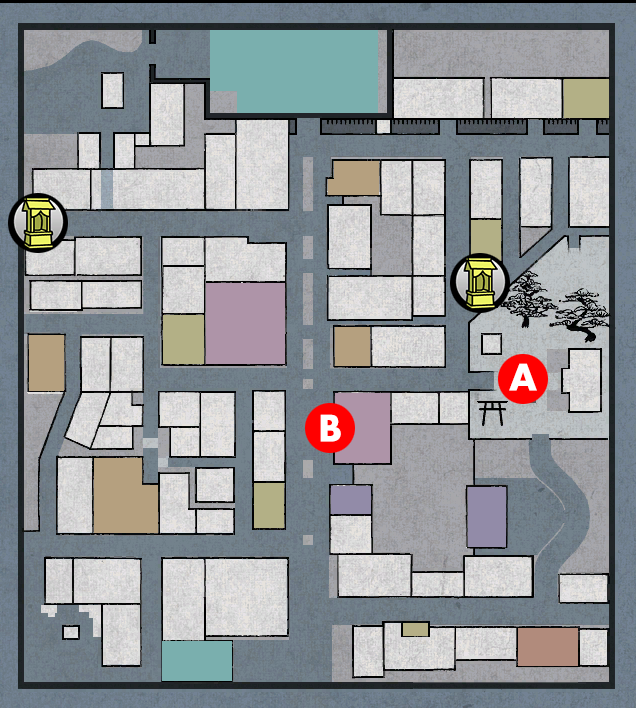
Steps
- A - Speak to Hinagiku at the Gion Inari Shrine
- Fight Ruffians
| 1: Speak to Hinagiku at the Gion Inari Shrine |
A - After maxing out her heart gauge, speak to Hinagiku at the Gion Inari Shrine. The two go for a walk in Gion and end up at the Suiten Inari Shrine. While they are minding their own business there, a woman appears along with 3 men. They are targeting Hinagiku. Kiryu steps in and fights the 3 men to stop them.
| 2: Fight Ruffians |
This is a fight against 3 men, none of whom have much health, so this shouldn't be anything to worry about. The only potential issue to watch out for is the brigand enemy type who has a shortsword weapon. The other 2 are unarmed so it's a good idea to take out the sword-user first. If you are worried about going up against a sword-user in Gion, you could buy a few healing items before speaking to Hinagiku in Step 1.
After the battle, the woman explains why she attacked Hinagiku - she desired revenge against Hinagiku's mother, but since she's gone she wanted to take it out on her daughter, Hinagiku. Then, there is a scene with Hinagiku at the brothel. After this, the substory ends with the COMPLETE result. You also receive 2000 EXP.

| 5 | Hanamaru from Azamiya |
| Available At: | 5-1 |
| Time: | Day / Evening / Night |
| Prerequisites: | Max out Hanamaru's heart gauge |
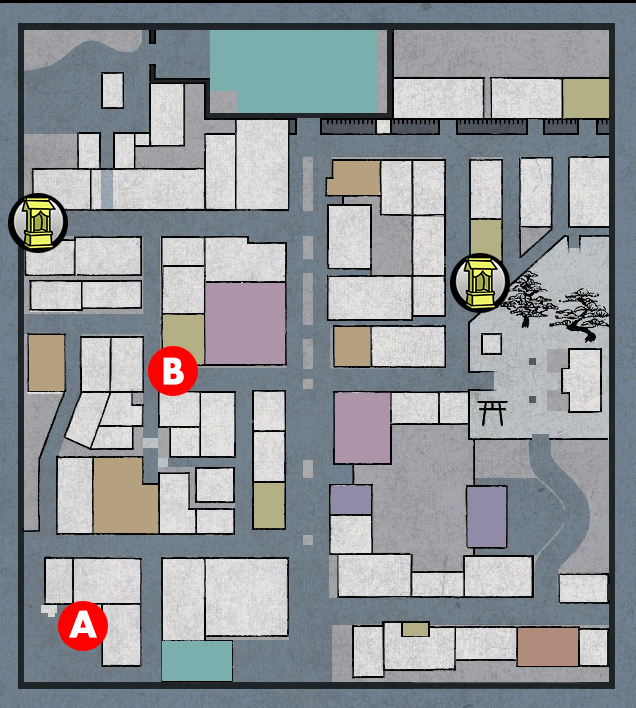
Steps
- A - Speak to Hanamaru at the Suiten Inari Shrine
- B - Speak to the pharmacist. Then select the FOURTH OPTION
- A - Return to Hanamaru with the medicine
| 1: Speak to Hanamaru at the Suiten Inari Shrine |
A - After maxing out her heart gauge, speak to Hanamaru at the Suiten Inari Shrine. She is with her father, who is suffering with heart pains, and asks Kiryu for his help. Kiryu says he will look for some medicine.
| 2: Speak to the pharmacist. Then select the FOURTH OPTION |
B - Head towards Tenguya. Outside there is a man standing around who sells special kinds of medicine. Speak to him and he offers Kiryu 4 different kinds of medicine. The one that will save Hanamaru's father is the Foreign Pill, which is the FOURTH OPTION and costs 1 Ryo.
If you buy one of the other pills and give it to her father, all that happens is that it doesn't heal him and you have to return to the pharmacist to buy a different pill. You can't fail this substory and there are no other possible endings besides giving him the Foreign Pill to heal him.
After Hanamaru's father recovers, she and Kiryu return to the brothel. After the scene that takes place there, the substory ends with the COMPLETE result. You also receive 2000 EXP.
| 6 | Shirayuki from Azamiya |
| Available At: | 5-1 |
| Time: | Day / Evening / Night |
| Prerequisites: | Max out Shirayuki's heart gauge |
Steps
- A - Speak to man standing by the gate of Gion
- B - Go near men
- Fight Ruffians
| 1: Speak to man standing by the gate of Gion |
A - After maxing out Shirayuki's heart gauge, she'll agree to meet with Kiryu at the gates of Gion. When you go there, you'll find a man called Komeyoshi standing around. Speak to him and he explains he is looking for someone called "Otae". After he leaves, Shirayuki shows up and the two head over to a restaurant to get something to eat. Before they can enter the restaurant, Komeyoshi appears and it seems he recognises Shirayuki as "Otae", but she denies it and says he has the wrong person. After a short conversation, two ruffians show up and take Komeyoshi away. Shirayuki asks Kiryu to go and help him, because it turns out what he was saying is true.
| 2: Go near men |
B - Go to the top-right of Gion, where you will find the two men with Komeyoshi. They are trying to extort money out of him, but Kiryu steps in to stop them.
| 3: Fight Ruffians |
This battle is against 2 brawler enemy types, both of whom have only a small amount of health. There are also weapons on the ground you can use if you want. However, while they are brawler types, one of them is holding a lantern weapon which will do more damage than the other brawler type. So, it's a good idea to get rid of this guy first.
After the fight, Shirayuki shows up, then she and Kiryu return to the brothel. After the scene that takes place there, the substory ends with the COMPLETE result. You also receive 2000 EXP.

| 7 | Asagiri from Yumejiya |
| Available At: | 5-1 |
| Time: | Day / Evening / Night |
| Prerequisites: | Max out Asagiri's heart gauge (cannot be done until you have completed requests 1 ~ 6) |
Steps
- A - Go to the Gion Inari Shrine
- B - Go near Asagiri at the entrance of Yumejiya
- B - Speak to Asagiri when you have at least 50 Ryo
- Fight henchmen
| 1: Go to the Gion Inari Shrine |
A - After maxing out Asagiri's heart gauge, she will agree to meet with Kiryu at the Gion Inari Shrine. However, when you arrive there, the owner of Yumejira appears and tells Kiryu that someone is trying to buy Asagiri's freedom.
| 2: Go near Asagiri at the entrance of Yumejiya |
B - Go back to Yumejiya, where you will see Asagiri and a man called Toramaro talking. You learn that Toramaro intends to buy Asagiri's freedom, but she is not keen on the idea. She is not ready to accept the offer to buy her freedom yet, so she tells Toramaro to give her time to think about it. When he leaves, they decide that Kiryu should pretend to buy her freedom so they can keep her at the brothel. The price for her freedom is 400 Ryo and Asagiri herself has saved up 350 Ryo, which she will give to Kiryu to use towards "buying her freedom". This means Kiryu needs to gather 50 Ryo to make up the money they need.
NOTEDon't worry, you will not lose your 50 Ryo. After the fight in Step 4 you will get the 50 Ryo back.
| 3: Speak to Asagiri when you have at least 50 Ryo |
B - If you don't have the money now, doing things like substories can get you some money. Alternatively, you could try your luck at gambling to get enough points to exchange for plates you can sell for lots of money. If you have any valuable items you could sell them at the pawn shop. Regardless of how you get the money, when you have 50 Ryo, speak to Asagiri who will then summon Toramaro. Now, Asagiri rejects Toramaro's offer and accepts Kiryu's offer to buy her freedom instead. Obviously, Toramaro isn't going to take no for an answer and a fight begins against his henchmen.
| 4: Fight henchmen |
This is quite a confined battlefield, so you might find it tricky to find space here. There are no weapons on the floor and the two henchmen you fight aren't tough, so just kick them a few times to take them out quickly.
After the fight, Toramaro leaves and Kiryu gets his 50 Ryo back. After all this, there is a scene with Asagiri at the brothel, then the substory ends with the COMPLETE result. You also receive 10000 EXP.
| 101 | The Ironclad Bill |
| Available At: | 5-1 |
| Time: | Day / Evening / Night |
| Prerequisites: | N/A |
Steps
- A - Speak to the Kakemawari on the ground
- B - Speak to Kumanosuke at the restaurant, then select the TOP OPTION
- Fight Kumanosuke
| 1: Speak to the Kakemawari on the ground |
A - When you go to Kamemachi Lane, near the back of Tsuruya, you will notice some men on the ground. Like Kiryu, they are kakemawari and were trying to collect a debt from someone. The man who owes the money is called Kumanosuke and is currently sat at the sushi restaurant. They tell Kiryu if he helps them get the money back, they will give him a cut of the reward.
| 2: Speak to Kumanosuke at the restaurant, then select the TOP OPTION |
B - Speak to Kumanosuke in the restaurant. He will challenge Kiryu to a fight - if Kiryu wins, he pays back what he owes. Select the TOP OPTION to agree to fight him. The two step outside to fight.
| 3: Fight Kumanosuke |
Kumanosuke has a reputation in Gion - they say no one can get the money he owes off of him. Considering he beats the asses of all the other kakemawari, he is surpisingly weak. Maybe the kakemawari around here are just really weak. At any rate, you shouldn't have any trouble kicking his ass in this fight.
After the fight, Kumanosuke gives the money he owes. Then the kakemawari from earlier shows up and asks if Kiryu has dealt with Kumanosuke. Kiryu gives the kakemawari the money, then the kakemawari gives Kiryu a cut of the money - you receive 1 Ryo. You also receive 1000 EXP.

| 8 | Gion Guidebook |
| Available At: | 5-2 |
| Time: | Day / Evening / Night |
| Prerequisites: | Complete Requests 1 ~ 7 - each one of those requests you complete opens up another part of this request, so you don't need to complete all of them to trigger this request but you do need to complete them all to finish this |
Steps
- A - Speak to the man near the gates of Gion and select the TOP OPTION
- Select the TOP OPTION to share yujo information
- Leave the area then come back and speak to him to claim a reward
- Repeat Steps 2-3 until you have shared information on all 7 yujo
| 1: Speak to the man near the gates of Gion and select the TOP OPTION |
A - If you have completed at least one yujo request (requests 1 ~ 7) a man will appear near the gates of Gion. Speak to him and you learn he is creating guidebooks for Gion, focusing on the yujo of Gion. They will contain all kinds of information that visitors will find useful if they want to spend time with those women. He asks Kiryu for his help, saying if Kiryu answers his questions about the yujo he will give him a share of the sales of the guidebooks he creates.
| 2: Select the TOP OPTION to share yujo information |
He will ask for information about a yujo - but only about the yujo whose requests you have completed. If you have completed more than one yujo request, the yujo he picks is completely random. Because of this, if you don't read Japanese, it's easier to complete one yujo request, then speak to this guy because you are guaranteed to only get that yujo's questions. So, you would complete a yujo request, speak to this guy and answer his questions, then move on to the next yujo request and repeat.
However, it's worth pointing out that even if you get 100% of the questions in this request wrong you still end up with the COMPLETE result in the end regardless. The only difference is that you don't get much money as a reward if you get them wrong.
Please see below for the list of correct answers for each set of yujo questions. I have included the Japanese text for the yujo's name if you want to try finding the right one to get all the questions right (if you have already completed all the yujo requests). When the dialogue options pop up (where you select the TOP OPTION to give him information about the yujo), the yujo's name is in brackets in the man's dialogue box. They look like this「name」- so before selecting an option, match that name with the names below.
| 3: Leave the area then come back and speak to him to claim a reward |
After answering his questions, you must leave the area then return to him to collect your reward (and proceed to the next yujo questions). Entering and exiting the nearby shop Arigataya works fine - go in, leave, then return to the man and speak to him to collect your reward. If you got all the questions right, you receive 1 Ryo. If you get 2 or 3 of the questions right, you receive 5000 Mon. If you get 0 or 1 question right, you receive 500 Mon. This means the max money you can get in this request if 7 Ryo, for all questions correct for all yujo.
| 3: Repeat Steps 2-3 until you have shared information on all 7 yujo |
You need to speak to him again to start the next set of questions (only if you have completed more yujo requests). Otherwise, if you have answered questions for all 7 yujo, the substory will end. Regardless of how many questions you get right over the course of this request, you receive 15000 EXP and get the COMPLETE result.

| Correct answers |
Kinuyo [絹夜]
- BOTTOM OPTION
- BOTTOM OPTION
- MIDDLE OPTION
- TOP OPTION
Suzukaze [涼風]
- BOTTOM OPTION
- TOP OPTION
- MIDDLE OPTION
- TOP OPTION
Momochika [桃千香]
- TOP OPTION
- MIDDLE OPTION
- MIDDLE OPTION
- BOTTOM OPTION
Hinagiku [ひな菊]
- BOTTOM OPTION
- TOP OPTION
- MIDDLE OPTION
- TOP OPTION
Hanamaru [花丸]
- TOP OPTION
- MIDDLE OPTION
- MIDDLE OPTION
- BOTTOM OPTION
Shirayuki [白雪]
- MIDDLE OPTION
- MIDDLE OPTION
- BOTTOM OPTION
- MIDDLE OPTION
Asagiri [朝霧]
- TOP OPTION
- MIDDLE OPTION
- TOP OPTION
- BOTTOM OPTION
| 9 | Stairway to Adulthood |
| Available At: | 5-2 |
| Time: | Day / Evening / Night |
| Prerequisites: | Complete Request 8 |
Steps
- A - Speak to the man from 8 who wrote the Gion yujo guides
| 1: Speak to the man from 8 who wrote the Gion yujo guides |
A - You'll find the man from the previous request standing around down this street. Speak to him and the two of you enter a building to spend some time with the women there. Kiryu notices the man is nervous - it turns out he's never been to a place like this before. After the events in the building, he thanks Kiryu for everything. You receive a Resurrection Magatama as a reward. You also receive 1000 EXP. The substory ends with the COMPLETE result.

| 102 | The Man Who Won't Move |
| Available At: | 5-2 |
| Time: | Day / Evening / Night |
| Prerequisites: | N/A |
Steps
- A - Receive letter
- B - Speak to man sat on the ground
- Fight man
| 1: Receive letter |
A - In this area, a pigeon will show up and deliver a letter. The letter is a commission for work. The commission is from the owner of a brothel to the east of the main gates, called "Chidoriya". Apparently someone is sat in front of the brothel and refuses to move and they are asking for Kiryu's help to get rid of him.
| 2: Speak to man sat on the ground |
B - When you arrive here you'll see a man sat on the ground. Kiryu tries to convince him to move, but he won't listen. Eventually, this leads to a fight.
| 3: Fight man |
The man has apparently been sat there for 3 days and 3 nights and doesn't have much strength left. Because of this, you can defeat him in one hit.
After the "fight", if you can call it that, we learn that he's sat there because there is a yujo he dearly loves at the brothel. He tried to buy her freedom but was refused, because he didn't offer enough money. In protest, he's been sat in front of the brothel. Eventually, the yujo he loves appears on the balcony. The man sees her and thinks she is there to cheer him on. This gives the man a new burst of energy and leads to a second fight against him. This time, he promises to leave if Kiryu beats him again.
He's tougher this time (as in it will take more than one hit to beat him), but he's still not a threat. After defeating him, he agrees to leave as promised. However, Kiryu advises him to use his feelings for the yujo to motivate him to make more money, so he can buy her freedom. After he leaves, the owner and the yujo come down. It turns out this yujo is still only the rank of kamuro (an assistant to the more senior yujo)! The owner thanks Kiryu for his help and gives him 1 Ryo as payment. You also receive 1500 EXP as a reward.

| 103 | Driving Away the Dog |
| Available At: | 5-5 |
| Time: | Day / Evening / Night |
| Prerequisites: | Complete Commission 102 |
Steps
- A - Receive letter
- B - Go to gambling den area and give the dog 2 items of food (TOP OPTION to give food)
| 1: Receive letter |
A - In this area, a pigeon will arrive to deliver a letter. It is a commission for work from someone near the gambling den. Apparently a dog is sat on his bag, but he's no good with dogs so can't do anything to get him off. So, he's asking Kiryu for his help.
NOTEBefore heading to the dog, buy a couple of food items - Arigataya is a convenient place to grab some food. For example, they sell manju for 10 Mon each.
| 2: Go to gambling den area and give the dog 2 items of food (TOP OPTION to give food) |
B - Obviously, you're not going to beat the dog's ass to get it off the bag. Instead, Kiryu thinks he should offer the dog some food. Select the TOP OPTION to give him food. This will bring up a menu of all the food items in your inventory. Select one and then select the option on the left to confirm.
The dog didn't seem interested in the food. Interact with the dog again and Kiryu thinks he should try offering food again. Again, choose the TOP OPTION to choose another food item (you can give the dog the same type of food you already gave him - for example, I just gave him 2 manju).
Again, the dog does not eat it. But then the dog's owner shows up and calls the dog away. Even though Kiryu didn't really do anything, the dog is now off the bag and so the commission is fulfilled. The man who commissioned the work pays Kiryu the 5000 Mon he promised him. You also receive 1500 EXP as a reward.

| 104 | Storage Lockers |
| Available At: | 5-5 |
| Time: | Day / Evening / Night |
| Prerequisites: | N/A |
Steps
- A - Speak to man by the storage lockers
- B - Pick up storage locker key (on roof)
- A - Speak to man by the storage lockers again
| 1: Speak to man by the storage lockers |
A - When you speak to the man standing here, he will tell Kiryu that he has an item stored in one of the lockers, but a cat ran off with his key so now he can't access it. He then gives Kiryu a formal commission for work, asking him to get the key back for him.
| 2: Pick up storage locker key (on roof) |
B - You will find the missing key on a roof at the Suiten Inari shrine. If you speak to the guy standing around here, the game will show you exactly where the key is. But, just in case, see below for its location - you can pick it up when you stand in the top-right corner of the shrine area. After interacting with the key, you'll need to select the TOP OPTION to pick it up.

| 3: Speak to man by the storage lockers again |
A - Once you have the key, speak to the man at the lockers again. Kiryu gives him the key. The man thanks him, then says that as a reward for his work, Kiryu can take the item he has in his locker. He then gives Kiryu the key. Besides the key, you get 1000 EXP as a reward. However, the most important reward for completing this commission is that you will now start finding storage locker keys lying around across the various maps in the game, which you can use to open up the lockers to obtain the items inside.

| 10 | The Little Chili Pepper Girl |
| Available At: | 5-6 |
| Time: | Day / Evening |
| Prerequisites: | N/A |
Steps
- A - Speak to the girl and select the TOP OPTION
- Walk away from the girl
- Speak to outlaw and select the TOP OPTION
- Fight men
| 1: Speak to the girl and select the TOP OPTION |
A - Here you will see a girl dressed in red. When you get close you hear she is trying to sell chili peppers. Speak to the girl, then select the TOP OPTION to buy a chili pepper. It will cost you 10 Mon.
| 2: Walk away from the girl |
After buying a chili pepper, walk away from the girl. When you get a certain distance away from her, a couple of outlaws show up and speak to the girl. They ask what she is selling here and ask to try one. The outlaw boss eats one, but it is too hot for him to handle. The henchman then threatens the girl, saying she has to pay a fee for the trouble she has caused. The girl then cries out for help.
| 3: Speak to outlaw and select the TOP OPTION |
Speak to the outlaw boss. They threaten to take Kiryu out if he doesn't mind his own business. Select the TOP OPTION to step in and help the girl. Kiryu scolds them for trying to extort money from a child, then they fight.
Nothing happens if you choose not to help. The substory just pauses there - to continue, come back and speak to the outlaw again and select the right option to progress this time. I guess in the meantime they just stand there staring at the girl.
| 4: Fight men |
You fight a brigand and brawler enemy type. The brawler is nothing to worry about. The brigand does have a wooden sword though, so watch out for that. However, neither of them have much health so it shouldn't be a problem - especially since you can use your swords in Rakugai.
After the fight, they apologise for their behaviour. Kiryu says if they really want to make ammends, they should buy some of the girl's stock. They end up buying all the chili peppers she has. The girl is very happy - this is the first time she's sold her whole stock. After the guys leave, the girl thanks Kiryu for his help, then leaves because she has no stock left to sell. The request ends with the COMPLETE result. You also receive 1500 EXP as a reward.

| 11 | The Hole in the Door |
| Available At: | 5-6 |
| Time: | Day / Evening |
| Prerequisites: | Complete Request 10 |
Steps
- A - Speak to the old man and select the BOTTOM OPTION
- Speak to the man who shows up
- B - Speak to the man who ran away
- Fight man
- C - Speak to man by the gates of Gion
- Fight man
| 1: Speak to the old man and select the BOTTOM OPTION |
A - Speak to the old man here. He says someone keeps making holes in their door and he has to keep getting it replaced. He asks Kiryu if he would be willing to stand by and watch over the house to see who shows up, hoping they can catch the guy responsible. Select the BOTTOM OPTION to agree to stand watch.
| 2: Speak to the man who shows up |
After a short while, a man shows up looking suspicious, staring at the door. Speak to him and he runs off to the east. You need to track him down.
| 3: Speak to the man who ran away |
B - You will find the man here. Speak to him and he immediately starts fighting Kiryu.
| 4: Fight man |
This is an easy fight - he is unarmed and doesn't have much health.
After the fight, Kiryu takes him back to the house to explain himself to the old man. Apparently, there is someone spreading a rumour that at this house you can see a bathing woman. When the old man hears this, he calls out the only woman who lives at the house - his wife. The man realises the rumour isn't quite how it initially sounded after all. Kiryu asks him where he heard this rumour. The man says some guy by the gates of Gion has been saying it. The old man asks Kiryu to go over there and deal with him.
| 5: Speak to man by the gates of Gion |
C - Go near here and Kiryu spots someone who he thinks might be the man spreading the rumour. Speak to this man and Kiryu confronts him about the rumour, which leads to a fight.
| 6: Fight man |
Another simple fight, much like the first fight. Only thing worth noting here is that there is a special environmental heat action in this battlefield, but if you are completing these requests as they become available in the story you won't have that ability unlocked yet anyway. But if you have unlocked the ability you can use it here.
After the fight, Kiryu takes him back to the old man. This man admits to spreading the rumour. It turns out he fits doors for a living and business has been poor recently, so he's been trying to help his business by spreading the rumour. So, the holes get put in the door to see the bathing woman, then the old man is paying this dude to replace the door, so it's easy money for him! Kiryu demands that the man pays back all the money he has charged this old man for door repairs.
After the guy leaves, the old man thanks Kiryu for his help and gives him a Flower-Pattern Incense Burner. You also receive 1500 EXP as a reward. The request ends with the COMPLETE result.

| 12 | The Enthusiastic Merchant Tanaka Appears |
| Available At: | 5-6 |
| Time: | Day / Evening |
| Prerequisites: | N/A |
Steps
- A - Speak to Tanaka and select the TOP OPTION
- Walk away from Tanaka and select the TOP OPTION
| 1: Speak to Tanaka and select the TOP OPTION |
A - Go here and you will see a suspicious-looking merchant selling something. Speak to him and he introduces himself as "Enthusiastic Tanaka" and he'll talk about an amazing item called the "Surprise Coin Purse". Apparently it multiplies the money you put into it by 10 times and he's selling it for 200 Mon. He also says he'll throw in a couple of brand new cloths which can clean up anything.
After his sales pitch, select the TOP OPTION to agree to buy it. You receive a Surprise Coin Purse and 2x Brand-New Cloth items.
| 2: Walk away from Tanaka and select the TOP OPTION |
Start leaving the area. When you get a certain distance away from Tanaka, Kiryu wonders if he should put some money in the coin purse. Select the TOP OPTION to do so. He notices the amount of money in there certainly does seem to have multiplied by about 10 times. However, on closer inspection, Kiryu sees that there is a round transparent crystal in the bag which only makes it appear that there is more money in there. So, it's just a visual illusion. After this revelation, the substory ends with the COMPLETE result. You also receive 1200 EXP as a reward.
If you're wondering what happens if you choose not to put money in the purse - when you walk even further away from Tanaka after refusing to put money in the purse, Kiryu wonders again if he should put money in as he is very curious. If you say no yet again, Kiryu will just ignore you and put money in anyway, saying he really wants to try it out. Not sure why they bothered with a dialogue option here to be honest.

| 13 | Temple School Homework (Reading) |
| Available At: | 5-6 |
| Time: | Day / Evening |
| Prerequisites: | N/A |
Steps
- A - Speak to child and select the TOP OPTION
- Answer his questions: MIDDLE OPTION - TOP OPTION - TOP OPTION
| 1: Speak to child and select the TOP OPTION |
A - Speak to the child sat around here. He'll mention he's struggling with his school work and asks Kiryu if he'll help him out. Select the TOP OPTION to agree to help him with some questions he's struggling with.
NOTEIf you get the first question wrong, it is impossible to get the COMPLETE result for request 53. You will miss out on some EXP and a valuable item, but other than that you don't lock yourself out of any future content (including the secret boss fight), so it's not a huge disaster if you mess up. If you get either/both the 2nd and 3rd questions wrong you can still get the COMPLETE result for request 53, it's just getting the first question wrong which locks you out of that result.
| 2: Answer his questions: MIDDLE OPTION - TOP OPTION - TOP OPTION |
At this point, we finally learn the kid's name - Mametaro. Then, we get into today's homework, which are some kanji reading exercises. There are 3 questions he needs help with. The answer to the first one is the MIDDLE OPTION. The answer to the second question is the TOP OPTION. The answer to the final question is again the TOP OPTION.
After this, the boy thanks Kiryu for his help. Then the request ends with the COMPLETE result. You also receive 1000 EXP as a reward.
| ALTERNATE ENDINGS |
If you get all of the questions in Step 2 wrong, the request ends with the FINISHED result. You still get the 1000 EXP reward though. If you get one or two wrong here you still get the COMPLETE result. But as mentioned in Step 1, if you get the first question wrong, you cannot get the COMPLETE result for request 53.

| 14 | The Flavour of Candy #1 |
| Available At: | 5-11 |
| Time: | Day / Evening |
| Prerequisites: | N/A |
Steps
- A - Speak to the boy and select the TOP OPTION
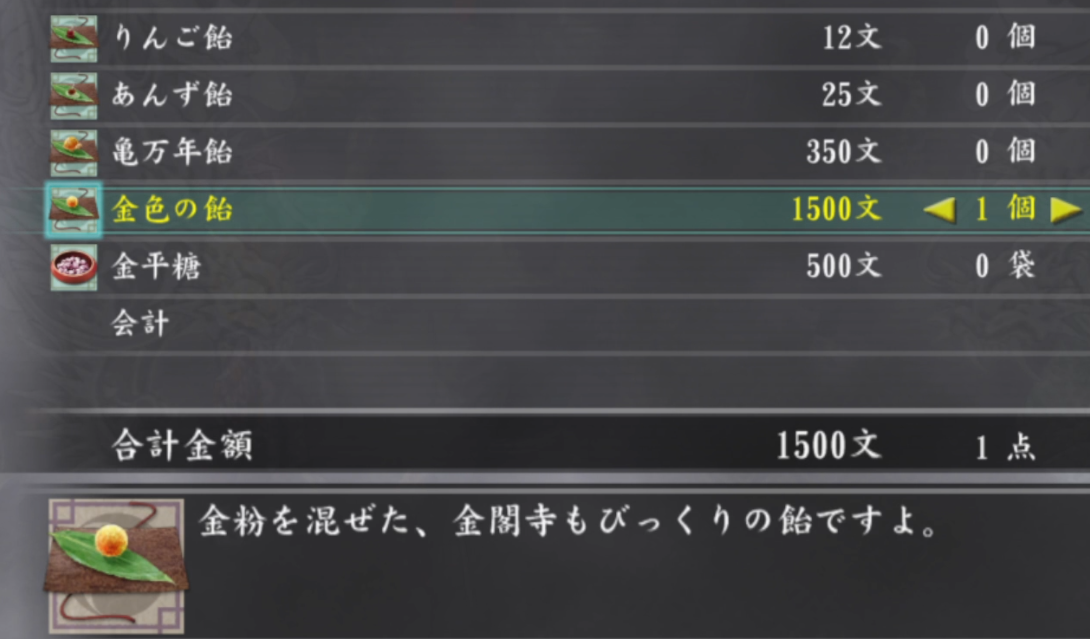
- B - Speak to the candy seller and buy the FOURTH ITEM
- Speak to boy again and select the BOTTOM OPTION, then select the Golden Candy from your inventory
| 1: Speak to the boy and select the TOP OPTION |
A - Speak to the boy here. He asks Kiryu to buy him some candy. He says the taste of a particular type of candy brings back memories of his dead father - the flavour of the last candy his father gave him before he died. Select the TOP OPTION to agree to buy this candy for him. He leads you down the road a bit, where a candy seller is standing around.
| 2: Speak to the candy seller and buy the FOURTH ITEM |
B - Speak to the candy seller. He sells 5 items. The correct candy to buy the boy is the Golden Candy, which is the FOURTH ITEM on the list - it costs 1500 Mon. After selecting the item, you need to also select the option on the left to confirm the purchase.
| 3: Speak to boy again and select the BOTTOM OPTION, then select the Gold Candy from your inventory |
After getting hold of the candy, speak to the boy again and select the BOTTOM OPTION which will bring up the candy you have in your inventory. Select the Golden Candy (as usual, after selecting, choose the left option to confirm). The boy is delighted, saying this is exactly like the candy his father bought him. The request ends with the COMPLETE result and you receive 1500 EXP as a reward.
NOTEIf you offer the boy any other type of candy, he'll just moan that it isn't the same as the one his father bought him and you'll have to buy another one to give to him. That doesn't stop him from taking it though, so you'll be wasting your money on candy and have nothing to show for it because it's no longer in your inventory.

| 15 | The Flavour of Candy #2 |
| Available At: | 5-11 |
| Time: | Day / Evening |
| Prerequisites: | Complete Request 14 |
Steps
- A - Walk away from the candy seller
- Speak to candy seller
- Fight candy seller
| 1: Walk away from the candy seller |
A - After completing request 14, walk away from the area. After getting a certain distance away from the boy and candy seller, Kiryu overhears them talking. It turns out the candy seller is the boy's father and they are running quite an operation - the boy gets people to buy the golden candy, then he gives the candy back to his father to sell again.
| 2: Speak to candy seller |
Speak to the candy seller. Kiryu calls them out on what he just heard, asking if they are father and son. The father tries to convince Kiryu he doesn't know the kid, but unfortunately the kid again addresses the father as "dad" by mistake. The boy then runs off. Kiryu moans at the candy seller for using a kid to do his dirty work. The man says he's not giving Kiryu his money back and instead chooses to fight him.
| 3: Fight candy seller |
This guy is a pushover - one of the weakest enemies you've encountered so far. There are weapons on the ground you can use, but you won't need them. Won't even need to use your swords to beat his ass. If you're doing this request in Chapter 5, you won't have this heat action yet, but if you're doing it later you can perform the Gion Martial Arts - Bowl Crusher heat action here.
After beating his ass, he gives you his earnings for today. You receive 1 Ryo. Apparently he built up quite a debt because of all his playing around in the red-light district. Kiryu warns him to conduct business honestly in the future. The request ends with the COMPLETE result and you receive 1000 EXP as a reward.

| 16 | The Fiance |
| Available At: | 5-12 |
| Time: | Day / Evening |
| Prerequisites: | N/A |
Steps
- A - Go near woman
- Lose the fight against the man
NOTETo make the fight in this request less tedious, buy a bunch of Sludge Worms from the Turtle Seller in Rakugai before coming here.
| 1: Go near woman |
A - When you get here you see a woman called Okiku. Getting near her triggers an event in which she moans to her father about some loser to whom she is married, saying she wants a real man like Kiryu. Suddenly, the fiance shows up. The man's name is Tasuke and he is suspicious about Kiryu being with his woman. She says she is going to marry Kiryu so Tasuke should just give up already, saying she would never marry such an effeminate woman like him. Tasuke gets angry with Kiryu, saying he stole his woman. He then challenges Kiryu to a fight so he can show Okiku how strong he is. The father asks Kiryu to lose the fight on purpose, to help Tasuke save face.
| 2: Lose the fight against the man |
This guy is extremely weak. He doesn't do much damage and doesn't attack much. But you have to lose against him (obviously, you don't get a game over screen for this as it is part of the substory). I mentioned in my note above to buy some sludge worms beforehand. If you eat these you will lose health. Eat enough to get your health down to 1 and you'll be defeated in one hit, ending the fight quickly. If you are at full health it could take a while for him to finally get your health down to 0.
NOTEIf you defeat him, you have to re-do the fight. You have to keep re-doing the fight until you finally lose. However, after beating him twice, on the third fight you will start the fight with 1 HP. No matter how the request plays out - whether you lose the first time or beat his ass 10+ times before finally losing to him, you will always end with the COMPLETE result.
Also, for the love of God make sure you don't have a Resurrection Magatama equipped or it will be completely wasted here. I made this mistake once because for some reason I equipped it after getting it in request 9...
After losing to him, Okiku is surprised. Tasuke explains he's been training so he can be strong enough to protect Okiku after they marry. However, it seems Okiku realises Kiryu lost on purpose, but she does realise she doesn't actually hate Tasuke and is willing to give him a proper chance. She thanks Kiryu by giving him a Tortoiseshell Hairpin. After this, the request ends with the COMPLETE result and you receive 1500 EXP as a reward.
The game is also nice enough to fully restore your health once the substory ends.

| 17 | Kennosuke |
| Available At: | 5-12 |
| Time: | Day / Evening |
| Prerequisites: | Complete Request 16 |
Steps
- A - Speak to men
- B - Go near Kennosuke and select the BOTTOM OPTION
- Fight Kennosuke
- After the talk with the woman, select the TOP OPTION
- C - Go near Kennosuke
| 1: Speak to men |
A - Speak to the guys standing here and some guy comes running up to them saying Kennosuke has arrived. We see a samurai, Kennosuke, threatening to kill someone but they offer to give him some money to spare their life. He accepts the money and walks off. The guys explain to Kiryu that he's some samurai who has been showing up recently and keeps threatening to kill people who "dishonour" him. However, he has not yet actually killed anyone. He keeps taking their money but they don't know what to do about it - how can they go up against a samurai?
| 2: Go near Kennosuke and select the BOTTOM OPTION |
B - Go near Kennosuke to trigger an event. He again is threatening to kill a civilian. After this scene, move even closer to him to trigger another event. Kiryu orders him to leave the woman alone. Kennosuke is offended but says he'll spare Kiryu's life for a fee - a fee of 3 Ryo. Select the BOTTOM OPTION to refuse to pay. This leads to a fight against Kennosuke.
| 3: Fight Kennosuke |
Kennosuke is not a pushover, but he's not exactly tough. He has a sword which makes him more dangerous than enemies in previous substories, but he is not particularly skilled with it. There are some weapons on the ground if you want to use them, otherwise just beat him up with your swords.
| 4: After the talk with the woman, select the TOP OPTION |
After the fight, a woman shows up and addresses Kennosuke as "Kenbei". Apparently he's from a farm, meaning he's actually not a samurai after all, just a farmer. The woman demands that Kenbei stops messing around here and comes back to help on the farms. After he runs off, another woman shows up. The woman explains what's going on to Kiryu. We learn that she is his wife and that Kenbei hated working on the farm, which is why he ran off. She asks if Kiryu will help track down where Kenbei went. Select the TOP OPTION to agree to help find him.
| 5: Go near Kennosuke |
C - Go near Kennosuke to trigger an event. His wife shows up and gives him a lecture. He explains how he hated working on the farm, saying he was tired of being made fun of for being a commoner. The wife moans about how that doesn't justify his samurai act and causing so much trouble for people. After they finish arguing, they thank Kiryu for everything and give him Parsley, Green Onion and Canal Burdock. The two head back to their village and the request ends with the COMPLETE result. You also receive 1500 EXP as a reward.
| ALTERNATE ENDINGS |
In Step 2, if you select the TOP OPTION to pay the 3 Ryo, the request ends there with the FINISHED result. You don't get any items as a reward but you still get the 1500 EXP reward.
In Step 4, if you select the BOTTOM OPTION to refuse to look for Kenbei, the request ends there with the FINISHED result. You don't get any items as a reward but you still get the 1500 EXP reward.

| 18 | Water from the Ladle #1 |
| Available At: | 5-13 |
| Time: | Day / Evening |
| Prerequisites: | N/A |
Steps
- A - Walk past the woman and select one of the dialogue options
| 1: Walk past the woman and select the BOTTOM OPTION |
A - Walk by this area and a woman will accidentally splash Kiryu with some water. She repeatedly apologises to him, then her father comes out the house wondering what all the noise is about. The father realises what happened (apparently this is a regular thing with her) and asks if Kiryu will forgive her.
NOTEYou get 3 options and all 3 will give you the COMPLETE result - it is not possible to get the FINISHED result in this substory and you even get the Beautiful Woman Picture no matter what option you select. However, the option you pick here affects the reward you get for a later substory, request 40 - no matter what you pick here, you will always get the COMPLETE result in that later request, but the best possible outcome (in terms of rewards) is to select the BOTTOM OPTION here.
Select the BOTTOM OPTION to say "Don't worry about it." - The father thanks Kiryu for his forgiveness, saying as a samurai he would be well within his rights to cut them down for the affront to his honour. The father gives Kiryu 3000 Mon and the Beautiful Woman Picture. The request ends with the COMPLETE result and you receive 1000 EXP as a reward.
| ALTERNATE ENDINGS |
If you select the TOP OPTION, Kiryu gets angry with them and they apologise and beg him not to kill them. Kiryu says he never said anything about killing anyone, then decides to forgive them. The father gives Kiryu 1 Ryo and the Beautiful Woman Picture. The request ends with the COMPLETE result and you receive 500 EXP as a reward. It may look like this is the better option to choose if you want money (and I guess short-term it is), but you get more money as a reward for request 40 if you select the BOTTOM OPTION now.
If you select the MIDDLE OPTION, the father apologises again and offers him something in the hopes he'll forgive them. The father gives Kiryu 5000 Mon and the Beautiful Woman Picture. The request ends with the COMPLETE result and you receive 100 EXP as a reward.
| 105 | The Cry for Help |
| Available At: | 5-13 |
| Time: | Day / Evening / Night |
| Prerequisites: | Complete Commission 103 |
Steps
- A - Receive Letter
- B - Go near the man and yujo
- Fight man
| 1: Receive Letter |
A - Here you will receive a letter from a pigeon. The sender clearly wrote it in a hurry. The name "Yayoi" is mentioned, and "being killed" is scribbled on the letter as well. It also mentions a location. Kiryu assumes the letter was written by the yujo called "Yayoi" at a brothel in Gion and she is being attacked by someone.
| 2: Go near the man and yujo |
B - Go near the man and yujo standing here to trigger an event. The man notices Kiryu show up and rushes towards him screaming. Kiryu immediately fights him.
| 3: Fight man |
Like with many fights in Gion, he's not difficult to beat. He does have slightly more health than most of the enemies in previous substories though. There are a lot of weapons on the ground in this area if you want to use them. Nothing else to note for this fight, just beat his ass.
After the fight, the man asks Kiryu what on earth he's doing. Kiryu tells him he got the letter from Yayoi about being attacked. But the man explains that HE is the one who sent the letter. Kiryu asks what the hell is going on. Yayoi explains that she heard this guy was spending time with a yujo at another brothel and got mad at him. She said he had to be punished. Kiryu realises the letter was supposed to mean "being killed by Yayoi" not "Yayoi is being killed". The man apologises for the misleading letter, saying he didn't have time to worry about correct grammar or anything. He says he was so happy when he say Kiryu arrive which is why he ran up to him the way he did. Yayoi gives Kiryu 5000 Mon as an apology for this whole situation. She then leaves with the man, then the commission ends and you receive 1000 EXP as a reward.

| 19 | The Enchanted Swords Man |
| Available At: | 5-15 |
| Time: | Day / Evening |
| Prerequisites: | N/A |
Steps
- A - Go near the man standing here and select the TOP OPTION
- Select the BOTTOM OPTION
| 1: Go near the man standing here and select the TOP OPTION |
A - When you get close to this man, he will ask Kiryu if he would like to take a look at his sword. Select the TOP OPTION too look at it. The man shows Kiryu and says it's a special enchanted sword, not any regular sword. He says it shines with the power of the wind god.
NOTEEven if you select the BOTTOM OPTION he shows Kiryu the sword, so it doesn't really matter what you say here.
| 2: Select the BOTTOM OPTION |
He offers to sell the sword to Kiryu for 1000 Mon. Select the BOTTOM OPTION to refuse. The man tries to convince Kiryu he really needs this sword, but Kiryu isn't convinced and wonders if there is even such a thing as an enchanted sword.
After some more dialogue, and as Kiryu starts to become convinced, an old man shows up. He asks to see this enchanted sword. After inspecting it he says it's a fake and asks where the man got it. Kiryu isn't happy the man tried to trick him, then the man runs off with the fake enchanted sword. Kiryu thanks the old man for stepping in. Kiryu says he was stupid to believe an enchanted sword could exist. But the old man says they do exist and proves it by showing Kiryu one of his own. The man says he's from a place called "Obama" and says he created loads of enchanted swords, including the one he just showed Kiryu. He explains he created them because he wanted to help the weak, but unfortunately there were people out there who abused their power and brought all kinds of evil into the world. He wants to clean up the mess he made, so he is tracking down all of the enchanted swords he created so he can get rid of them. He made 100 of the swords but still needs to track down the last 5. Kiryu agrees to help him find the swords. He tells Kiryu he'll be waiting at the blacksmith in Rakugai for him - you can speak to him there to give him the swords when you find them.
After all that, the request ends with the COMPLETE result and you receive 1500 EXP as a reward. Request 20 triggers automatically as soon as this request ends.
NOTEIf you select the TOP OPTION to agree to buy the sword, the old man jumps in before that happens so you don't lose any money. In addition, there is hardly any dialogue with the sword seller when you select that option so if you want to rush through the request you could just go with that option since it doesn't affect the outcome and saves you having to go through a load of dialogue.
| 20 | Enchanted Sword Collection |
| Available At: | 5-15 |
| Time: | Day / Evening |
| Prerequisites: | Complete Request 19 |
Steps
- A - Automatically triggers when you complete request 19
- B - Give the 5 Enchanted Swords to the old man
| 1: Automatically triggers when you complete request 19 |
A - After completing request 19, this request instantly begins. You won't be able to do anything about this substory now, but over the course of the game you will find the enchanted swords he wants.
| 2: Give the 5 Enchanted Swords to the man |
When you speak to the old man in the blacksmith, if you have any enchanted swords in your inventory an item menu will pop up showing the ones you have. From the list, select a sword, then select the option on the left to confirm you want to give him the sword. If you don't have any of these swords no item menu will pop up. See below for enchanted sword locations.
| Sword | How to Obtain |
|---|---|
| Bassarimaru | Buy from Ebisuya in Gion (available in Chapter 6, after completing request 19) |
| Suiken | Request 25 reward |
| Senraibo | Request 42 reward |
| Kanekuimushi | Request 43 reward |
| Sesuimaru | Bounty 136 reward |
The earliest you can complete this request is at 10-11, after getting Sesuimaru from the bounty.
After giving him all 5 enchanted swords, he thanks Kiryu for his help. As thanks, he gives Kiryu the Enchanted Sword - Chifubukimaru weapon. He says it is the last one he ever made. Kiryu asks if he's sure he wants to hand this over - after all, he went through all that effort to gather the swords. The old man says he is confident that Kiryu will use the sword correctly. Kiryu accepts the sword, then the old man says he's heading back to his hometown. After this, the request ends with the COMPLETE result and you also receive 1500 EXP as a reward.
NOTEHere is an interesting fact: You don't actually have to give him the 5 different enchanted swords - all you need to give him is 5 enchanted swords. It's actually possible to finish the request by giving him 5 of the exact same sword. Obviously, this is not possible on your first playthrough, but if, for example, you played through the game 5 times and got hold of 5 Bassarimaru, you could give the old man those 5 Bassarimaru to end the request.
| 21 | The Show-Off |
| Available At: | 5-20 |
| Time: | Day / Evening / Night |
| Prerequisites: | Complete Request 18 |
Steps
- A - Interact with man
- B - Go to this area and see an event
- C - Go near man and select the TOP OPTION
- Fight bandits
- Select the TOP OPTION
| 1: Interact with man |
A - Interact with the man sat here with two women. He's trying to show off to impress them, saying he was offering a teaching position at Yoshioka dojo. The women are amazed - Yoshioka dojo is an extremely prestigious dojo. But he says he turned it down because that dojo just isn't good enough for his standard. A nearby old man (owns a tea house in Rakugai) overheard his bragging and asks the show-off for a favour - he says some bandits have been showing up along the Forest Road recently and it's disrupting business. The show-off says he's not interested - it's just not fun to kill bandits. He tries to head off, but the women say they really want to see him take out those bandits. He tries to get out of it, but the women start getting suspicious, wondering if he's scared and not actually as good as he says he is. He changes his mind and heads to Forest Road with the women.
| 2: Go to this area and see an event |
B - When you enter this area, the two women from before rush back towards Rakugai screaming. It seems the bandits showed up and they got scared. Kiryu thinks he should head further down the road to see what's going on.
| 3: Go near man and select the TOP OPTION |
C - When you get close to the show-off you see him confronting the bandits, if you can call it a confrontation... The show-off cowers before them. After the event, get even closer to him to trigger another event. He sees Kiryu and recognises him from near the tea house earlier and asks if he's here to save him. The bandits see how pathetic the show-off is and decide they don't even feel like killing him. The show-off gets offended by the way they speak about him and starts insulting the bandits, causing them to change their minds about killing him. Select the TOP OPTION to step in and help him. This leads to a fight with the bandits.
By the way, selecting the BOTTOM OPTION still leads to the next step, so it doesn't matter what you say here.
| 4: Fight bandits |
You fight 3 bandits. They aren't particularly tough, but one of them is a Martial Artist type who can grab you. Another bandit is also holding a log which can do some decent damage. There are a couple of logs on the ground in this battlefield if you want to use them. Also, as with all battlefields on Forest Road, the battle area is quite narrow so it can be tricky to keep your distance and spread out enemies in these fights.
| 5: Select the TOP OPTION |
After the fight, the show-off asks Kiryu if he'll let him take credit for beating the bandits. He promises he'll reward Kiryu if he does. Select the TOP OPTION to let him take all the credit. The game immediately transports you back to the tea house where you started the request. The show-off brags about how easy it was to deal with them. He says they got so scared and looked so pathetic that he didn't even feel like killing them, telling them instead to just get out of here. They notice Kiryu standing behind him and ask who he is. The show-off says Kiryu is his apprentice. He says Kiryu tried to show off to him by rushing up to the bandits but ended up coming crying to him for help.
After these scenes, the women and tea house owner leave, then the show-off thanks Kiryu for playing along. He rewards him with Demon Remains. The request ends with the COMPLETE result and you also receive 1500 EXP as a reward.
NOTESelecting the BOTTOM OPTION to refuse to let him take credit results in him begging Kiryu to let him take credit, then bringing up the same dialogue options again. It doesn't matter how many times you refuse, you'll just endlessly loop back to the dialogue options until you pick the TOP OPTION.


| 22 | The Collection Box |
| Available At: | 5-20 |
| Time: | Day / Evening / Night |
| Prerequisites: | N/A |
Steps
- A - Speak to group of people
- B - See Kota
- C - See Kota again
- D - Watch Kota steal money
- Fight Kota
| 1: Speak to group of people |
A - Speak to the people here and Kiryu hears them talking about a guy called Kota, who is making a name for himself here for catching thieves in the area. Kota shows up and after a brief exchange with the guys there, he says he's heading off to visit the shrine.
| 2: See Kota |
B - When you get to this area, Kiryu spots Kota passing by. Kiryu comments that he's acting strangely. Kota then walks off.
| 3: See Kota again |
C - When you get to this area, Kiryu spots Kota again and comments that he seems very nervous about something. Kota then continues towards the shrine.
| 4: Watch Kota steal money |
D - Enter the shrine and go near to Kota. Kiryu witnesses him stealing money from the collection box. Kiryu scolds him but Kota tries to justify himself by saying he deserves it for all he has done. After this scene, a fight against Kota begins.
| 5: Fight Kota |
Kota is not tough, but he does have quite a lot of health. He's unarmed though and you can use your sword, so you shouldn't have any trouble taking out all his health.
After the fight, Kota tries to bribe Kiryu with the money he just stole. Kiryu refuses and tells him he's going to jail. The request ends with the COMPLETE result and you also receive 1000 EXP as a reward.

Chapter 6: Yoshioka Dojo
| 6-1 | 23 | Day / Evening / Night | Irresistible Skin | > |
| 6-1 | 24 | Evening / Night | Two Sword Style | > |
| 6-1 | 25 | Day / Evening / Night | Enchanted Sword - Suiken | > |
| 6-1 | 26 | Day / Evening / Night | The Cursed Teabowl | > |
| 6-1 | 27 | Day / Evening / Night | The Gold Sword | > |
| 6-1 | 28 | Night | The Landlord's Treat | > |
| 6-1 | 29 | Night | I Want to be a Chivalrous Thief | > |
| 6-1 | 30 | Day / Evening / Night | I Couldn't be a Chivalrous Thief | > |
| 6-1 | 31 | Day / Evening / Night | Where’s the Palanquin Bearer? | > |
| 6-1 | 32 | Night | Izumo no Okuni | > |
| 6-1 | 106 | Day / Evening / Night | The Poor Man is a Master | > |
| 6-1 | 107 | Day / Evening / Night | The Targeted Yujo | > |
| 6-1 | 108 | Day / Evening / Night | Substitute Gatekeeper | > |
| 6-1 | 109 | Day / Evening / Night | Debt Collection | > |
| 6-1 | 110 | Day / Evening / Night | Move On Like Men | > |
| 6-1 | 111 | Day / Evening / Night | Ebisuya Bodyguard | > |
| 6-1 | 121 | Day / Evening / Night | Gonzaemon the Formless | > |
| 6-1 | 122 | Night | Yata the Fake Ninja | > |
| 6-3 | 33 | Day / Evening / Night | The Town Doctor #1 | > |
| 6-3 | 34 | Day / Evening / Night | The Imposter | > |
| 6-3 | 35 | Day / Evening / Night | How to Make Delicious Candy | > |
| 6-3 | 36 | Day / Evening | The Chili Pepper Girl’s Father | > |
| 6-3 | 37 | Day / Evening | Return of the Enthusiastic Merchant | > |
| 6-3 | 38 | Day / Evening / Night | Today’s Excuse | > |
| 6-3 | 39 | Day / Evening / Night | Sujitaro 1 | > |
| 6-3 | 40 | Day / Evening | Water From the Ladle #2 | > |
| 6-3 | 41 | Day / Evening | Wish-Granting Sword | > |
| 6-3 | 42 | Day / Evening | Enchanted Sword - Senraibo | > |
| 6-3 | 43 | Day / Evening | Enchanted Sword - Kanekuimushi | > |
| 6-5 | 44 | Day / Evening | Demon Extermination | > |
| 6-5 | 45 | Day / Evening | Temple School Homework - Writing | > |
| 6-5 | 46 | Day / Evening / Night | Messenger From the Underworld | > |
| 6-5 | 123 | Day | Baian the Dull | > |
| 23 | Irresistible Skin |
| Available At: | 6-1 |
| Time: | Day / Evening / Night |
| Prerequisites: | N/A |
Steps
- A - Speak to man and select the TOP OPTION
- Pick any dialogue option
- Select the TOP OPTION
- Fight the sumo wrestlers
| 1: Speak to man and select the TOP OPTION |
A - Speak to the man here. He recently launched a new brothel here in Gion and wants Kiryu to visit. Kiryu isn't interested at first, but the man manages to convince him to come along. Apparently he's got some real cute ones at his brothel, with plump and irresistible skin. Select the TOP OPTION to agree to go along.
If you refuse twice (BOTTOM OPTION x2), you can come back and speak to him again later to continue the request.
| 2: Pick any dialogue option |
The man takes you to his brothel and you go inside. Kiryu says it doesn't look like much of a brothel from the outside. The man asks who you would like to spend time with. It makes no difference which option you select, so just pick anything here. After selecting an option, he'll go and bring them out to you. This is not what Kiryu was expecting - he brings out a sumo wrestler! The only difference between the 3 choices is the colour of their mawashi.
| 3: Select the TOP OPTION |
Kiryu asks what the hell is going on. The man points out he never once mentioned his brothel has women. Kiryu says he's not into this kind of thing and tries to leave. The man says Kiryu has to pay the service fee first, saying it is 2 Ryo. Select the TOP OPTION to refuse to pay. The man brings out the other 2 sumo wrestlers (the ones you didn't pick in Step 2) and the 3 of them fight you.
| 4: Fight the sumo wrestlers |
This fight can potentially be a challenge. You are up against 3 wrestler types in a very confined space, so it's difficult to keep your distance. This means you could find yourself on the floor a lot if you're not careful, since the wrestler type's grab + throw cannot be blocked. Thankfully, they don't have much health though. There are no weapons on the ground you can use, but if you have any special weapon types you can equip them here to make your life easier.
After the fight, the man is impressed with Kiryu's strength, but says he is still continuing his business. He intends to run an honest business here - apparently, there is high demand for this kind of thing. The man and sumo wrestlers apologise to Kiryu, then the man gives Kiryu a Tengu Stone. After this, the request ends with the COMPLETE result and you also receive 1000 EXP as a reward.
| ALTERNATE ENDINGS |
In Step 3, if you select the BOTTOM OPTION to pay the 2 Ryo fee, the man allows Kiryu to leave. Outside, he thanks Kiryu for coming along, saying he's welcome to come again any time. Kiryu says he's never coming back here ever again. The request ends with the FINISHED result and you also receive 1000 EXP as a reward. You do not get the Tengu Stone item though.
| 24 | Two Sword Style |
| Available At: | 6-1 |
| Time: | Evening / Night |
| Prerequisites: | Complete Request 12 |
Steps
- A - Speak to the man and select the BOTTOM OPTION
- B - Enter Ikkonya and speak to Sasemon
- Leave the bar and receive the letter
- C - Get close to Sasemon
- Fight Sasemon
| 1: Speak to the man and select the BOTTOM OPTION |
A - Talk to the man standing around here. He says he's selling information for 1 Ryo. He doesn't say anything about what this information is though, just that it's breaking news. Select the BOTTOM OPTION to buy the information. He says at the local bar, Ikkonya, there is a handsome and flamboyant man called "Sasemon". This man is known as a "Two Sword Style" guy. Kiryu is shocked he hear it and the man says Kiryu should watch out for him.
| 2: Enter Ikkonya and speak to Sasemon |
B - When you enter Ikkonya, a scene plays in which Kiryu overhears a woman address a man as "Sasemon". Speak to this man and Kiryu says he wants to talk to him. Kiryu said he's heard he's a "Two Sword Style" guy. Sasemon asks where he heard this. He says he loves women and is not a "Two Sword Style" kind of guy. He then leaves the bar.
| 3: Leave the bar and receive the letter |
Leave the bar. When you walk away, the owner of the bar comes out and says that Sasemon asked him to give Kiryu a letter. Sasemon says he's waiting for Kiryu at the nearby shrine in Rakugai.
| 4: Get close to Sasemon |
C - When you get close to Sasemon, you'll trigger an event. Sasemon asks if Kiryu, too, is a "Two Sword Style" kind of guy. He says there aren't many guys like them around - he rarely encounters people like Kiryu. He then tells Kiryu it's 2 Ryo for one night. Kiryu has no idea what he's talking about. Sasemon then decides to up his price to 3 Ryo for one night. Kiryu again asks what's going on. Sasemon says Kiryu obviously came here because he's into him. He then says he's had plenty of women come to him but he doesn't get any men who tick all his boxes like Kiryu does. Kiryu says this isn't how he rolls. Sasemon gets pissed off, saying Kiryu won't get away with making a fool of him. A fight then begins.
| 5: Fight Sasemon |
Sasemon is very easy. He doesn't have much health, so you can beat him quickly. As a swordsman enemy type, he does use a sword though. Nothing else worth noting about this fight - no items or special heat actions are available here so just kick his ass quickly.
After you kick his ass, Sasemon says that's enough - he doesn't want to risk wounding his face. He then says Kiryu has lost his chance with him - if Kiryu later falls in love with him, that's tough luck. He then leaves. You receive a Peaceful Spirit Orb. The request then ends with the COMPLETE result and you also receive 1500 EXP as a reward.
NOTEThe punchline of this request is a double entendre. The expression "Two Sword Style" (or "Two-Sworded", if you prefer) is used throughout the game to refer to Kiryu's fighting style, a "Two Sword Style" of fighting. However, this expression does have another meaning - it can be used to refer to a bisexual man. One who is bisexual is said to be "Two-Sworded". So, a "Two Sword Style" man here was referring to Sasemon's bisexuality. The joke is that up to the last part of the request, Kiryu thought this was about someone who uses a Two Sword Style of fighting, only to find out the "Two Sword Style" here was using the other meaning...

| 25 | Enchanted Sword - Suiken |
| Available At: | 6-1 |
| Time: | Day / Evening / Night |
| Prerequisites: | Complete Request 19 |
Steps
- A - Go near the two men
- B - Go near Hikobei
- Fight Hikobei
| 1: Go near the two men |
A - Go here to trigger an event. Some guy, called Hikobei, is talking about his "Enchanted Sword", called Suiken, and threatens to kill the other guy with it. His wife then shows up and tells him to stop acting like an ass. Hikobei then says he's off to get a drink. Kiryu asks the wife what's up - commenting that her husband seemed pretty drunk. Apparently he never used to be much of a drinker, but it's all he's done since he got hold of that enchanted sword. It turns out that the power of this particular enchanted sword increases based on how drunk the wielder is. She says he's probably at the bar getting violent again, so she heads over there.
| 2: Go near Hikobei |
B - When you get close to Hikobei, an event is triggered. He stands there laughing, having defeated a bunch of guys who are all on the floor. He brags about how he'll always be the strongest around as long as he has the enchanted sword and alcohol. A regular customer of the bar shows up to challenge him, but Hikobei calls a time out, saying he needs more alcohol first - he asks the owner of the bar to bring more out to him. After drinking, he fights and defeats the challenger. The wife finally decides to show up and tells Hikobei to stop it. She then asks Kiryu to put a stop to this madness. Kiryu challenges him, but again he calls a time out and demands more alcohol. After his drink, he fights Kiryu.
| 3: Fight Hikobei |
This guy has a decent amount of health. Even though he is using the enchanted sword, and is obviously drunk, his attacks don't do as much damage as you might think, so don't worry too much about his attacks.
After the fight, the wife thanks Kiryu by giving him 2 Ryo. You also receive the Enchanted Sword - Suiken weapon, which you need to complete request 20. After this, the request ends with the COMPLETE result and you also receive 1500 EXP as a reward.
| 26 | The Cursed Teabowl |
| Available At: | 6-1 |
| Time: | Day / Evening / Night |
| Prerequisites: | Complete Request 15 |
Steps
- A - Listen to the women
- B - Speak to man and select the TOP OPTION (x2)
- Fight man
| 1: Listen to the women |
A - There are 3 women standing here. Speak to them. One of the girls got hold of some teabowl, called the Yamanoi Teabowl. Apparently it was really difficult to get hold of one of them. One of them mentions some guy called Genjiro had one of the same tea bowls as well, but he suddenly died the other day. It seems there has been a lot of bad luck recently, with someone called Okiku also dying recently - coincidentally, she also had one of those teabowls. They start wondering if these teabowls are cursed.
NOTEI don't know if this is a bug or if it is intentional, but for whatever reason the guy you need to speak to in Step 2 does not spawn until you trigger request 25. If you haven't done that yet, do that now. You don't need to complete the request, you just need to trigger it - complete Step 1 of that substory and the guy will spawn.
| 2: Speak to man and select the TOP OPTION (x2) |
B - Talk to the man standing here (remember, he won't spawn if you have not at least started request 25). He asks Kiryu if he's heard about the Yamanoi Teabowl. Select the TOP OPTION to say you know of it. He reveals that he is the one who makes those teabowls. He's delighted that they are so popular that he can hardly keep up with demand for them. However, he's bothered by all the talk going around that people who have the Yamanoi Teabowl end up dead. He's starting to think his teabowls really are cursed and wonders if he should stop making them. Kiryu says this could all just be an unfortunate coincidence - all just accidents. He says the guy should find out for sure. The man agrees, saying he sold a teabowl to a woman earlier (the one from Step 1) - if she avoids any misfortune he will agree it's just coincidence. He asks Kiryu if he'll help if any trouble kicks off. Select the TOP OPTION again to say you'll help.
If you select the BOTTOM OPTION the first time, the dialogue is slightly different but besides that nothing else happens, so it doesn't really matter what you say for the first choice. If you select the BOTTOM OPTION for the second choice, you can come back to the guy later and tell him you'll help. So, that option just puts the request on hold, it doesn't change the outcome at all.
| 3: Fight man |
You automatically travel to an area in Rakugai, where you see the woman who bought the bowl with a man. The man demands he go with her, since she has a Yamanoi Teabowl. Kiryu steps in and asks what he's up to. He then notices the man behind him and recognises him as the one who makes those teabowls. He says this suits him nicely - he can kill all of them at once!
This is another easy fight. He doesn't have much health so you should be able to make quick work of him. He does have a sword though, so he can do some decent damage if he hits you.
After the fight, Kiryu asks him why he was after the woman. He says it's because she has a Yamanoi Teabowl. It turns out this guy is a teabowl maker himself. Because of the incredible popularity of the Yamanoi teabowl, his own bowls have not been selling well. So, he's been killing off people who buy the teabowls so rumour would spread that people who own those bowls end up dead. The Yamanoi teabowl maker asks him to put an end to his actions. Kiryu asks if he's sure he wants to leave it like this and he says he's just satisfied he knows the truth about what's been going on. The killer leaves.
It's an interesting end to the substory... Dude is literally a serial killer and they're like "lol, just let him go. As long as he doesn't do it anymore it's fine". Anyway, after he leaves, he thanks Kiryu for his help, saying he's got the confidence now to keep making teabowls. He gives Kiryu a Yamanoi Teacup. The request then ends with the COMPLETE result and you also receive 1500 EXP as a reward.


| 27 | The Gold Sword |
| Available At: | 6-1 |
| Time: | Day / Evening / Night |
| Prerequisites: | Complete Request 22 |
Steps
- A - Listen to the rumour
- B - Speak to the blacksmith apprentice and select the BOTTOM OPTION
- C - At Day/Evening time, go to the waterfall and select the TOP OPTION
- Select the BOTTOM OPTION (x2)
- D - See the woman from the waterfall
- Fight man
| 1: Listen to the rumour |
A - Interact with the two guys standing here. One of them asks the other if they've heard about the samurai who dropped his sword into the waterfall on Mountain Road. Apparently this samurai dropped his sword into the waterfall and a beautiful woman appeared. She presents a Gold Sword, asking if that is the sword he just dropped into the waterfall. But it wasn't the sword he dropped - he only dropped some regular old sword in there. So, he told the woman it's not the one he dropped. She then went off to search for a different sword, then re-appeared. She then presents a Silver Sword, again asking if that's the one he dropped. Again, the samurai said that is not his sword. Apparently, the woman was moved by the samurai's honesty and ended up giving him both the Gold and Silver Swords. After hearing the rumour, Kiryu wonders to himself if it's worth finding an unwanted sword he can drop in the waterfall to try it out.
| 2: Speak to the blacksmith apprentice and select the BOTTOM OPTION |
B - Enter the blacksmith. The guy you want to speak to is standing next to the old man from request 19-20. He goes on about how awesome that greatsword was (back when Kiryu was first given it by the blacksmith) and says he was inspired to try making an awesome sword of his own. Unfortunately, it was not very successful. Apparently it's completely useless. He's too embarrassed to show it to his master. Select the BOTTOM OPTION to take it off his hands. The apprentice is more than happy to get rid of it and hands it to Kiryu. You receive the Blunt Iron Sword.
NOTEYou cannot do the next step at Night time, it can only be done at Day or Evening time. During the main story, you can do the next step at 6-3. In premium adventure, simply speak to Yoshino at Kiryu's house to change the time of day.
| 3: At Day/Evening time, go to the waterfall and select the TOP OPTION |
C - At Day or Evening time, go to the waterfall and Kiryu wonders if he should drop the blunt sword in. Select the TOP OPTION to do so. Nothing happens after dropping it in.
| 4: Select the BOTTOM OPTION (x2) |
Start walking away from the waterfall, back to the main road. When you get a certain distance away a woman appears at the waterfall. Kiryu tells her he dropped his sword into the waterfall. She says she'll go and look for it. When she returns, she presents a Gold Sword, asking if this is Kiryu's sword. Select the BOTTOM OPTION to say it is not your sword. She goes back in to look again. When she re-appears, she presents a Silver Sword, again asking if it is Kiryu's sword. Again, select the BOTTOM OPTION to say it is not your sword. She praises Kiryu's honesty, but says it seems she cannot be of any help since she cannot find his sword. She bids him farewell. Kiryu says he's not going to leave it there and wants to search for this woman.
| 5: See the woman from the waterfall |
Leave the waterfall - head back towards the main road. Shortly after entering the main Mountain Road map, you'll trigger an event where Kiryu sees the woman from the waterfall with a man. The man talks about how easy this work is - they are getting so many swords. The woman says all samurai seem to be idiots. They said it was a great idea to spread that story about the Gold and Silver swords. Kiryu jumps in after hearing all this and asks the woman for his sword. The thief points out that Kiryu is the one who threw it into the waterfall. He says if Kiryu wants it back, he'll have to take it by force.
| 6: Fight man |
He's a pushover, so just beat his ass however you want. Nothing you need to worry about here.
After kicking his ass, the thief apologises and gives Kiryu back his Blunt Iron Sword. Kiryu orders him to stop doing this. The man says he will and also gives Kiryu the Gold Sword and Silver Sword, in the hopes that they will earn forgiveness. The request ends with the COMPLETE result and you also receive 1000 EXP as a reward.
| ALTERNATE ENDINGS |
In Step 4, if you select the TOP OPTION for either the Gold Sword or Silver Sword, the woman calls Kiryu a liar and says she'll never give the sword to someone like him, then disappears into the waterfall. The request ends right there with the FINISHED result and you get absolutely nothing as a reward. You don't even get a bit of EXP.


| 28 | The Landlord's Treat |
| Available At: | 6-1 |
| Time: | Night |
| Prerequisites: | Complete Request 17 |
Steps
- A - Speak to man and select the TOP OPTION
- B - Speak to the attendant
- Fight bodyguards
| 1: Speak to man and select the TOP OPTION |
A - Speak to the man standing around here. He tells Kiryu he was invited to a meal by a local landlord but doesn't really want to go. He asks Kiryu if he'd like to go in his place, assuring him the meal will be completely free. Kiryu asks why he won't go and the guy says he has business he must attend to. Select the TOP OPTION to go. The man thanks Kiryu and tells him the house is just down the road - he'll find an attendant standing outside the building to show him in.
| 2: Speak to the attendant |
B - Speak to the man standing outside the house. Kiryu asks if this is the landlord's house and the man shows him inside. Inside, Kiryu sits with the landlord, who treats him to all he can eat. Eventually, Kiryu says he cannot eat anymore. He then gives Kiryu 1 Ryo and a Beautiful Woman Shunga item. Kiryu asks if he's sure about giving him this stuff on top of all the food he's given him. The landlord says it's all a small price to pay if it means he gets to touch that muscular chest. He then gets up and tells Kiryu they should get started. Kiryu is naturally confused but the landlord said he knew what he was getting into coming here. It seems this is something of a duty all young men must perform for the privilege of living in his properties. Now it seems clear why the guy from earlier didn't want to come! Kiryu demands he be allowed to leave, but the landlord summons his bodyguards to take down Kiryu for defying him.
| 3: Fight bodyguards |
This is the first substory fight which potentially could be an actual challenge. You are up against 4 sword users and one of them is the swordmaster type. This type loves to use iaido techniques which, if they hit you, knock you to the ground without fail. They love spamming that attack so be ready to either block or dodge their iaido techniques or you'll have to get used to being on the floor for most of the fight. It also doesn't help that the battlefield is relatively confined so it's difficult to keep your distance. I would suggest taking out the swordmaster first since he's the biggest threat, then you can focus on the weaker enemies without worrying about being forced to the ground all the time.
After the fight, Kiryu says he's leaving, but the landlord says he wants Kiryu to beat him even more with that firm body of his. He then turns around and bends over, telling Kiryu to literally kick his ass. Kiryu decides to just leave. The request ends with the COMPLETE result and you also receive 1000 EXP as a reward.

| 29 | I Want to be a Chivalrous Thief |
| Available At: | 6-1 |
| Time: | Night |
| Prerequisites: | N/A |
Steps
- A - Trigger event and select the BOTTOM OPTION
- Fight guards
| 1: Trigger event and select the BOTTOM OPTION |
A - Go here and you will trigger an event. Some guy falls off the roof and lands on Kiryu. The guy says he's lucky he landed on Kiryu because he broke his fall, so he's not hurt. He then asks Kiryu if he's hurt. Select the BOTTOM OPTION to say you are injured. The man apologises and gives Kiryu 1 Ryo to cover medical fees. The man is about to dash off, but Kiryu stops him and asks what he was doing on the roof. He says he doesn't have time to talk. Some guards show up and accuse Kiryu of being the one who stole money. But Kiryu says he was just passing by when some dude fell on him from above - he must have been the one who stole the money. Unfortunately, the money box is right next to Kiryu, dropped there by the man from before, so they say the fact no one else is here plus the money box right next to him is proof he is responsible.
| 2: Fight guards |
You are dealing with 3 sword users here - one of them is the annoying swordmaster type. As always, the swordmaster loves forcing you to the ground with his iaido techniques. Take him out first so you don't have to worry about being on the floor all the time. The rest of the enemies are straightforward and 2 of them are unarmed so they won't put up much of a fight.
After the fight, the guards run off. Then the thief from earlier shows up again and thanks Kiryu for dealing with them. He gives Kiryu 1 Ryo as thanks. He tells Kiryu he strives to become a chivalrous thief - he takes money from evil people like those guys who extort money from innocent people, then gives that money back to the poor (so, he's like a Japanese Robin Hood, in a sense. The real-world equivalent is Ishikawa Goemon). The request ends with the COMPLETE result and you also receive 1500 EXP as a reward.
| ALTERNATE ENDINGS |
In Step 1, if you select the TOP OPTION to tell the man you are okay, he does not give you any money. In addition, the rest of the request plays out differently. He rushes off like before, but the guards don't show up right away. When you start walking away from the area, you trigger another event. The thief returns and says he dropped something important. He spots the money box on the floor. He then wonders if their encounter was fate and asks Kiryu to join up with him. You get a choice of 2 options but the only difference between the two is different dialogue - the request outcome doesn't change. Then the guards arrive, but this time you fight them alongside the thief rather than alone. After the fight it plays out like before - he explains that he steals from the rich to give to the poor, then heads off. However, you don't get 1 Ryo here. So, in this version of the request you get no money at all while in the other version you get 2 Ryo. However, you do still get 1500 EXP and the COMPLETE result.

| 30 | I Couldn't be a Chivalrous Thief |
| Available At: | 6-1 |
| Time: | Day / Evening / Night |
| Prerequisites: | Complete Request 29 |
Steps
- A - Move close to the yujo and man and select the TOP OPTION
- Select, in order: TOP OPTION - TOP OPTION - FOURTH OPTION
- Speak to the yujo
- B - Trigger an event
- Select the BOTTOM OPTION (x2)
- Fight man
- A - Move close to the yujo and man
| 1: Move close to the yujo and man and select the TOP OPTION |
A - You'll see a yujo and a man in a fancy-looking haori. Get close to them to trigger an event. The guy is clearly into this yujo, who apparently is not a very popular yujo, and says he'd love to see her every day. Even says he'd love to buy her freedom when he gets the money. Kiryu thinks he recognises the man and wonders if he should interrupt.
| 2: Select, in order: TOP OPTION - TOP OPTION - FOURTH OPTION |
After selecting that option, another dialogue option will come up - select the TOP OPTION. Kiryu asks how he got the money for such a fancy haori, not to mention having the money to buy a yujo's freedom. The man says work has been very successful, so he's loaded. Now select the TOP OPTION to ask if he stole the money. The man is offended at the suggestion, saying Kiryu doesn't even know his name and yet he questions his character. Select the FOURTH OPTION to identify him as Asakusa Rokuzaemon. He is shocked that Kiryu knows his name, but then recognises him as the guy he landed on when he fell off a roof. Yes, this guy is the thief from request 29! He says he's been treating himself after a job well done and says he'll treat Kiryu as well. He gives Kiryu 1 Ryo. He then leaves.
| 3: Speak to the yujo |
Speak to the yujo. She says she's delighted she's found a man willing to buy her freedom. However, she mentions he lives in Rakugai, in an area usually populated by poor people, and wonders if he really does have that kind of money.
| 4: Trigger an event |
B - When you get here, an event is triggered. Kiryu overhears the man from earlier speaking inside a house. He is saying he'll take all the money he has, buy that yujo's freedom, and the two will marry and go off on a honeymoon.
| 5: Select the BOTTOM OPTION (x2) |
Select the BOTTOM OPTION to ask about the stolen money. Select the BOTTOM OPTION again to press the issue further. Kiryu calls him out on the fact the said he was going to give the money to the poor, yet he's spending it all on himself. Kiryu says Ishikawa Goemon would be ashamed of him, then beats some sense into him.
NOTEIshikawa Goemon is the real Japanese Robin Hood - a Japanese bandit in the 16th century who stole from the rich to give to the poor.
| 6: Fight man |
Not much of a fight to be honest. Just clap his cheeks quickly and get it over with.
After beating him, he apologises and promises he'll give the rest of the money to the poor, as per his original plan. He says it's the first time in his life he's ever had that kind of money so he just got a bit carried away in the moment. He says he'll work hard to legitimately make enough money to buy that yujo's freedom. He gives Kiryu a Gold Kiseru. He says he's heading back to Gion to explain the situation to the yujo.
| 7: Move close to the yujo and man |
A - Like in Step 1, get close to the man and yujo to trigger an event. The man vows to somehow make enough money to buy her freedom. The request ends with the COMPLETE result and you also receive 1500 EXP as a reward.
| ALTERNATE ENDINGS |
There are a lot of ways this request can change, but most of them are just variations of the same change.
In Step 1, if you select the BOTTOM OPTION, Step 2 is skipped - the man goes off without any interaction with Kiryu - and you go straight to Step 3. You have a time limit of 3 minutes to trigger Step 4. If you are too late, the event won't trigger. After the time limit expires, the only way to get the request to end is by speaking to the women standing nearby (see picture below), who will tell you about some guy who dashed off. Then the request ends with the FINISHED result. You get no EXP.
In Step 3, if you select the BOTTOM OPTION for either the first or second dialogue options, the guy gets angry with Kiryu and leaves. Then you go to Step 3 as normal. You have a time limit of 5 minutes to trigger Step 4. Again, if you are late the event doesn't trigger and you speak to the woman nearby to get the FINISHED result. You get no EXP.
In Step 3, for the third dialogue choice, if you select the TOP OPTION or the SECOND OPTION or the BOTTOM OPTION, the man just gets annoyed with Kiryu and leaves. You then go to Step 3 again. This time, you have a time limit of 10 minutes to trigger step 4. Again, you get the FINISHED result and no EXP if you don't make it in time (after speaking with the woman).
In Step 3, for the third dialogue choice, if you select the THIRD OPTION (Ishikawa Goemon), he says he's flattered to be mistaken for the legendary thief, but points out that he died many years ago. He then leaves. You then go to Step 3 again. This time, you have a time limit of 30 minutes to trigger step 4. Again, you get the FINISHED result and no EXP if you don't make it in time.
NOTEI'm not sure if this is a bug or not, but it does seem to be one. For the variations above, with the time limit, if you speak to the woman once before you trigger Step 4, the event will not trigger. Then, if you speak to her a second time, you get the FINISHED result. This is true even if you have loads of time left. So, if you are going down one of the time limit routes, just ignore this woman or you cannot get the COMPLETE result, whereas you can still get complete as long as you make it in time. The woman in question is in the screenshot below (pink kimono):

Also, only these routes have the time limit for Step 4 - if you follow the steps in the "correct" route you don't have a time limit and even speaking to the woman doesn't stop Step 4 triggering.
In Step 5, for the first dialogue choice, if you select the TOP OPTION, Kiryu wishes him all the best. The man thanks Kiryu for coming out here for that and gives him 1 Ryo as thanks. He says he intended to come here and become the new Ishikawa Goemon, but he's met the woman of his dreams so his plans have changed. The request ends with the FINISHED result and you also receive 1500 EXP as a reward.
In Step 5, for the second dialogue choice, if you select the TOP OPTION to stay silent and not press the issue further, he just rushes off. The request ends with the FINISHED result and you also receive 1500 EXP as a reward.


| 31 | Where’s the Palanquin Bearer? |
| Available At: | 6-1 |
| Time: | Day / Evening / Night |
| Prerequisites: | Travelled via palanquin at least 30 times |
Steps
- A - Speak to the palanquin bearer and select the BOTTOM OPTION
- B - Speak to customer in the bar
- C - Speak to palanquin bearer in udon restaurant
- A - Go near the palanquin bearers and select a dialogue option
| 1: Speak to the palanquin bearer and select the BOTTOM OPTION |
A - When you have travelled in the palanquin (fast travel) at least 30 times, you will trigger an event when you speak to the palanquin bearer. There seems to be some trouble. After the event, speak to the palanquin bearer (Tetsutaro). He says his partner, Zennosuke, has buggered off. Apparently he had something to do. He still hasn't come back, so he asks Kiryu if he'll go and look for him. Select the BOTTOM OPTION to say you'll look for him. He thanks Kiryu and says he went off in the direction of the bar.
| 2: Speak to customer in the bar |
B - Speak to the customer in here. He's sat closest to the door. The game seems to be very fussy here - you have to stand in a very specific position before the game lets you interact with him. Stand in the gap between the table and the door (/front of the bar) and face him. Kiryu asks about the palanquin bearer. The customer said he was here earlier drinking with him, but then said he wanted to eat some udon and head out.
| 3: Speak to palanquin bearer in udon restaurant |
C - Go to the udon restaurant and speak to the Zennosuke. Kiryu finds him stuffing his face with noodles. He tells Zennosuke his partner is waiting for him - they have a customer. He thanks Kiryu for coming to get him.
| 4: Go near the palanquin bearers and select a dialogue option |
A - Go back to the palanquin, where you'll find both palanquin bearers. They were able to take the customer to his destination. Tetsutaro then moans at Zennosuke for disappearing to drink and eat udon, leaving him on his own while they were working. It turns out Zennosuke has been thinking about opening up another palanquin pick-up/drop-off point in Rakugai so he's been going exploring the area to get an idea of where they could establish this new point. He's torn between 2 locations. He asks Kiryu for his thoughts about where the new palanquin point should be.
NOTEYou get two options. You get to decide where to place the new palanquin point. The map below shows the two possible locations:
The TOP OPTION puts the palanquin in the north-east. The BOTTOM OPTION puts the palanquin in the middle of the map, right next to the small shrine. It's up to you where you'd like to put it. Personally, I usually go with the bottom option because I find it more convenient. But if you think you'll make better use of the north-east location then go for it.
After making the decision, they establish the new palanquin point. The request ends with the COMPLETE result and you also receive 1500 EXP as a reward.

| 32 | Izumo no Okuni |
| Available At: | 6-1 |
| Time: | Night |
| Prerequisites: | N/A |
Steps
- A - Go near men
- Fight bounty hunters
- Fight pursuers
| 1: Go near men |
A - Go near the 3 men standing around here to trigger an event. They recognise Kiryu as Miyamoto Musashi and draw their swords.
| 2: Fight bounty hunters |
You are up against three bounty hunters, all of whom are the swordsman type. For swordsman types, they have quite a lot of health, so this may not be quite so quick and easy. Might be a good idea to use the two sword style so you can defend from all directions, at least until you are down to the last guy, at which point you could switch to single sword to finish him off.
After the fight, more swordsmen show up and go after Kiryu. Kiryu rushes off to hide somewhere, leading him into a building where he meets a woman called Okuni. Kiryu explains he's being hunted down and asks if he can hang out here for a while. He then collapses. When he regains consciousness, he thanks Okuni for her help but she explains that she can't guarantee he won't be caught even if he stays here. Then she has an idea. She paints Kiryu's face with kabuki makeup. Now people won't recognise him. Her theory is immediately proven wrong, however, since the swordsmen burst in and recognise Kiryu right away. Kiryu gets up, grabs a nearby umbrella, and leads the guys out to a platform where he'll beat their asses.
| 3: Fight pursuers |
You fight 4 swordsman types. They have a lot less health than the guys you fought earlier. However, this time you are forced to use the umbrella weapon. This is the first opportunity in the game to perform the Star Actor Mastery heat action. Get yourself into heat mode, wait for an enemy to attack you, then hit triangle (it is a counter heat action). But if you miss your chance to use it here, you can always do it in the Star Actor mini-game.
After the fight, Kiryu apologises to Okuni for the trouble. However, she says he hasn't caused trouble at all - the audience loved what they saw! Okuni says she never imagined seeing the crowd so excited. She explains they've been struggling as a theatre to the point they may have to shut down, since audience numbers are declining.Kiryu tells her not to give up hope and that she should keep going. When Kiryu gets outside, the request ends with the COMPLETE result and you also receive 10000 EXP as a reward.
Also, right after completing the request some dude bursts outside and tells Kiryu that thanks to him Okuni is ready to keep working hard for the theatre's success. He then asks Kiryu if he'd be up for coming by to perform every now and then. You get two options, but the top option just loops back to the dialogue choices again. Select the BOTTOM OPTION to agree. You are now able to play the Star Actor mini-game. Speak to the guy standing here to play. You can only do this at Night time.
NOTEThe woman here, Izumo no Okuni, is allegedly the inventor of Kabuki theatre in real life.
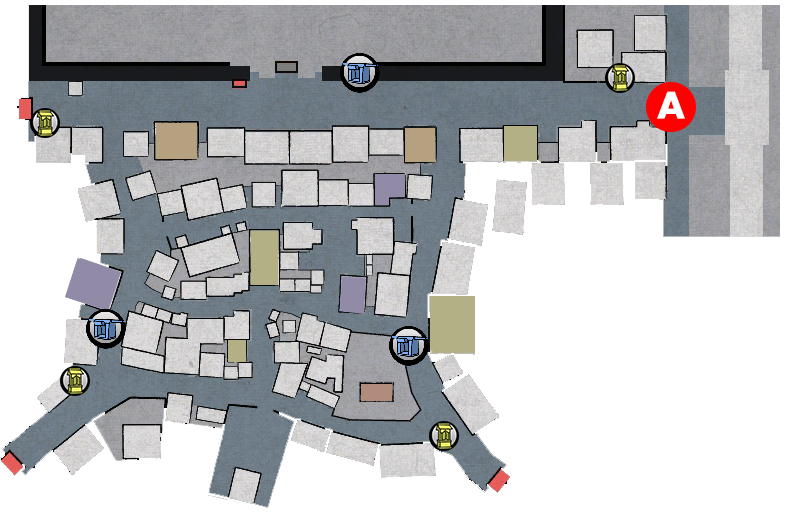
| 106 | The Poor Man is a Master |
| Available At: | 6-1 |
| Time: | Day / Evening / Night |
| Prerequisites: | Complete commission 105 | You must have at least 5 Ryo in your possession |
Steps
- A - Go near three men
- Select the TOP OPTION (x2)
- B - Go near the Ebisuya shopkeeper and select the TOP OPTION
NOTEIn addition to the requirements listed above, this commission will not trigger if you are in the middle of request 36. You either need to complete this commission before triggering that request, or after you finish the request. If you do it after completing that request this means you can't do it until at least 7-5 in the main story, since that's the earliest point in the game you can finish that request. Because of this, you're much better off doing it right away in 6-1 before you go on to trigger request 36 in 6-3
| 1: Go near three men |
A - Go near the three men here to trigger an event. They are demanding money off this old guy. Apparently he owes 5 Ryo. Speak to them and Kiryu asks what's going on. The old guy begs them to give him some time, promising he'll get the money, but they aren't convinced.
| 2: Select the TOP OPTION (x2) |
Select the TOP OPTION to help. Kiryu asks them to leave the poor old guy alone, but they point out he can't get away with having fun in Gion for free. They ask if they can leave this money collection situation in Kiryu's hands, since they aren't having any luck getting the money off him. Select the TOP OPTION to take the job. Kiryu asks him to take him to his house. They've got to get the money from somewhere, so maybe the old guy can sell something. But Kiryu looks around and doesn't think anything there is worth that much. The old man thanks Kiryu for earlier and reveals he's actually a calligrapher. He insists that Kiryu take one of his books as thanks and hands him the Incomprehensible Calligraphy. Kiryu, to himself, moans about how this looks worse than graffiti some kid drew and that his visit here was a failure. In the end, Kiryu heads off to go back to the guys from earlier. Looks like Kiryu is going to have to cover the cost himself
You automatically transport back to the starting location with those two other guys. They ask if Kiryu managed to get the money, as promised. Kiryu hands over 5 Ryo (out of his own pocket - hence the 5 Ryo requirement to trigger this commission). After they leave, Kiryu wonders if he could sell this calligraphy. Even if he only gets a bit of money for it, at least that's better than nothing.
| 3: Go near the Ebisuya shopkeeper and select the TOP OPTION |
B - Go near the shopkeeper to trigger an event. He spots the calligraphy Kiryu has and asks to see it. He makes a big deal about it - apparently this is the work of the famous calligrapher Arashiyama Dorohei. The shopkeeper says he'll give Kiryu 10 Ryo for the work. Select the TOP OPTION to sell it. You receive 10 Ryo. The commission ends and you also receive 1000 EXP as a reward.
If you select the BOTTOM OPTION to refuse to sell it, he'll just keep insisting that you sell it to him. It's impossible to proceed and finish the commission until you sell it to him.

| 107 | The Targeted Yujo |
| Available At: | 6-1 |
| Time: | Day / Evening / Night |
| Prerequisites: | Complete Commission 106 |
Steps
- A - Receive Letter
- A - Speak to attendant
- Fight man
| 1: Receive Letter |
A - When you get here, a pigeon shows up to deliver a letter. It's from the attendant of a local brothel called Mochizukiya. It is a commission for some kind of protection work. Something to do with a potential kidnapping. Kiryu isn't completely sure what's expected to him based off the letter, so he says he should head over to the brothel.
| 2: Speak to attendant |
B - Speak to the attendant standing outside. Kiryu asks what's going on and the attendant says they can talk inside. Inside, he introduces Kiryu to their popular yujo, Sakuya. It seems she received a letter earlier that day from someone threatening to take Sakuya. Kiryu asks what they want him to do. His job is basically to act as a bodyguard. He will keep watch today to make sure she doesn't get kidnapped. She doesn't seem keen on the idea, saying it's probably just a prank and she'll be fine, but the attendant isn't interested. After a while of waiting around, no one has shown up. Kiryu guesses it was just a prank after all. He notices Sakuya has been acting strange right from the beginning and guesses she was the one who wrote the letter. Another hint that gave it away, Kiryu says, is that the letter had the scent of a woman's perfume on it - the same scent Sakuya has. The explanation for this is that she has a lover, but after a fight they had, she hasn't seen him recently. She hoped if he heard she was in danger he'd show up again. She says she will explain the situation to the attendant. But in the next room, Kiryu hears her scream. Some dude has shown up. He heard she was going to be kidnapped and says he wants to get there first. Kiryu steps in and they fight.
| 3: Fight man |
Another easy fight. He doesn't have much health and is no threat to you. Beat his ass and move on.
After the fight, the attendant shows up. Kiryu explains the would-be kidnapper showed up but he beat his ass down. As payment for his work, the attendant gives Kiryu 1 Ryo. The commission ends and you receive 1500 EXP as a reward.

| 108 | Substitute Gatekeeper |
| Available At: | 6-1 |
| Time: | Day / Evening / Night |
| Prerequisites: | Complete Commission 101 |
Steps
- A - Speak to gatekeeper and select the BOTTOM OPTION
- Let the first man in - BOTTOM OPTION
- Don't let the second man in - TOP OPTION - and fight
- Don't let the third man in - TOP OPTION - and fight
- Let the fourth man in - BOTTOM OPTION
- Let the fifth man in - BOTTOM OPTION
- Don't let the sixth man in - TOP OPTION (x2)
| 1: Speak to gatekeeper and select the BOTTOM OPTION |
A - Speak to the two gatekeepers standing around here. They are literally right in front of the guy you need to speak to to play mahjong. The gatekeeper is in a lot of pain. Kiryu says they need to get a doctor. After being treater by the doctor, the gatekeeper thanks Kiryu for his help. He then asks Kiryu if he'll do a job for him - because he's in no condition to continue working right now, he asks Kiryu if he'll take his place. Select the BOTTOM OPTION to accept the job.
Kiryu is taken to the place of work and they explain what he needs to do. Basically, when hopeful customers show up, Kiryu needs to decide whether he lets them in or not. Not all customers are good after all - you get some thugs around here sometimes.
Selecting the TOP OPTION is a waste of time. No matter how many times you refuse it will just loop back to the dialogue choices until you say you'll do it.
| 2: Let the first man in - BOTTOM OPTION |
The first customer shows up. It's his first time visiting, apparently. Select the BOTTOM OPTION to let him in.
| 3: Don't let the second man in - TOP OPTION - and fight |
The second customer shows up. He's pretty aggressive and when Kiryu asks who he would like to see (which woman he wants to spend time with), he just demands they bring out the women and booze. Select the TOP OPTION to refuse entry. The man demands Kiryu steps outside, then the two fight.
| 4: Don't let the third man in - TOP OPTION - and fight |
The third customer shows up. He's clearly very nervous. When Kiryu asks who he wants to see, he says "Wakaume". Apparently they are lovers. Select the TOP OPTION to refuse entry. After leading the man outside, the man gets angry and thinks the reason he won't let him in is because Kiryu is in love with Wakaume, so he doesn't want anyone else near her. He then fights Kiryu.
| 5: Let the fourth man in - BOTTOM OPTION |
The fourth customer shows up. Apparently it is his first time in Gion, so he doesn't have any specific yujo he wants to see here. Select the BOTTOM OPTION to let him in.
| 6: Let the fifth man in - BOTTOM OPTION |
The fifth customer shows up. He wants to see Misuzu - he's had his eye on her for a while. Select the BOTTOM OPTION to let him in.
| 7: Don't let the sixth man in - TOP OPTION (x2) |
The sixth customer shows up. He's some old dude. When Kiryu asks who he wants to spend time with, he notices the old guy is acting weird - looking around the inside of the brothel. Kiryu speaks to him again and he says the place is really nice. He then says he wants to spend time with Watayuki. Select the TOP OPTION to refuse entry. He asks if Kiryu is worried that he doesn't have the money. He flaunts his wealth, saying he'll pay 20 Ryo right now if he lets him in. Again, select the TOP OPTION to refuse entry.
After all that, Kiryu's shift ends and the gatekeeper shows up. He evaluates how things have gone at the brothel. Turns out sales were great! He pays Kiryu for his efforts, giving Kiryu 1 Ryo. The commission ends and you receive 1500 EXP as a reward.
| ALTERNATE ENDINGS |
Depending on who you let in and who you don't let it, it affects the fee you receive. The amount can range from nothing to 1 Ryo. Following the steps above gives you the full 1 Ryo. For different outcomes, see the table below. Note that of the 6 customers who show up, only 3 of them actually have any effect on the total bonus.
| 2nd Man | 3rd Man | 6th Man | Reward |
|---|---|---|---|
| Let in | Don't let in | Don't let in | 5000 Mon |
| Don't let in | Let in | Don't let in | 5000 Mon |
| Don't let in | Don't let in | Let in | 1000 Mon |
| Let in | Let in | Don't let in | 1000 Mon |
| Let in | Don't let in | Let in | Nothing |
| Don't let in | Let in | Let in | Nothing |
| Let in | Let in | Let in | Nothing |

| 109 | Debt Collection |
| Available At: | 6-1 |
| Time: | Day / Evening / Night |
| Prerequisites: | Complete Commission 108 |
Steps
- A - Speak to man
- B - Go near group of guys and select a dialogue option
- Select the BOTTOM OPTION (x2)
- C - Spot Kokichi trying to escape and select the BOTTOM OPTION (x2)
- Fight Kokichi
- A - Return to man
| 1: Speak to man |
A - Speak to the guy here. He works for the brothel Azamiya. He says a guy called Kokichi has not paid back the 1 Ryo he owes. He commissions Kiryu to collect it for him. He says Kiryu will find him in Rakugai.
| 2: Go near group of guys and select a dialogue option |
B - You see a group of men here, surrounding a house. Go close to them to trigger an event. They are a bunch of debt collectors who are here to collect money from the guy inside, who turns out to be Kokichi.. After the event, get closer to the door to trigger another one. Kiryu says he's here to collect a debt. Kokichi says he hasn't got much money so he can't pay back all of them. He suggests the debt collectors fight it out amongst themselves - Kokichi will pay back the winner only. One of the debt collectors asks what kind of battle they should have. You get 3 options but it doesn't make a difference what you pick.
| 3: Select the BOTTOM OPTION (x2) |
Select the BOTTOM OPTION to refuse to fight. A debt collector points out they are not gonna let him join in mid-fight and ask if he's sure he doesn't want this chance to get the money back. Select the BOTTOM OPTION again to refuse to fight.
| 4: Spot Kokichi trying to escape and select the BOTTOM OPTION (x2) |
C - Head towards the back of the house. Kiryu spots Kokichi trying to make a run for it. He realises Kokichi wanted to use the debt collectors fight as a distraction so he could get away unseen. Kokichi says he has no money on him right now - he has all his money hidden away somewhere. He promises if Kiryu lets him go now, he'll come back to pay him in full. Select the BOTTOM OPTION to refuse to let him go. He tries to convince Kiryu to let him go. Select the BOTTOM OPTION again to refuse. He says he'll have to fight his way out then.
| 5: Fight Kokichi |
Another very easy fight. He is no threat to you - just a brawler type with low health. Only interesting feature of this fight is that you are limited to the brawler style. You cannot use swords in this fight (though you can use weapons on the ground in the battlefield). Go ahead and beat his ass for trying to deceive you.
After the fight, Kokichi finally pays back the money he owes to Azamiya.
| 6: Return to man |
A - Return to the guy from Azamiya. He thanks Kiryu for collecting the money for him and pays him the promised reward of 5000 Mon. The commission ends and you receive 1500 EXP as a reward.
| ALTERNATE ENDINGS |
In Step 3, if you join in the fight (TOP OPTION either the first or second time), you have to fight the 4 debt collectors (who for some reason all gang up on you in a 4v1 rather than it being a free-for-all). You are limited to the brawler style in this fight - you cannot use your swords, but you can use weapons you pick up on the battlefield. After the fight, you learn Kokichi used the fight as a distraction to escape out the back. Someone mentions it's unlikely he will ever return here, because of all the debts he has built up. Kiryu realises he messed up. The commission ends there. You don't get any money, but you do still get 1500 EXP.
In Step 4, if you allow Kokichi to get away (TOP OPTION either the first or second time), he thanks Kiryu for trusting him, then heads off. Next, you need to return to the guy from Azamiya at A - he says Kiryu has been tricked and that they will never see Kokichi again. He says Kiryu failed in his work, so he won't pay him anything. The commission ends and you get 1500 EXP.


| 110 | Move On Like Men |
| Available At: | 6-1 |
| Time: | Day / Evening / Night |
| Prerequisites: | Complete Commission 109 |
Steps
- A - Speak to the two men and select the BOTTOM OPTION
- Press to move the men
| 1: Speak to the two men and select the BOTTOM OPTION |
A - In the narrow passage just north of the liquor store, two men are stuck. Speak to them. They got themselves stuck and ask Kiryu to help free them. They say they will pay him for the trouble. Select the BOTTOM OPTION to accept the commission.
| 2: Press to move the men |
You need to press the when prompted to free them (you'll need to do this multiple times). However, you must do this from the RIGHT-HAND SIDE of the passageway, pushing them towards the main street of Gion - not away from it. When you are facing towards the main street, pressing the button will push them free.
NOTEDepending on your console region settings, the button here changes. On Japanese PS3s this button is while on a European PS3 it will be - the game does show you what button you need to press though, so just press what it shows on screen.
They thank Kiryu for freeing them and pay him 1 Ryo. The commission ends and you receive 1000 EXP as a reward.

| 111 | Ebisuya Bodyguard |
| Available At: | 6-1 |
| Time: | Day / Evening / Night |
| Prerequisites: | Complete Request 104 |
Steps
- A - Read Ebisuya owner's letter
- B - Speak to Ebisuya owner
- Fight man, then select the TOP OPTION
| 1: Read Ebisuya owner's letter |
A - Check the letters in Kiryu's house (corner of the room, left of the exit to Gion). If you're not sure which one is the Ebisuya letter, just open up all of the unread letters then leave the menu to be sure you've triggered the start of the commission (Kiryu does comment when you've read the right one - the commission letter pops up to signal the start of this commission. If you don't trigger that event, it means you haven't read the Ebisuya owner's letter). The letter says some guy sold his sword to him, but he keeps coming back begging him to give it back. He asks Kiryu to get rid of this guy for him. He is willing to pay Kiryu 1 Ryo for this job.
| 2: Speak to Ebisuya owner |
B - Speak to the owner of Ebisuya. He explains to Kiryu that a samurai sold a sword to him about 6 months ago because he needed the money to pay off gambling debts. But suddenly, a few days ago, that samurai has started showing up again, asking to have his sword back - for free! Obviously, the owner wasn't having any of it. Apparently he got really angry and started screaming about how he's going to die. The owner has had enough of all the fuss this guy is causing at his shop, so he has commissioned Kiryu to take care of him.
After all that, leave Ebisuya. The owner sees the samurai show up and points him out to Kiryu. The samurai screams at Kiryu about needing his sword back, but Kiryu says he can't let him go inside. This leads to a fight.
| 3: Fight man, then select the TOP OPTION |
The samurai has double the health of most brawler types you've fought in substories up to now. But he still won't be a threat to you. You could use the weapons in the area to take out his health quicker if you want, but just using your bare hands will be enough.
After the fight, the samurai screams about how he's going to die if he goes back without his sword. Apparently, he got that sword from a lord and this lord wants to see the sword again - he's coming to visit the samurai soon - but if the lord finds out he sold it to pay off gambling debts, he'll be forced to commit seppuku. The owner of Ebisuya asks Kiryu what they should do in this situation. Select the TOP OPTION to buy the sword for him. The owner asks if he's sure - the sword is worth a massive 50 Ryo, after all! The owner has an idea - he says if the samurai pays him everything he has on him right now, he will allow him to borrow the sword until his lord has seen it.
The owner thanks Kiryu for his work. He says he, too, was moved by Kiryu's offer to buy the sword. Because of this, he has decided to double the original payment - he gives Kiryu 2 Ryo. The commission ends and you receive 1500 EXP as a reward.
| ALTERNATE ENDINGS |
In Step 3, if you select the MIDDLE OPTION, Kiryu suggests that the owner lets the samurai borrow the sword for now (so, how the commission ends up when you select the top option). You get the 1 Ryo as originally promised, plus the 1500 EXP reward.
In Step 3, if you select the BOTTOM OPTION, Kiryu suggests to the samurai that he just give up and commit seppuku. Again, the owner just ends up offering to let the samurai borrow the sword. However, he says he wasn't fond of how Kiryu told him to just commit seppuku like that. Because of this, he halves the original payment - he gives Kiryu 5000 Mon. Also, you only receive 500 EXP reward in this ending.

| 121 | Gonzaemon the Formless |
| Available At: | 6-1 |
| Time: | Day / Evening / Night |
| Prerequisites: | N/A |
Steps
- A - Trigger bounty event and select the BOTTOM OPTION
- Interact with the notice board
- B - Speak to Gonzaemon
- Fight Gonzaemon
| 1: Trigger bounty event and select the BOTTOM OPTION |
A - When you go near the police box, an event is triggered. The Okappiki calls out to Kiryu and asks for his help in tracking down wanted men - there's a lot of money in it for him if he does. Select the BOTTOM OPTION to agree to help. Selecting the top option just loops back to the dialogue options until you finally agree to help.
He then spends ages going on about how it works. The simple version is: First, you look at the notice board. Second, read the wanted man poster to find out when and where they show up. Third, track down and capture the wanted man. Fourth, claim your reward. When he finally shuts up, select the BOTTOM OPTION to say you understand. If you select the top option he goes over everything all over again.
NOTETriggering this event also triggers the arrival of the Doshin - the policeman who patrols Rakugai. If he spots you, he will chase you. It's a complete waste of time fighting him since you get jack shit for beating him (no money, no items, no EXP). If you even manage to beat him, that is - he's no pushover. He beat my ass the first time I fought him. So, just keep away from him. He exists solely to make travelling around Rakugai a miserable experience.
| 2: Interact with the notice board |
After being introduced to bounties, you can now examine the notice board next to the police box to trigger bounty substories. You must always look at the poster before you can encounter the wanted man. Examine the board now (interact, then select the TOP OPTION) to see a poster. The first guy you see is actually for the next bounty (122), but interact with the notice board a second time and you will see Gonzaemon's poster. You can now track down the wanted man.
| 3: Speak to Gonzaemon |
B - When you get close to this area, Kiryu spots Gonzaemon. Speak to the man and Kiryu confronts him, saying he is a wanted man and should accept his punishment like a man. He refuses, so Kiryu says he'll have to bring him in by force.
| 4: Fight Gonzaemon |
This is your introduction to the bounty substory fights and you'll quickly learn that the guys you fight in bounties are a lot tougher than enemies from other substories. In fact, many of them are the special "Boss" enemy type, meaning some heat actions cannot be performed on them. Gonzaemon has quite a lot of health and is no pushover. He is good at evading (he can backflip away from your attacks) and he also uses the iaido techniques of the swordmaster enemy type, so watch out for that. He is also very good at blocking your attacks. A good idea might be to wait for him to launch an attack and dodge roll around him to get some hits in from behind.
After defeating him, Kiryu summons an official, who confirms that this is indeed Gonzaemon. He thanks Kiryu for bringing him in and pays him the advertised reward of 1 Ryo. You also receive 1500 EXP as a reward for completing this bounty.

| 122 | Yata the Fake Ninja |
| Available At: | 6-1 |
| Time: | Night |
| Prerequisites: | N/A |
Steps
- See Yata's poster on the notice board
- A - Speak to Yata
- Fight Yata
| 1: See Yata's poster on the notice board |
Examine the notice board by the police box in Rakugai and see Yata's poster (if you completed 121 you have probably already seen this poster).
| 2: Speak to Yata |
A - When you get close to this area, Kiryu spots Yata. Speak to Yata and Kiryu confronts him. He says he's bringing Yata in to pay for his crimes. Obviously, Yata isn't going in so easily so he starts fighting Kiryu.
| 3: Fight Yata |
You fight Yata, a boss type, alongside 2 ninja type enemies. Yata moves like a ninja type but wields a greatsword weapon. He is very good at evading and blocking Kiryu's attacks. On the bright side, like with all ninja types, they don't have that much health so when you finally do hit them they go down pretty quickly.
After defeating him, Kiryu summons an official, who confirms that this is indeed Yata. He thanks Kiryu for bringing him in and pays him the advertised reward of 1 Ryo. You also receive 1500 EXP as a reward for completing this bounty.

| 33 | The Town Doctor #1 |
| Available At: | 6-3 |
| Time: | Day / Evening / Night |
| Prerequisites: | Complete Request 23 |
Steps
- A - Speak to the sick man
- B - Speak to man
- C - Speak to doctor
| 1: Speak to the sick man |
A - Speak to the man on the floor. He says he's in a lot of pain and asks Kiryu to get a doctor.
| 2: Speak to man |
B - Speak to the man here. Kiryu asks if he's seen a doctor anywhere. The man says he saw a doctor at the sushi restaurant.
NOTEYou do have to speak to this guy in order to do the next step - the doctor will not spawn in the sushi restaurant until you speak to this man. So, don't think you can just jump straight ahead to the sushi restaurant if you already knows he shows up there.
| 3: Speak to doctor |
C - Go inside the sushi restaurant and speak to the doctor. He's the guy dressed in white, sat at the counter. Kiryu asks him if he's a doctor and then asks if he'll come and look at the guy he found in Step 1. The doctor doesn't seem keen but does agree to go with him. The doctor looks at the man, then mixes together a medicine for him. After drinking it, the sick man gets back to his feet saying he feels great. He thanks the doctor, paying him a medical fee. He also thanks Kiryu for getting the doctor, giving him 1 Ryo. After the guy leaves, the doctor introduces himself to Kiryu as "Ken". Suddenly, another doctor, "Wakamatsu", shows up. He claims he is the top doctor in Gion. We get a bit of backstory - namely, that Ken is known as a hack doctor because he once killed someone. The other doctors have given him the nickname "Ken the Killer Doctor". Wakamatsu says Ken should just leave Gion - no one trusts him any more. After all this backstory, the request ends with the COMPLETE result and you also receive 1500 EXP as a reward.
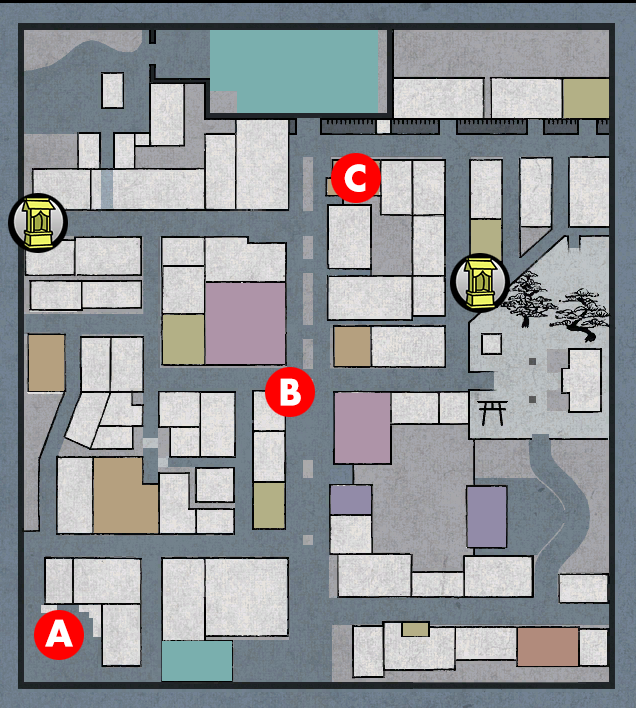
| 34 | The Imposter |
| Available At: | 6-3 |
| Time: | Day / Evening / Night |
| Prerequisites: | Complete Request 33 |
Steps
- A - Speak to the kakemawari
- B - Speak to man
- C - Catch Fake Kiryu
- Fight Fake Kiryu
- A - Speak to the kakemawari
| 1: Speak to the kakemawari |
A - Speak to the guy standing outside Kiryu's house. He says he's a kakemawari and he's here to collect Kiryu's debt. Apparently, Kiryu has built up a debt of 2 Ryo in Gion. Kiryu wonders if someone is using his name. The kakemawari says if that's the case then he'd better hunt that guy down and make him pay.
| 2: Speak to man |
B - Go inside the liquor store. Speak to the guy in the corner of the room - there's an employee standing next to him. The employee asks the man to pay his fees. But the man says he's Kiryu Kazumanosuke, so the employee says he doesn't have to worry about paying right now - he'll just add it to Kiryu's bill. As the fake Kiryu leaves, real Kiryu confronts him. Real Kiryu demands fake Kiryu pays back everything he owes. Fake Kiryu then realises this guy is the real Kiryu and runs off.
NOTEYou must find him within 30 seconds or you cannot get the COMPLETE result for this request. Even if you don't get that result, you don't get locked out of anything later on so don't worry too much.
| 3: Catch Fake Kiryu |
C - Interact with fake Kiryu within 30 seconds. Fake Kiryu says there's no way he's going to pay him back and the two fight.
| 4: Fight Fake Kiryu |
Fake Kiryu is a pushover so just beat his ass and get it over with.
After the fight, fake Kiryu apologises and promises not to use his name again. Kiryu again demands he pays back the 2 Ryo debt he has built up in Gion. He gives Kiryu the money he owes and then leaves Gion.
| 5: Speak to the kakemawari |
A - Return to the kakemawari. Kiryu gives him the 2 Ryo he got off fake Kiryu. The kakemawari thanks him and gives Kiryu an Ultimate Tamahagane. The request ends with the COMPLETE result and you also receive 1000 EXP as a reward.
| ALTERNATE ENDINGS |
In Step 3, if you do not speak to fake Kiryu within 30 seconds after finishing Step 2, Kiryu says the guy got away. Fake Kiryu will just despawn if you are in the Gion map. Next, you'll need to go back to the kakemawari outside Kiryu's house. When you speak to the kakemawari, he says it looks like Kiryu is going to have to pay the money then since he let the fake one get away. But then one of the Gion gatekeepers shows up with fake Kiryu. The kakemawari tries to get him to pay, but fake Kiryu runs off, then the kakemawari chases after him. You do not get any item as a reward here. The request ends with the FINISHED result and you also receive 1000 EXP.

| 35 | How to Make Delicious Candy |
| Available At: | 6-3 |
| Time: | Day / Evening / Night |
| Prerequisites: | N/A |
Steps
- A - Speak to the man at the shrine and select the TOP OPTION
- Select the TOP OPTION (x2)
- B - At night, speak to the man outside Tsuruya
- C - At night, examine the magistrate's mansion
- Fight magistrate
| 1: Speak to the man at the shrine and select the TOP OPTION |
A - Speak to the man at the shrine. He is a confectioner running a business called "Kanmido" who is troubled by a rival confectioner in Gion (who runs a business called "Senryoya". Apparently something strange is going on with that guy - a high ranking and influential magistrate ensures that this other confectioner always wins the confectionary contests, being crowned the greatest confectioner every time. The reason this is suspicious is because apparently the candy this other guy makes isn't even nice. He asks Kiryu to try out one of his creations. Select the TOP OPTION to say it's delicious. He thanks Kiryu, saying that gives him a bit more confidence going into the contest. He explains to Kiryu about the contest - loads of confectioners from across Kyoto gather and judges determine the best confectioner.
Selecting the BOTTOM OPTION to tell him the candy is not great doesn't make any difference to the request. Only difference is a different line of dialogue.
| 2: Select the TOP OPTION (x2) |
He says he really doesn't want to lose to Senryoya. Select the TOP OPTION to tell him not to worry about that guy. He then asks Kiryu if he'd like to be a judge in the contest - after all, he is allowed to nominate one judge. Select the TOP OPTION to agree to judge the contest. He tells Kiryu the contest will take place at Tsuruya at night.
NOTEYou cannot do the next step until Night time. In the main story, you can continue this request at 7-4. In premium adventure, you can speak to Yoshino to change the time of day.
| 3: At night, speak to the man outside Tsuruya |
B - At night, speak to the Kanmido confectioner outside Tsuruya. He says the contest is about to begin. Inside, the judges first try Kanmido's candy. Then, after trying Senryoya's candy, the high ranking magistrate who leads the contest shouts out praise for this candy, declaring it to be the best of the lot. All the judges join in and agree with the boss. But then Kiryu tries it and says it tastes like shit. The magistrate says Kiryu, being a commoner, just isn't used to such high-class tastes. Senryoya is declared the winner of the contest. Back outside, Kiryu tells the Kanmido confectioner not to worry - something is definitely odd about this other guy. Kiryu says he wants to investigate this more.
| 4: At night, examine the magistrate's mansion |
C - At night, examine the house here outside Yoshioka Dojo. We learn that the Senryoya confectioner has been bribing the magistrate so he'd ensure he would win these contests. He even brings a yujo from Gion for the magistrate's pleasure. After the confectioner leaves and the magistrate starts having his way with the yujo, Kiryu bursts in and confronts him for his corruption. The magistrate recognises Kiryu from the contest and summons his henchmen to fight.
| 5: Fight magistrate |
Besides the magistrate himself, you also fight two swordsman types, a swordmaster type, and the confectioner (who is a brigand type). As always, deal with the swordmaster first unless you enjoy spending a lot of time on the floor. Those iaido attacks are a pain. You don't need to worry about the other enemies - the swordsmaster is the only real threat here. However, the battlefield is quite confined, so it might be difficult to find space.
After the battle, you automatically transport back to Gion. Kiryu explains the situation to the Kanmido confectioner, who thanks Kiryu for everything. The request ends with the COMPLETE result and you also receive 10000 EXP as a reward.


| 36 | The Chili Pepper Girl’s Father |
| Available At: | 6-3 |
| Time: | Day / Evening |
| Prerequisites: | Complete Request 11 |
Steps
- A - Speak to chili pepper girl and select the TOP OPTION
- B - Speak to chili pepper girl's father
- C - Invent the Chili Pepper Wet Cloth item
- B - Speak to chili pepper girl's father
- A - Go near chili pepper girl's father
| 1: Speak to chili pepper girl and select the TOP OPTION |
A - Here, you will see the chili pepper girl from request 10 selling chili peppers again. Speak to her and we get a bit of backstory. We learn her mum died and now she only has her dad. Kiryu asks what her dad is up to. She explains her dad is bedridden with some back problem, so she is standing in for him by selling chili peppers in his stead. She mentions her dad wants to thank Kiryu for helping her before, so she asks if Kiryu will go with her to see her dad. Select the TOP OPTION to go.
| 2: Speak to chili pepper girl's father |
B - When you are inside the house, speak to the father. He thanks Kiryu for saving his daughter and rewards him with a Chili Pepper Set. He then spends ages moaning about his condition and how he has no choice but to lie around until he has recovered - after all, he can't afford any expensive medicine or anything.
NOTEYou cannot proceed to the next step until you have all the required items to invent the Chili Pepper Wet Cloth item. The Chili Pepper Set the father gave you is one of the required items. Another required item is Dried Algae which you can buy whenever you want from the turtle seller in Rakugai. However, you cannot get the final item you need for this invention until 7-4 during the main story. Specifically, you get the item from request 47, which you can do at 7-4.
| 3: Invent the Chili Pepper Wet Cloth item |
C - After completing request 47, invent the Chili Pepper Wet Cloth item (remember, you also need Dried Algae from the turtle seller). The dried algae is the "Mystery Item" and when you try to invent the Chili Pepper Wet Cloth, you must select the dried algae item from your inventory. It should appear near the top of the inventory list if you have it on you (not in storage). Otherwise, scroll through the list until you find it.

NOTEYou cannot proceed to the next step until Day time. In the main story, you can continue this request at 7-5. In premium adventure, speak to Yoshino to change the time.
| 4: Speak to chili pepper girl's father |
B - Speak to the father again and Kiryu will automatically give him the Chili Pepper Wet Cloth invention. He thanks Kiryu for his help, saying he thinks this will help him recover quickly. You then automatically leave the house.
| 5: Go near chili pepper girl's father |
A - The chili pepper girl's father, along with the girl, will appear at this location 3 minutes after completing Step 4. If you stand around at this location for 3 minutes, they won't show up - you'll need to leave the area and return. Going into a shop and returning will work. Otherwise, just go to Gion, then back to Rakugai again, and they'll appear. When you get close to them, you will trigger an event. They thank Kiryu for his help and reward him with a Chili Pepper Wet Cloth - the same item you gave him earlier. After this, the request ends with the COMPLETE result and you also receive 1500 EXP as a reward.


| 37 | Return of the Enthusiastic Merchant |
| Available At: | 6-3 |
| Time: | Day / Evening |
| Prerequisites: | Complete Request 24 |
Steps
- A - Speak to Tanaka and select the TOP OPTION
- Walk away and look at the gourd, then select the TOP OPTION
| 1: Speak to Tanaka and select the TOP OPTION |
A - Speak to Tanaka. He's trying to sell a new product. This time, it's some kind of "Full-Stomach Gourd". Apparently, when you feel hungry, all you have to do is stare at this thing and you'll feel full in no time. He says it's only 500 Mon and he'll even throw in an Arashi Yokan as a bonus. Select the TOP OPTION to buy it.
| 2: Walk away and look at the gourd, then select the TOP OPTION |
After buying the item, walk away from the area. Kiryu says he feels a bit hungry and decides to give this gourd a try. He stares at it, but it appears to just be a normal gourd from the outside. But then he decides to take a closer look inside. Looking closely inside, he sees a message that says: "If you eat too much, you'll end up with a gourd-shaped body." along with a picture of a fat woman. Right after that, some dude shows up saying he bought a bunch of sake and needs some kind of container for it. He asks Kiryu if he'll be willing to swap his gourd with a copper plate. Select the TOP OPTION to trade. You receive a Copper Plate. After this, the request ends with the COMPLETE result and you also receive 1500 EXP as a reward.
| ALTERNATE ENDINGS |
In Step 2, if you select the BOTTOM OPTION to refuse to trade, the request ends with the FINISHED result. You still get the 1500 EXP reward, but you obviously don't get the copper plate.
| 38 | Today’s Excuse |
| Available At: | 6-3 |
| Time: | Day / Evening / Night |
| Prerequisites: | Complete Request 37 |
Steps
- A - Speak to man
- Select, in order: MIDDLE OPTION - BOTTOM OPTION - TOP OPTION - TOP OPTION - MIDDLE OPTION
| 1: Speak to man |
A - Go near the entrance to the bar. Some guy will run up to Kiryu and ask him for a favour. Apparently, his wife has heard that he has been spending time in Gion and is not happy about it. The guy wants Kiryu to act an an alibi. The wife will ask some questions and Kiryu is supposed to get the guy off the hook. You don't even get a choice in the matter - after all this you immediately go inside the bar and speak with the wife.
| 2: Select, in order: MIDDLE OPTION - BOTTOM OPTION - TOP OPTION - TOP OPTION - MIDDLE OPTION |
She first asks Kiryu if he knows her husband through work. Select the MIDDLE OPTION to say you don't work together. Next, she mentions her husband wasn't back home until this morning. What was he doing all night? Select the BOTTOM OPTION to say he was at your house. Next, she mentions she noticed the scent of what seemed to be a woman's perfume on the clothes he was wearing when she went to wash them. She asks if there were any women with them. Select the TOP OPTION to say there were no women. Next, she says her husband spent all the money he had on him and asks what he spent it on. Select the TOP OPTION to say sake. Finally, she says they received a letter from a yujo in Gion and wonders if this gives her good reason to believe her husband has been playing around in Gion. Select the MIDDLE OPTION to say she's mistaken. Kiryu comes up with some bollocks to get the husband off the hook.
After all that, the wife says she'll let the husband off this time, then goes home. The husband thanks Kiryu for backing him up and rewards him with a Lapis Lazuli. The request ends with the COMPLETE result and you also receive 1000 EXP as a reward.
| ALTERNATE ENDINGS |
If you get at least 2 of the 5 options wrong during Step 2, the request ends with the FINISHED result. You don't get the Lapis Lazuli item, but you do receive a Tortoiseshell Hairpin. You also still receive 1000 EXP as a reward. In this version of the story, the wife thanks Kiryu for helping her realise the truth of what her husband is up to and rewards him with that hairpin item.

| 39 | Sujitaro 1 |
| Available At: | 6-3 |
| Time: | Day / Evening / Night |
| Prerequisites: | N/A |
Steps
- A - Speak to woman and select the TOP OPTION
- B - Go near Sujitaro and select the TOP OPTION
- Fight Sujitaro
- Give Sujitaro food (TOP OPTION)
| 1: Speak to woman and select a dialogue option |
A - Speak to the woman here and she'll ask Kiryu if he's a skilled samurai. Select the TOP OPTION to say you back your ability. She explains bandits have been appearing on mountain road recently and asks if Kiryu will deal with them.
NOTEBefore going to the next step, make sure you have a food item in your inventory.
| 2: Go near Sujitaro and select the TOP OPTION |
B - Go near the big guy on the bridge. His name is Sujitaro and says he won't let anyone pass. Select the TOP OPTION to say you're going past him. Sujitaro says the only way Kiryu will get past him is if he beats him in a fight - using only their fists. This leads to a fight with Sujitaro.
| 3: Fight Sujitaro |
You cannot use your swords in this fight. You are locked to the brawler style. However, you can still use weapons on ground in the battlefield. Sujitaro is the wrestler type and this type is a pain because they love throwing you to the ground. To avoid spending all your time on the floor, there are two strategies you could use here: One is to use battlefield weapons - beat his ass with a log or branch and use heat actions. Another strategy is to rush up to him and spam the kick attack () - if you get a hit in before he can throw you, it is possible to stun-lock him by spamming that attack until all his HP is gone. It doesn't always work though, since he will sometimes block, but it's worth a try - it sometimes works for me and makes the fight easier.
| 4: Give Sujitaro food (TOP OPTION) |
After you beat him, Sujitaro says the only reason he lost is because he's hungry, so he's not at full strength. He asks Kiryu if he'll give him some food. Select the TOP OPTION to give him food. This brings up your inventory - select a food item to give him. He is overjoyed that Kiryu really gave him some food, saying it's the first time he's experienced such kindness since his mother died. After Kiryu encourages him to stop living out here and that he could help a lot of people with his strength, Sujitaro gives Kiryu a Vermilion Hairpin. After this, the request ends with the COMPLETE result and you also receive 1000 EXP as a reward.


| 40 | Water From the Ladle #2 |
| Available At: | 6-3 |
| Time: | Day / Evening |
| Prerequisites: | Complete Request 21 |
Steps
- A - Go near woman and select the BOTTOM OPTION
- Fight samurai
| 1: Go near woman and select the BOTTOM OPTION |
A - Go near the woman. This triggers a scene where the woman accidentally throws water over a couple of samurai passing by. They tell the father they will let her off if he pays them 100 Ryo. Obviously, he is not able to pay such an extraordinary amount of money. But they say they will let this go if they get to "have some fun" with his daughter. Kiryu steps in and tells them to get out of here. The samurai ask if Kiryu is willing to pay the 100 Ryo they are demanding, in the father's stead. Select the BOTTOM OPTION to refuse to pay. This leads to a fight.
If you select the TOP OPTION, you don't hand over any money (even if you have more than 100 Ryo). Kiryu says he would give them the money if that kimono was actually worth that amount. So, the end result is the same because regardless of which option you pick, Kiryu is saying the kimono is not worth the 100 Ryo he's demanding to replace it.
| 2: Fight samurai |
Both are basic swordsmen types with very little health, so this won't be a problem.
After the fight, they run off. The man and his daughter thank Kiryu for their help. If you selected the BOTTOM OPTION in request 18 you will receive 2 Ryo at this point. Next, the request ends with the COMPLETE result and you also receive 1000 EXP as a reward.
NOTERemember, you will only receive the 2 Ryo reward if you selected the BOTTOM OPTION in request 18. If you selected any other option, you don't get any money but will still receive the 1000 EXP reward and this request will still end with the COMPLETE result.
| 41 | Wish-Granting Sword |
| Available At: | 6-3 |
| Time: | Day / Evening |
| Prerequisites: | Complete Request 19 |
Steps
- A - Speak to man and select the TOP OPTION
- Fight Zenjiro
- Fight yakuza
| 1: Speak to man and select the TOP OPTION |
A - Speak to the guy (name is Zenjiro) with a crowd around him. He claims to have an enchanted sword that, when unsheathed, grants the wielder a wish. But it turns out that it's not quite so simple to unsheath it. He says it's 100 Mon to give it a try. Select the TOP OPTION to try. Kiryu ends up breaking it apart, revealing to everyone watching that the sword is a fake. When his crowd leave, Zenjiro gets angry and fights Kiryu.
| 2: Fight Zenjiro |
He's just a brawler type and doesn't have much health, so this fight won't last long, especially if you beat his ass with your swords.
After the fight, Kiryu tells him to give up all this deception. But Zenjiro explains he owes the yakuza some money, so he has to do whatever he can to make enough to pay off his debt. Suddenly, 3 yakuza show up and demand their money. Zenjiro explains that everyone realised the sword was a fake because it broke. The yakuza say that sword was very valuable and they'll be adding that to his debt - they say he owes an additional 10 Ryo. Kiryu tells them to leave the guy alone, but the yakuza fight Kiryu because he's the one who broke their fake sword.
| 3: Fight yakuza |
Two are brawler types - one of which has a weapon (piece of wood). The other is a brigand type armed with a sword. So, this is tougher than the previous fight but still shouldn't be a problem because they don't have much health. Take out the guy with the sword first since he can do the most damage to you, then take out the guy with the wood weapon, then the unarmed guy.
After the fight, Kiryu warns them not to go near Zenjiro again. They leave and then Zenjiro's grandmother shows up, worried about him. She thanks Kiryu for helping her grandson and reward him with the Mythical Beast Tome (weapon recipe book). After this, the request ends with the COMPLETE result and you also receive 1500 EXP as a reward.

| 42 | Enchanted Sword - Senraibo |
| Available At: | 6-3 |
| Time: | Day / Evening |
| Prerequisites: | Complete Request 19 |
Steps
- A - Speak to Keisuke
- B - Speak to Hanaoka
- C - Speak to man and select the BOTTOM OPTION
- Select any dialogue option
- Fight thugs
- Fight thugs
| 1: Speak to Keisuke |
A - Speak to the man here. He's a food merchant called Keisuke, but he's not having much luck with his customers. He's not great at talking with them, but he sells high-quality food. He says he can't compete with the merchant next to him - Hanaoka - who is a skilled talker.
| 2: Speak to Hanaoka |
B - Speak to Hanaoka. It turns out he's the complete opposite of Keisuke - Hanaoka is good with customers, but his products are low quality.
| 3: Speak to man and select the BOTTOM OPTION |
C - After speaking with both Keisuke and Hanaoka, when you go to this area some guy with a sword will rush up to you. He seems desperate to get rid of the sword, saying it's a special sword which makes one's business prosperous. He is willing to sell it to Kiryu for 100 Mon. Select the BOTTOM OPTION to say you don't need it. The guy says Kiryu doesn't have to pay anything after all and hands over the sword for free.
If you select the TOP OPTION you lose 100 Mon. Other than that, nothing else changes.
| 4: Select any dialogue option |
After the guy runs off, Kiryu supposes he should give the sword to one of the two merchants he spoke with earlier, as they need it more than he does. The choice you make here does not affect the outcome at all, so give it to whoever you want. Only thing that changes slightly is the sequence of events. Top option is Hanaoka, bottom option is Keisuke. When you give the sword to one of the merchants, Kiryu explains it's supposedly a sword which helps businesses to prosper. After this, a crowd of people surround the merchant. They think the sword must work, but it turns out that's not quite the case - all these guys are angry and seem to be looking for a fight. Kiryu now realises why that merchant was so desparate to get rid of the sword.
| 5: Fight thugs |
Kiryu fights the thugs who showed up. They are all brawler types with low health. Use your swords and you won't have any difficulty taking care of these guys.
After the fight, the merchant throws away the sword, saying he doesn't want something like that. Then, the other merchant sees the sword and picks it up to take a closer look. Then another crowd of thugs show up. Hanaoka/Keisuke throws the sword away and the thugs move on. They think they are in clear now, but it turns out some poor old guy picked up the sword and now he's being threatened by the thugs. Kiryu steps in.
| 6: Fight thugs |
Very similar to the previous fight - same number of enemies and again all are brawlers with low health.
After the fight, Hanaoka/Keisuke gets the sword back. Suddenly, a new crowd of people show up and surround the two merchants. However, this time they are not thugs. Hanaoka and Keisuke decide to work together to serve this huge crowd. They say now they are working together they are sure they will be popular - with Keisuke's high-quality goods and Hanaoka's customer service skills, they have no need for the sword. So, they give it to Kiryu. You receive the Enchanted Sword - Senraibo. After this, the request ends with the COMPLETE result and you also receive 1500 EXP as a reward.

| 43 | Enchanted Sword - Kanekuimushi |
| Available At: | 6-3 |
| Time: | Day / Evening |
| Prerequisites: | Complete Request 19 |
Steps
- A - Witness event
- B - Go near Kichiemon
- Fight thugs
| 1: Witness event |
A - Go near the crowd of people. Some guys are threatening some man, but the man says they can't defeat him because he is using an enchanted sword. He proves this by easily defeating them. The guy's name is Kichiemon and he claims he's unbeatable while he has this sword. After all this, Kichiemon speaks to a woman called Oshizu. It seems he was trying to impress her - he asks what she things, pointing out she mentioned before she likes strong guys. He says with this new sword, as long as he has money he can protect her for the rest of his life. It seems she's not impressed - she has no interest in this fake strength he has. Not long after running off, it seems Oshizu is being harassed by some thugs.
| 2: Go near Kichiemon |
B - Kichiemon rushes off to this location. Go near him to trigger another event. Kichiemon is now being threatened by the thugs and, unfortunately, he has no money right now (so the sword has no power). Kiryu steps in to help, but Kichiemon tells Kiryu it is his duty to protect Oshizu - even with no money and without the power of his enchanted sword, he must still protect her. They easily defeat Kichiemon, then they fight Kiryu.
| 3: Fight thugs |
You are up against 4 enemies, 2 brawler types and 2 have swords. The toughest enemy is the thug boss, who has the most health and is the swordman type. This should be straightforward. Take out the enemies with a sword first, since they can do the most damage to you.
After the fight, we get some drama scene between Oshizu and Kichiemon. Short version of the story is that Oshizu has come to appreciate him more, since he tried so hard to protect her even without his enchanted sword. They thank Kiryu for his help and give him 3 Ryo. They also give him the Enchanted Sword - Kanekuimushi. After this, the request ends with the COMPLETE result and you also receive 1500 EXP as a reward.

| 44 | Demon Extermination |
| Available At: | 6-5 |
| Time: | Day / Evening |
| Prerequisites: | Complete Request 13 |
Steps
- A - Speak to man on the ground
- A - Speak to man again and give him a Vitality Pill - Special Grade
- Select the BOTTOM OPTION
- B - Look through the hole in the wall, then select the BOTTOM OPTION
- C - Buy Mugwort Dango from Riverside Tea House
- B - Speak to man
| 1: Speak to man on the ground |
A - There is a guy on the ground here (and everyone is ignoring him, lol). Kiryu asks if he's okay but isn't getting anything out of him. Kiryu supposes he should get him some medicine.
NOTEThe only medicine item that will work is the Vitality Pill - Special Grade, nothing else will work. If you don't have one, you can buy one at Ecchuya in Rakugai.
| 2: Speak to man again and give him a Vitality Pill - Special Grade |
A - When you have a Vitality Pill - Special Grade in your inventory, speak to the man again. Select the TOP OPTION to give him medicine. Then select the right item from your inventory.
| 3: Select the BOTTOM OPTION |
After the man drinks it, he regains consciousness. Kiryu asks what happened and the man says he has a demon in his house. The guy asks if he'll help exterminate the demon. Select the BOTTOM OPTION to help. They travel to his house, then go inside. They spot the alleged "Demon", but Kiryu points out this is just a human. The man says yes, it is his "Demon Wife"! She turns to face them and they run outside.
If you select the TOP OPTION to refuse to exterminate the demon, the dialogue keeps looping back to these dialogue options until you select the BOTTOM OPTION.
| 4: Look through the hole in the wall, then select the BOTTOM OPTION |
B - When you are outside, the man points out his wife is not always like this - she's only been like this recently. They suggest taking a peek inside to see what's going on. Interact with the door and Kiryu spots a hole. After a short scene, we learn that before they got married this guy promised her he would treat her to a Mugwort dango once a month, because she loves them so much. It turns out he forgot his promise. He says he has to go and buy some, but in his condition he won't be able to make it. He asks Kiryu if he'll buy Mugwort Dango in his stead. Select the BOTTOM OPTION to agree.
| 5: Buy Mugwort Dango from Riverside Tea House |
C - Travel here to get the Mugwort Dango. Nowhere else sells this particular dango, including the Yoshioka Dojo Tea House (Nonaka). If you have already travelled here during the main story for Koetsu's dango, you can fast travel here. Otherwise, you'll have to travel down River Road to get here. But after buying the dango you can fast travel back to Rakugai.

| 6: Speak to man |
B - Go back to the man. Kiryu hands over a Mugwort Dango. The guy thinks giving her this dango will calm her down, but Kiryu points out she's not actually angry because she didn't get to eat a dango, it's because he didn't keep his promise. He thanks Kiryu and gives him a Potted Chrysanthemum. After this, the request ends with the COMPLETE result and you also receive 1500 EXP as a reward.
| ALTERNATE ENDINGS |
In Step 4, if you select the TOP OPTION to refuse to buy the Mugwort Dango, the request ends here with the FINISHED result. You obviously don't get the item reward, but you do still get 1500 EXP for finishing the request.

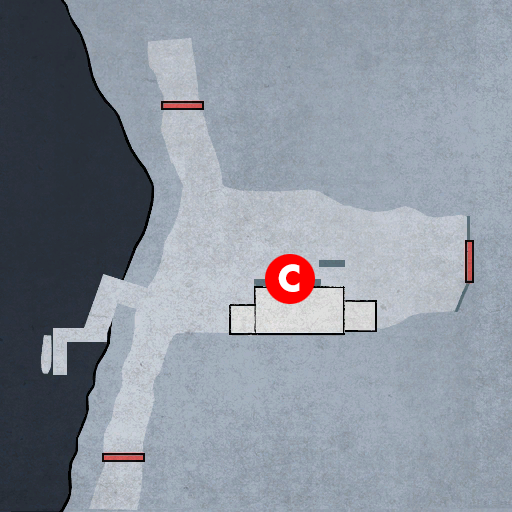
| 45 | Temple School Homework - Writing |
| Available At: | 6-5 |
| Time: | Day / Evening |
| Prerequisites: | Complete Request 44 |
Steps
- A - Speak to Mametaro and select the TOP OPTION
- Select, in order: MIDDLE OPTION - MIDDLE OPTION - TOP OPTION - BOTTOM OPTION - MIDDLE OPTION
| 1: Speak to Mametaro and select the TOP OPTION |
A - Mametaro, the kid you helped back in request 13, is struggling with his homework again. Select the TOP OPTION to help him.
| 2: Select, in order: MIDDLE OPTION - MIDDLE OPTION - TOP OPTION - BOTTOM OPTION - BOTTOM OPTION |
He asks 6 questions. The answers, in order, are: MIDDLE OPTION - MIDDLE OPTION - TOP OPTION - BOTTOM OPTION - MIDDLE OPTION
Mametaro thanks Kiryu for his help again. Then the request ends with the COMPLETE result and you also receive 1000 EXP as a reward.
NOTEIf you get the second question wrong, it is impossible to get the COMPLETE result for request 53. You will miss out on some EXP and a valuable item, but other than that you don't lock yourself out of any future content (including the secret boss fight), so it's not a huge disaster if you mess up. If you get any/all of the other questions wrong you can still get the COMPLETE result for request 53, it's just getting the second question wrong which locks you out of that result.
| ALTERNATE ENDINGS |
In Step 2, if you get ALL of the questions wrong, the request ends with the FINISHED result. You still get 1000 EXP for finishing though. You will still get the COMPLETE result if you get one/some of the questions wrong. But as mentioned above, if you get the second question wrong, you cannot get the COMPLETE result for request 53.
| 46 | Messenger From the Underworld |
| Available At: | 6-5 |
| Time: | Day / Evening / Night |
| Prerequisites: | Complete Request 45 |
Steps
- A - Speak to the fortune teller
- Fight henchmen
| 1: Speak to the fortune teller |
A - Speak to the fortune teller here. She says she is a fortune teller and that she sees a messenger from the underworld following Kiryu. She warns that people around Kiryu will die, but if he buys this special tag he can ward off the evil spirit. She is selling it for 100 Ryo, but says considering it will save lives, it's a bargain at that price. Kiryu isn't interested and she tries to bargain with him, lowering the price, but Kiryu still isn't having any of it. But she summons her henchmen to take out Kiryu before he can leave.
| 2: Fight henchmen |
You are up against 3 swordsman types. They don't have much health though, so it shouldn't be a problem. If you want to play it safe, you could use the two sword style so you can defend against their attacks even if they surround you.
After the fight the woman apologises. Kiryu asks how long she's been up to this. Apparently she just started today and Kiryu was her first customer. She says she has seen the error of her ways - 100 Ryo was too expensive, so now she's going to pitch the tags at 10 Ryo instead... She gives Kiryu a Pinzoro Tag. After this, the request ends with the COMPLETE result and you also receive 1000 EXP as a reward.
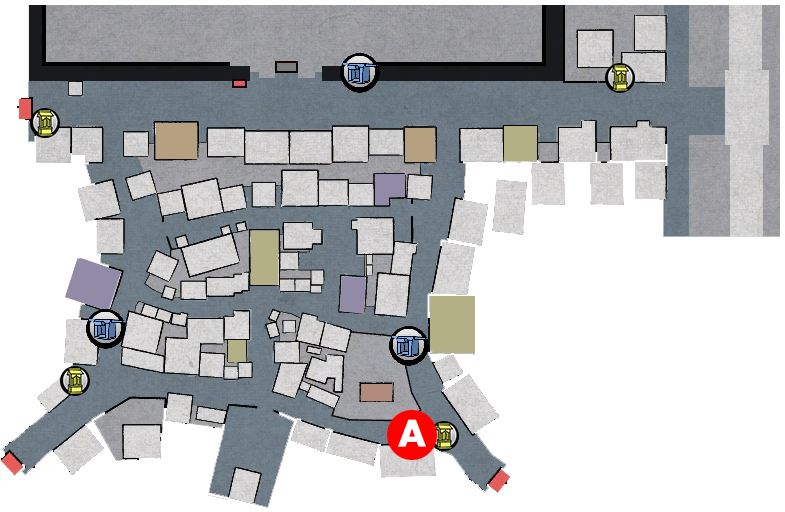
| 123 | Baian the Dull |
| Available At: | 6-5 |
| Time: | Day |
| Prerequisites: | N/A |
Steps
- See Baian's poster on the notice board
- A - Speak to Baian and select the TOP OPTION
- Fight Baian
| 1: See Baian's poster on the notice board |
Examine the notice board by the police box in Rakugai and see Baian's poster.
| 2: Speak to Baian and select the TOP OPTION |
A - When you get close to Baian, Kiryu will recognise him from the wanted poster. Speak to him and Kiryu confronts him for his crimes. Baian agrees he will give himself up if Kiryu can defeat him in a one-on-one unarmed fight - no swords allowed. Select the TOP OPTION to accept the challenge.
If you don't want to fight him yet, select the BOTTOM OPTION.
| 3: Fight Baian |
As you may have guessed, you are forced to use the brawler style in this fight. However, there are loads of weapons lying around the battlefield you can use if you want to make this fight easier. Baian is the martial arts expert type, so he is very good at countering your attacks. I recommend beating his ass with weapons and using heat actions as much as possible.
After the fight, Kiryu summons an official to deal with Baian. The two speak for ages (it turns out the two have a history together), but eventually the official rewards Kiryu with 2 Ryo. He also gives Kiryu a Tetsumaru Teachings (weapon recipe book). The bounty ends and you receive 1500 EXP as a reward.

Chapter 7: Ablaze
| 7-4 | 47 | Night | Talent | > |
| 7-4 | 48 | Night | The Ghosts | > |
| 7-4 | 124 | Night | Umaru the Bullet | > |
| 7-5 | 49 | Day / Evening | The Dream White Snake | > |
| 7-5 | 50 | Day / Evening | The Enthusiastic Merchant Tanaka Returns Again | > |
| 7-5 | 51 | Day / Evening | Temple School Homework - Abacus | > |
| 7-5 | 52 | Day / Evening / Night | Weight of Responsibility | > |
| 7-5 | 53 | Day / Evening | Temple School Homework - Essay | > |
| 7-5 | 54 | Day / Evening | Master and Apprentice | > |
| 7-5 | 55 | Day / Evening | The Flavour of Candy #3 | > |
| 7-5 | 56 | Day / Evening / Night | Blacksmith Turmoil | > |
| 7-5 | 57 | Day / Evening | The Painter | > |
| 7-5 | 58 | Day / Evening | Cat Hunt | > |
| 7-5 | 59 | Day / Evening | Cat Koban | > |
| 7-5 | 60 | Day / Evening | Mysterious Piece of Paper | > |
| 7-5 | 112 | Day / Evening / Night | Judgment | > |
| 7-5 | 113 | Day / Evening / Night | The Shadow Star | > |
| 7-5 | 125 | Day | Hikozaemon the Blade | > |
| 7-6 | 61 | Day / Evening / Night | Chili Pepper Seller’s Ingredient Collection | > |
| 7-6 | 62 | Day / Evening / Night | Udon Spice | > |
| 7-6 | 63 | Day / Evening / Night | The Monk's Secret | > |
| 7-6 | 64 | Day / Evening / Night | Sujitaro 2 | > |
| 7-6 | 65 | Day / Evening / Night | The Dog | > |
| 7-6 | 66 | Day / Evening / Night | Water from the Ladle #3 | > |
| 7-8 | 67 | Evening / Night | Double Suicide | > |
| 7-8 | 126 | Day / Evening / Night | Kinta the Brawler | > |
| 47 | Talent |
| Available At: | 7-4 |
| Time: | Night |
| Prerequisites: | Complete Request 39 |
Steps
- A - Go near man and fight samurai
- Select, in order: TOP OPTION - BOTTOM OPTION - TOP OPTION
- Fight bodyguard
NOTEIn addition to the prerequisite listed above, this request cannot be triggered if you have already started request 21 but not yet finished it. You must complete that request before you can trigger this one (if you haven't triggered it at all, you can still begin this one - it's only a problem if that other request remains incomplete).
| 1: Go near man and fight samurai |
A - Go near here. There is a man being attacked by someone. The man rushes up to you and asks for your help. You don't get any choice - you get thrown into a fight with the attacker. This guy is a basic swordsman enemy type, so he shouldn't be an issue for you.
| 2: Select, in order: TOP OPTION - BOTTOM OPTION - TOP OPTION |
After the fight, the attacker runs off. The man (Kamotaro) thanks you. Kamotaro reveals he is an artist and asks Kiryu if he'll escort him home - he's worried he'll be attacked again. Select the TOP OPTION to agree. At his house, we get a massive scene involving his daughter. Kamotaro owes some guy called "Kinzo" a debt. He's very late paying it back, but he managed to strike a deal - by the agreed deadline (which happens to be today), he will paint a new picture to pay back the debt and if he doesn't manage it in time, he will allow Kinzo to marry his daughter. However, because of the attack on the road earlier, he is in no condition to paint. He doesn't know what to do about this situation.
(selecting the BOTTOM OPTION to not escort him home puts the request on hold. He'll just be waiting around here on the road - speak to him again to continue)
Select the BOTTOM OPTION to say you will paint the picture. After Kiryu paints the picture, Kamotaro is very impressed, saying it could easily pass for one of his own, so Kinzo wouldn't be able to tell someone else painted it. They head over to Kinzo right away and hand over the painting. Kinzo is shocked - he thought Kamotaro was too injured to paint.
(if you select the TOP OPTION, Kamotaro ends up asking you to paint a picture anyway, so it doesn't make much difference what you say here)
Select the TOP OPTION to ask him how he knew about Kamotaro's injury. Kiryu accuses him of sending that samurai earlier to attack Kamotaro. Kinzo summons his bodyguard - it is the same guy from earlier.
(even if you select the BOTTOM OPTION Kiryu accuses Kinzo of sending that attacker)
| 3: Fight bodyguard |
Even though it's the same guy as before, this fight is more difficult. This is because this time, he is the swordmaster enemy type and has double the health he had earlier. As always with swordmaster types, watch out for those iaido attacks! Dodge around him when he does one of those attacks and hack away at his health.
After the fight, Kamotaro thanks Kiryu for all his help. He gives Kiryu Washi Bundle #1 and Washi Bundle #2. After this, the request ends with the COMPLETE result and you also receive 1500 EXP as a reward.

| 48 | The Ghosts |
| Available At: | 7-4 |
| Time: | Night |
| Prerequisites: | Complete Request 30 |
Steps
- A - Speak to the man and select the TOP OPTION
- B - Hand over the item
- A - Give the money to the man
- Head towards Kawara Street
- C - Speak to the samurai
- D - Meet Benkei on the bridge
- Fight ghosts
| 1: Speak to the man and select the TOP OPTION |
A - Speak to the man here. He tells you about a rumour of a ghost who shows up and attacks people. He has something to give to someone on Kawara Street but he's too scared to do it himself. Select the TOP OPTION to do it for him. He gives Kiryu the item and says he needs to hand it over to some guy called Heisuke.
| 2: Hand over the item |
B - Speak to Heisuke here. Kiryu hands over the item and receives payment from Heisuke.
| 3: Give the money to the man |
A - Return to the man. He thanks Kiryu for delivering the item for him and gives him 100 Mon.
| 4: Head towards Kawara Street |
Head towards the gateway to Kawara Street. Kiryu hears a scream coming from Kawara Street.
| 5: Speak to the samurai |
C - Speak to the samurai hunched over on the floor. He says he fought a ghost and lost. After this, head back towards the bridge. Someone comes running across the bridge towards Kawara Street, screaming about how he just bumped into a ghost. Speak to the man who just ran across the bridge - he's hunched over on the floor. He talks about the ghost again, saying it was on the bridge.
| 6: Meet Benkei on the bridge |
D - Go near the guy on the bridge. He goes on about how weaklings will not get past him and stuff, then Kiryu challenges him.
| 7: Fight ghosts |
The first fight is against Benkei. This is one of the rare occasions in the game where you fight a brute enemy type. He has some powerful attacks but he's slow, so keep your distance and get hits in between his attacks.
After beating him, another "ghost" shows up to fight Kiryu. His name is Ushiwakamaru. He is the ninja type, so he's very good at evading your attacks.
Next, you fight both Benkei and Ushiwakamaru at the same time. This could be a tricky one - you are up against a brute and a ninja at the same time. The brute is slow, so you might be better off getting rid of the ninja first.
After the fight, they apologise for their actions, admitting they are not real ghosts and just wanted to steal things and sell them off for profit. They give Kiryu a Special Shintogo weapon as an apology. After they have a massive argument, the request ends with the COMPLETE result and you also receive 1500 EXP as a reward.
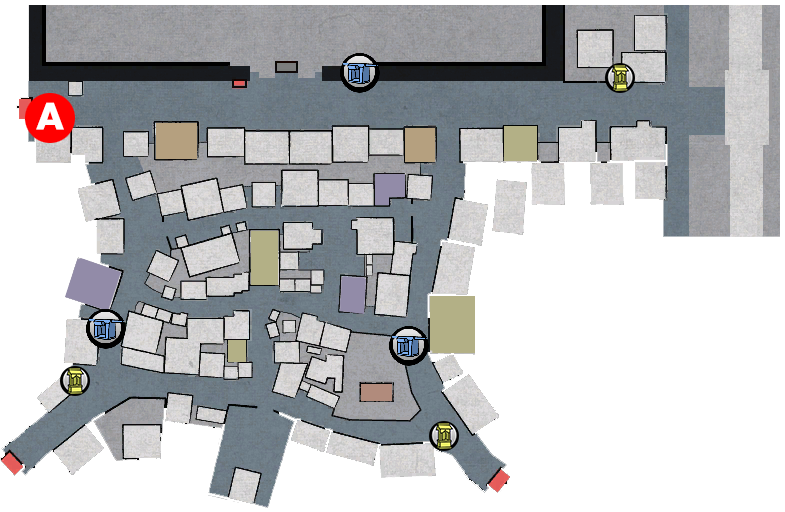

| 124 | Umaru the Bullet |
| Available At: | 7-4 |
| Time: | Night |
| Prerequisites: | N/A |
Steps
- See Umaru's poster on the notice board
- A - Speak to Umaru
- Fight Umaru
| 1: See Umaru's poster on the notice board |
Examine the notice board by the police box in Rakugai and see Umaru's poster.
| 2: Speak to Umaru |
A - When you get near here, Kiryu spots Umaru. Speak to him to challenge him.
| 3: Fight Umaru |
Umaru is a boss enemy type and has quite a lot of health. However, he's not too tough as a fighter. Note that you need to defeat him without a sword in order to obtain the best reward (meaning your finishing blow needs to be without a sword - use the brawler style to finish him). You can still chip away at his health with a sword though.
NOTERemember - if you want the best reward your finishing blow must be without a sword. Use the brawler style to finish him.
After the fight, Kiryu summons an official, who confirms this is Umaru. If your finishing blow was without a sword, you will receive 2 Ryo as a reward. If your finishing blow was with a sword, you will receive 1 Ryo as a reward. You also receive a Superior Tamahagane. The bounty ends and you receive 1500 EXP as a reward.

| 49 | The Dream White Snake |
| Available At: | 7-5 |
| Time: | Day / Evening |
| Prerequisites: | Complete Request 36 |
Steps
- A - Listen to conversation
- B / C / D - Find snake and select the TOP OPTION
- Give snake to boy (TOP OPTION)
- Fight merchant
- E - Speak to employee
| 1: Listen to conversation |
A - Interact with the old lady surrounded by some guys. She explains about a "Dream White Snake" she has seen - apparently, getting hold of it will make your business prosper. The men rush off to find this white snake, to help their business flourish.
| 2: Find snake and select the TOP OPTION |
B / C / D - You will first find the snake at location B. Select the TOP OPTION to catch it. If you don't catch it (BOTTOM OPTION), you will next find the snake at location C. After that, you will find the snake at location D. Then the snake loops back to B again. This will go on forever until you catch the snake. It doesn't matter how many times you don't catch it - it changes nothing in the substory.
The snake is fairly well hidden. You could easily miss it while running around the map. See the picture below for its location at B.

| 3: Give snake to boy (TOP OPTION) |
When you are about to catch it, a poor child shows up. He's from a family that runs a tea house and he's looking for the snake in the hopes it will bring good fortune to his family. Right after that, a rich merchant shows up, also looking for the snake. Both the boy and merchant ask Kiryu to give them the snake. You now choose the one to whom you will give the snake. Select the TOP OPTION to give the snake to the boy.
| 4: Fight merchant |
The merchant is not happy you aren't giving him the snake and summons a couple of followers to fight you. As well as the two followers, you also fight the merchant. All 3 enemies are brawler types (though one follower is holding a wooden box weapon). None of them are a threat and have very little health, so just kick their asses.
After the fight, the merchant runs off. The boy thanks Kiryu for letting him have the snake. The request ends here with the COMPLETE result and you also receive 1500 EXP as a reward.
| 5: Speak to employee |
E - Even though the substory is over, there is one more thing you can do post-completion. Go to the tea house at this location and speak to the employee. She thanks Kiryu for helping the boy with the snake and rewards him with a Tri-Colour Dango. If you don't care about the dango you don't have to do this step.
| ALTERNATE ENDINGS |
In Step 3, if you give the snake to the merchant (BOTTOM OPTION), he thanks Kiryu by giving him 3x Manju and 3x Yaki Dango. The request ends here with the FINISHED result, but you still get the 1500 EXP reward. Also, you obviously don't go to Step 4 (fight the merchant) if you take this option.
NOTEThere is a massive bug in this substory. Even if you give the snake to the rich merchant, if you go to the tea house and speak to the employee after the request ends, it plays out as if you did give the boy the snake. The woman still thanks you for helping the boy with the snake situation and will give you a Tri-Colour Dango. You even see the boy with the snake, even though he didn't get it!
That's not all - if you do this extra step after getting the FINISHED result by giving the snake to the old man, the request result CHANGES TO THE COMPLETE RESULT! So, you could argue the best way to do this substory is to give the snake to the merchant so you can get all those extra items (and avoid a fight which is basically a waste of time), then go on to get the extra dango reward, which in turn changes the request outcome to the COMPLETE result.

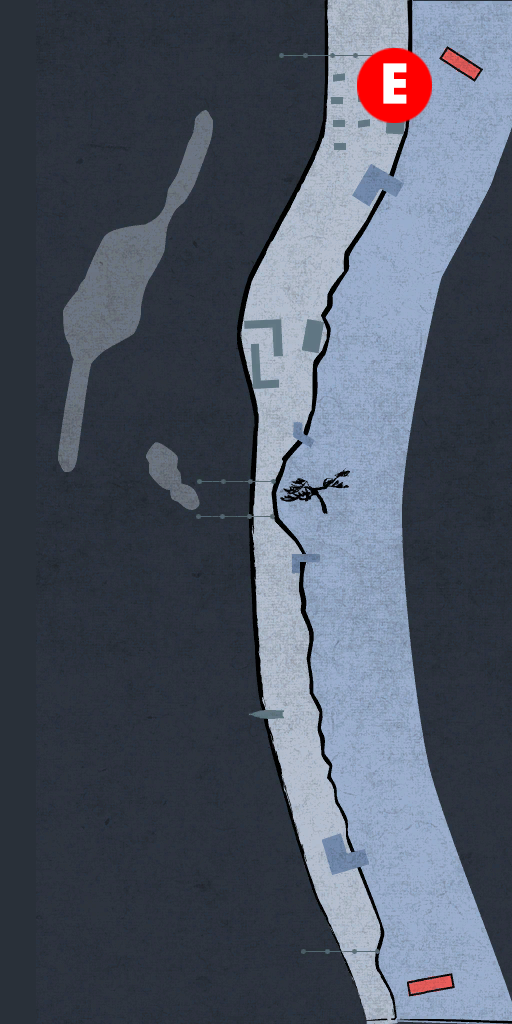
| 50 | The Enthusiastic Merchant Tanaka Returns Again |
| Available At: | 7-5 |
| Time: | Day / Evening |
| Prerequisites: | Complete Request 38 |
Steps
- A - Speak to Tanaka and select the TOP OPTION
- Select the TOP OPTION
| 1: Speak to Tanaka and select the TOP OPTION |
A - Speak to Tanaka. Again, he's got some new item he wants to sell. This time, it's a "Telepathy Box". Apparently, it will allow you to understand and be understood by someone with whom you can't communicate (e.g. a foreigner who doesn't know Japanese). He's selling it for the special price of 500 Mon. Select the TOP OPTION to buy it. You receive the Telepathy Box and he also throws in a European Men's Scented Sachet.
| 2: Select the TOP OPTION |
Immediately after buying the box, a foreigner shows up. Kiryu has no idea what he is saying. Select the TOP OPTION to use the telepathy box. Somehow, the box explodes. But the foreigner seems to be happy and gives Kiryu a Portuguese Hand Mirror.
After the foreigner leaves, a restaurant chef shows up and tells Kiryu that foreigner ate at his restaurant and seemed to get a bone stuck in his throat. It seems the explosion from Kiryu's box shocked the foreigner enough to dislodge the bone. After this, the request ends with the COMPLETE result and you also receive 10000 EXP as a reward.
| ALTERNATE ENDINGS |
In Step 2, if you don't use the box, the foreigner just walks off. The request ends there with the FINISHED result. You don't get the hand mirror item, but you still get the 10000 EXP reward.
| 51 | Temple School Homework - Abacus |
| Available At: | 7-5 |
| Time: | Day / Evening |
| Prerequisites: | Complete Request 46 |
Steps
- A - Speak to Mametaro and select the TOP OPTION
- Select, in order: BOTTOM OPTION - MIDDLE OPTION - TOP OPTION
| 1: Speak to Mametaro and select the TOP OPTION |
A - Speak to Mametaro. He needs help with his homework again. This time, it's maths-related. Select the TOP OPTION to help him.
| 2: Select, in order: BOTTOM OPTION - MIDDLE OPTION - TOP OPTION |
For the first question, select the BOTTOM OPTION. For the second question, select the MIDDLE OPTION. For the final question, select the TOP OPTION.
After helping him with the questions, the request ends with the COMPLETE result and you also receive 1000 EXP as a reward.
NOTEIf you get the first question wrong, it is impossible to get the COMPLETE result for request 53. You will miss out on some EXP and a valuable item, but other than that you don't lock yourself out of any future content (including the secret boss fight), so it's not a huge disaster if you mess up. If you get any/all of the other questions wrong you can still get the COMPLETE result for request 53, it's just getting the first question wrong which locks you out of that result.
| ALTERNATE ENDINGS |
In Step 2, if you get ALL of the questions wrong, the request ends with the FINISHED result. You still get 1000 EXP for finishing though. You will still get the COMPLETE result if you get one/some of the questions wrong. But as mentioned above, if you get the first question wrong, you cannot get the COMPLETE result for request 53.
| 52 | Weight of Responsibility |
| Available At: | 7-5 |
| Time: | Day / Evening / Night |
| Prerequisites: | Complete Request 51 |
Steps
- A - Speak to newspaper seller and select the TOP OPTION
- B - Speak to Shinkichi
- C - See Shinkichi
- Fight Shinkichi
- A - Speak to newspaper seller
| 1: Speak to newspaper seller and select the TOP OPTION |
A - Speak to the guy here. He's selling newspapers (or at least the Edo period equivalent). Select the TOP OPTION to buy one for 15 Mon. Kiryu reads it but it's not particularly interesting stuff. The seller mentions that another newspaper seller, called Shinkichi, has much more interesting stories in his papers. It seems he's always the first to get any incidents recorded, which is why he's so popular.
| 2: Speak to Shinkichi |
B - Speak to Shinkichi. He says he has sold out and needs to create more newspapers to sell.
| 3: See Shinkichi |
C - Go here and you'll see Shinkichi crouched down near a house. Kiryu catches him trying to start a fire and hears him planning the next big news headline covering the incident. Kiryu steps in to stop him and Shinkichi fights him.
| 4: Fight Shinkichi |
A very simple fight - he's a brawler type with very little health. Only thing worth mentioning is that you can perform the Gion Martial Arts - Bowl Crusher heat action in this battlefield. You can learn this heat action by this point in the story, so if you haven't performed it yet you could do it here.
After the fight, he comes clean. He was struggling to sell papers, so he would create incidents that would attract attention and write about them right away, before anyone else. Kiryu says he should come clean about this to everyone and he says he will confess what he has done. As an apology, he gives Kiryu a True Rainbow Stone.
| 5: Speak to newspaper seller |
A - Speak to the newspaper seller. He seems to be a lot more popular than before. He mentions that since the truth about Shinkichi came to light, his former readers have been coming to him instead. The request ends with the COMPLETE result and you also receive 1500 EXP as a reward.

| 53 | Temple School Homework - Essay |
| Available At: | 7-5 |
| Time: | Day / Evening |
| Prerequisites: | Complete Request 52 |
Steps
- A - Speak to Mametaro
| 1: Speak to Mametaro |
A - Speak to Mametaro sat here. He has written an essay and wants to read it to Kiryu. It contains some of the answers you've given to him in previous requests. When he finishes, he thanks Kiryu again for everything and gives him a Poorly-Drawn Yamata no Orochi. After he leaves, the boy's father shows up and also thanks Kiryu for everything he's done for his son. He gives Kiryu a Glass Kiseru. After this, the request ends with the COMPLETE result and you also receive 1500 EXP as a reward.
| ALTERNATE ENDINGS |
If you get the FIRST question wrong in requests 13 and/or 51, and/or the SECOND question wrong in request 45, you will finish 53 with the FINISHED result. This is because the answers you give to those questions are used in the essay Mametaro writes. You will not receive the glass kiseru or EXP, but you will still receive the Yamata no Orochi picture.
| 54 | Master and Apprentice |
| Available At: | 7-5 |
| Time: | Day / Evening |
| Prerequisites: | N/A |
Steps
- A - Speak to boy and select a dialogue option
- Select the TOP OPTION
- B - See the boy on the roof
| 1: Speak to boy and select a dialogue option |
A - Go here and a boy will speak to Kiryu. He asks Kiryu to make him his apprentice because he wants to get stronger. You get 3 dialogue options here but it doesn't matter what you pick. Kiryu tries to distract him by saying something is behind him (what that thing is depends on the dialogue choice).
| 2: Select the TOP OPTION |
The boy doesn't fall for it and again asks Kiryu to be his master. Kiryu figures if he asks him to do something crazy he'll refuse to do it and give up the issue. It doesn't matter which option you choose, but you can finish the substory quicker if you pick the TOP OPTION. So, basically, Kiryu tells the kid to kill himself. Not in those exact words, but the top option tells the kid to jump off the top of Kiyomizudera and the bottom option tells him to dive into a waterfall. He hopes this will scare the kid off, but it does not and the kid rushes off to do as his master commanded.
| 3: See the boy on the roof |
B - Go here and you'll get an interact button pop up at the top-right of the screen. Press the interaction button and Kiryu sees the boy on the roof. Kiryu gets the boy to come back down by telling him he was just testing his resolve. He can see how badly he wants to be Kiryu's apprentice so he agrees to be his master. After the boy comes down, Kiryu says they'll start training another time. Then the request ends with the COMPLETE result and you also receive 1000 EXP as a reward.
NOTEIf you selected the BOTTOM OPTION in Step 2, you'll find the boy at C. It's a longer journey to get there, which is why I said earlier that you can finish the substory quicker by selecting the TOP OPTION.

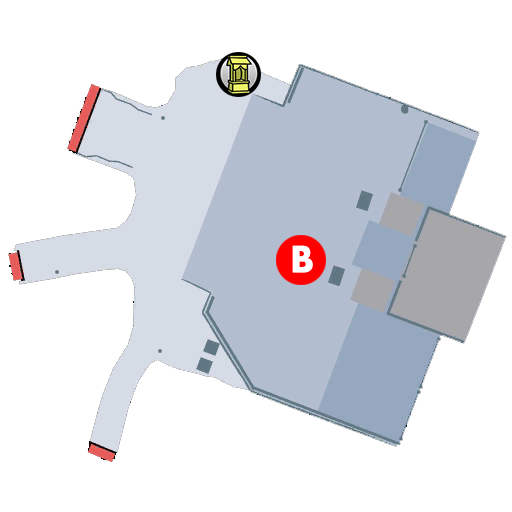
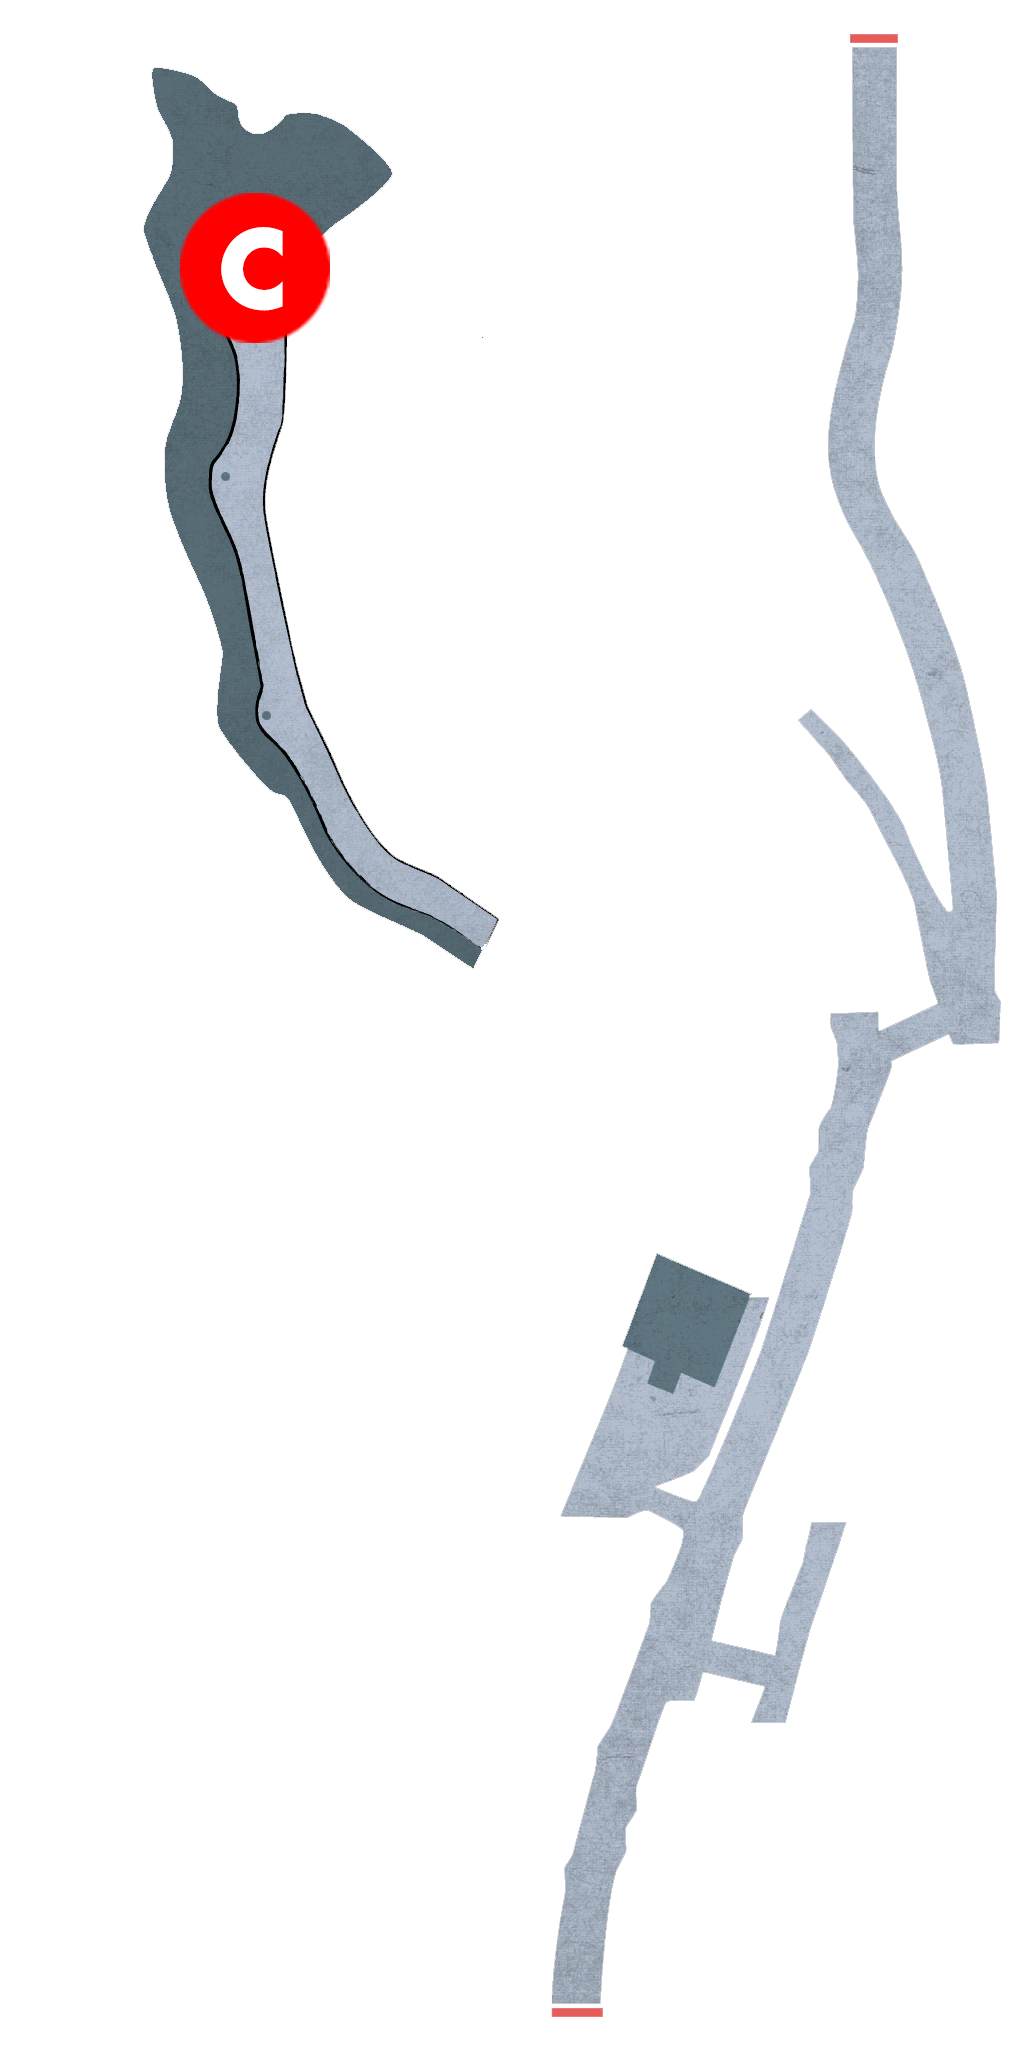
| 55 | The Flavour of Candy #3 |
| Available At: | 7-5 |
| Time: | Day / Evening |
| Prerequisites: | Complete Request 26 |
Steps
- A - Speak to girl
- B - Buy Golden Candy
- A - Speak to girl and select the BOTTOM OPTION
- A - Come back here again later, after leaving the area, and speak to the old man
- Select the TOP OPTION (x2)
| 1: Speak to girl |
A - Speak to the girl here. She says she say some boy with a special kind of candy before and wants the same one.
| 2: Buy Golden Candy |
B - Speak to the candy seller. He remembers Kiryu from before and says he'll give him a 50% discount on all his candy, as an apology. Buy the Golden Candy (now 750 Mon), like you did in request 14.
| 3: Speak to girl and select the BOTTOM OPTION |
A - Go back to the girl. Select the BOTTOM OPTION to give her candy. If you give her anything other than the Golden Candy, you'll have to go back to the candy seller again and buy the right candy, then come back and speak to the girl again.
| 4: Come back here again later, after leaving the area, and speak to the old man |
A - After giving the girl the candy, leave the area and come back. Try entering Gion, then coming back again and he should be back.
| 5: Select the TOP OPTION (x2) |
The old man asks if you are the one who gave candy to his grandchild. Select the TOP OPTION to say yes. He then asks if you'll tell him where he can buy candy like that, so he can get some for his grandchild himself. Select the TOP OPTION again to tell him. He thanks Kiryu and gives him 5 Ryo as a reward. After this, the request ends with the COMPLETE result and you also receive 10000 EXP as a reward.
| ALTERNATE ENDINGS |
In Step 5, if you select the BOTTOM OPTION either the first or second time, the request ends with the FINISHED result and you get absolutely nothing as a reward.

| 56 | Blacksmith Turmoil |
| Available At: | 7-5 |
| Time: | Day / Evening / Night |
| Prerequisites: | Complete Request 40 |
Steps
- A - Listen to the conversation in the smithy
- A - Leave the smithy, then re-enter
- Fight thugs
- Fight brigands
NOTEDue to a bug with substory 66, you might prefer to skip this request when it first becomes available in 7-5 (if you are playing the main story) and instead do it in 7-6. Please see the note on request 66 for details.
| 1: Listen to the conversation in the smithy |
A - Go into the smithy and head to the back area to trigger an event involving the blacksmith. Some guy wants to buy the smithy from the blacksmith, but he refuses to sell.
| 2: Leave the smithy, then re-enter |
A - After witnessing the event, leave the smithy and re-enter to trigger another event. Some thugs are in there accusing the blacksmith of selling them bad-quality swords. They say they'll forgive him if he pays them 100 Ryo. Kiryu steps in to help the blacksmith and fights the 3 guys.
| 3: Fight thugs |
You are up against a martial arts expert type, a martial artist type, and a swordsman type. They aren't much of a threat to you, but watch out for the martial arts expert's countering abilities. The battlefield is also quite confined so you might struggle to create space for yourself.
NOTEThis request is the only opportunity in the game to perform the Bellows Mastery heat action! If you're going for 100% completion, make sure you do not miss your opportunity to perform this. Grab an enemy and go near the fire. If you want to perform the heat action, you must do so either in this fight against the 3 thugs, or the next fight against the 2 brigands.
| 4: Fight brigands |
After the fight, we learn that these guys were sent by the merchant from earlier who tried to buy the smithy from the blacksmith. The guy brings out another two guys to fight you. Even though they are called "brigands", their enemy type is swordsman rather than brigand. This is easier than the previous fight, since you don't have to worry about the martial artists. But remember - this is your very last chance to perform the Bellows Mastery heat action. Do that now if you didn't manage it in the previous fight (unless you don't care about completing all the heat actions, of course).
After the fight, Kiryu demands that the guy pays the blacksmith money to cover repairs that are needed after his men wrecked the place. Then, Kiryu tells him to leave and never return. The blacksmith thanks Kiryu for his help, giving him the Yamimaro Manuscript 1 weapon recipe book. After this, the request ends with the COMPLETE result and you also receive 1500 EXP as a reward.

| 57 | The Painter |
| Available At: | 7-5 |
| Time: | Day / Evening |
| Prerequisites: | N/A |
Steps
- A - Speak to Ranzan and select the TOP OPTION
- Select the TOP OPTION
- Fight Ranzan
- Select the TOP OPTION
| 1: Speak to Ranzan and select the TOP OPTION |
A - Speak to the man standing here. His name is Ranzan and he is a painter who specialises in pictures of warriors. He is impressed with Kiryu's body and asks if he will allow him to paint him. Select the TOP OPTION to accept.
| 2: Select the TOP OPTION |
Inside his studio, he asks Kiryu to strip down to his underwear. Select the TOP OPTION to agree. He likes what he sees, then asks Kiryu to remove his underwear as well. Kiryu says that's not happening. So, Ranzan says he will get them off by force.
If you select the BOTTOM OPTION the dialogue keeps looping back to the dialogue options until you select the TOP OPTION.
| 3: Fight Ranzan |
Ranzan is the martial arts expert type, so watch out for his counters. You have to fight him using the brawler style and there are no weapons on the ground, but he doesn't have much health so it shouldn't be a problem. Just spam the kick attack.
| 4: Select the TOP OPTION |
After the fight, Ranzan offers one of his paintings as an apology, saying Kiryu could sell it for money. Select the TOP OPTION picture. You get taken back to the place where you triggered the substory (A), then the request ends with the COMPLETE result and you also receive 1000 EXP as a reward.
NOTEThe outcome will always be COMPLETE regardless of which option you select. The TOP OPTION and MIDDLE OPTION pictures can be sold for 1 Ryo. However, the BOTTOM OPTION picture can only be sold for 1 Mon.

| 58 | Cat Hunt |
| Available At: | 7-5 |
| Time: | Day / Evening |
| Prerequisites: | Complete Request 47 |
Steps
- A - Speak to man and select the TOP OPTION
- Select the TOP OPTION
- B - Catch cat
- C - Catch cats
NOTEYou might want to save before triggering this substory. If you follow this guide you shouldn't have anything to worry about, but there is a time limit on this and failing this substory prevents you from being able to complete request 59
| 1: Speak to man and select the TOP OPTION |
A - Speak to the man here with the cats. He introduces himself as Tsuchiura Keibun. He says if Kiryu likes cats, he's got a job for him to do and he'll pay Kiryu for his trouble. Select the TOP OPTION to agree.
| 2: Select the TOP OPTION |
He tells Kiryu some of his cats have gone missing and needs help to find them. He says his cats go mad for catnip, so he gives Kiryu some to use to catch them when he finds them. However, he warns Kiryu that the effect wears off after a little time, so he'll need to find all the cats before that happens. He says he'll pay Kiryu a fee for each cat he brings back. Select the TOP OPTION to say you understand (he'll just repeat everything again if you select the BOTTOM OPTION).
NOTEYou now have 2 minutes to catch the cats.
| 3: Catch cat |
B - Interact with the cat here. Kiryu will take it back to Tsuchiura. After this, the rest of the cats will spawn.
| 4: Catch cats |
C - You can catch the remaining 4 cats in any order you like. You automatically transport back to Tsuchiura each time you catch a cat. Also, each time you bring back a cat you get a dialogue option. Select the TOP OPTION to continue catching cats and the BOTTOM OPTION to stop. If you don't care about the extra money and want to get this over with, you may as well stop here since besides the amount of money you receive, nothing else changes. In fact, you don't even have to catch the second cat - speak to him after catching the first one and you can end it.
After catching all 5 cats (or if you stop after the 1st-4th cat), Tsuchiura pays Kiryu 5000 Mon per cat. So, the maximum you'll receive is 2 Ryo 5000 Mon. After that, the request ends with the COMPLETE result and you also receive 10000 EXP as a reward.
| ALTERNATE ENDINGS |
If you fail to catch a single cat before time runs out, the request ends with the FINISHED result. You don't get any money but you do still get the 10000 EXP reward. Also, you will be locked out of the COMPLETE result for request 59 if you get this result. In fact, you will not be able to trigger that request at all. However, it automatically triggers the FINISHED result for that request, so you still don't get locked out of any future substories (including Amon).

| 59 | Cat Koban |
| Available At: | 7-5 |
| Time: | Day / Evening |
| Prerequisites: | Complete Request 58 |
Steps
- A - Speak to girl
- Select, in order: TOP OPTION - TOP OPTION - TOP OPTION - TOP OPTION - MIDDLE OPTION - TOP OPTION
- Speak to Tsuchiura and select the BOTTOM OPTION (x2)
- Fight Tsuchiura Keibun
| 1: Speak to girl |
A - Speak to the girl on the bridge. It seems her cat has gone missing. It's a calico cat called Tama and has a collar made from the same fabric as the obi she is wearing. She asks Kiryu if he has seen it.
| 2: Select, in order: TOP OPTION - TOP OPTION - TOP OPTION - TOP OPTION - MIDDLE OPTION - TOP OPTION |
Select the TOP OPTION to say you've seen the cat. She asks if he remembers where he saw it. Select the TOP OPTION to say you remember. Kiryu tells her about the guy who asked him to catch cats. She asks if this man had a strange way of speaking - using cat sounds in his speech. Select the TOP OPTION to say yes. She says her cat might already be dead. She asks Kiryu if he knows what materials are used to make a shamisen. Select the TOP OPTION to say yes. Then select the MIDDLE OPTION to say cat skin is used. She asks Kiryu if he'll help her get her cat back, if it's still alive. Select the TOP OPTION to say you'll get it back. She mentions that Tsuchiura is often seen on River Road.
If you select the BOTTOM OPTION for any of the first 3 choices, the substory gets put on hold. Speak to the girl again to continue. If you select the BOTTOM OPTION for the 4th choice, she just explains it in the dialogue rather than Kiryu. Finally, if you select the BOTTOM OPTION twice on the last choice, it again puts the substory on hold. If you speak to her again, you only get this final dialogue option again and don't have to go through the entire conversation again.
| 3: Speak to Tsuchiura and select the BOTTOM OPTION (x2) |
B - You'll find Tsuchiura sat down at the cafe. Kiryu says he knows his game and demands that he gives back the cat that belongs to that girl he spoke to. Tsuchiura says all the cat is his and asks if Kiryu has proof that the cat isn't his. Select the BOTTOM OPTION to talk about the cat's collar. He finally admits the cat isn't his and he's just collecting cats to use their skin to make shamisen. He says if he gives back the cat he loses out on a lot of money, so says if Kiryu is willing to compensate him he'll give him the cat. Select the BOTTOM OPTION to refuse to pay. He then brings out 3 of his followers to fight Kiryu.
For the first dialogue choice, if you select the TOP OPTION or MIDDLE OPTION, the dialogue ends and the request is on hold - speak to him again to continue. For the second dialogue choice, if you select the MIDDLE OPTION, Kiryu attempts to haggle the price but Tsuchiura refuses to drop the price, then you get 2 dialogue options (pay or refuse). Selecting the TOP OPTION to pay changes the substory outcome (see below for details).
| 4: Fight Tsuchiura Keibun |
You are up against 4 enemies - 3 brawler types and a martial artist. They are all pretty weak so this should be a quick and simple fight. One notable feature of this fight is that there are 3 environmental heat actions you can perform here: Gion Martial Arts - Bowl Crusher on the cafe tables. Secret Sword - Swallow's Dance from the top of the stairs on an enemy below you. Stair Mastery at the top of the stairs, when you grab an enemy up there.
After the fight, he'll give Kiryu the cat and then you automatically transport back to the girl on the bridge. She thanks Kiryu and gives him Dried Mackerel. After that, the request ends with the COMPLETE result and you also receive 1500 EXP as a reward.
| ALTERNATE ENDINGS |
In Step 3, if you select the TOP OPTION (in the second dialogue choice) to pay him 5 Ryo, Kiryu takes the cat without a fight and gives it back to the girl. You still get the Dried Mackerel item and the 1500 EXP reward, however you only get the FINISHED result in this version. This doesn't affect any future substories, so it's not a problem.
If you got the FINISHED result in request 58 you cannot trigger this substory (the girl won't spawn). Instead, you automatically get the FINISHED result for this request along with 58, so you don't get locked out of any future substories (including Amon).

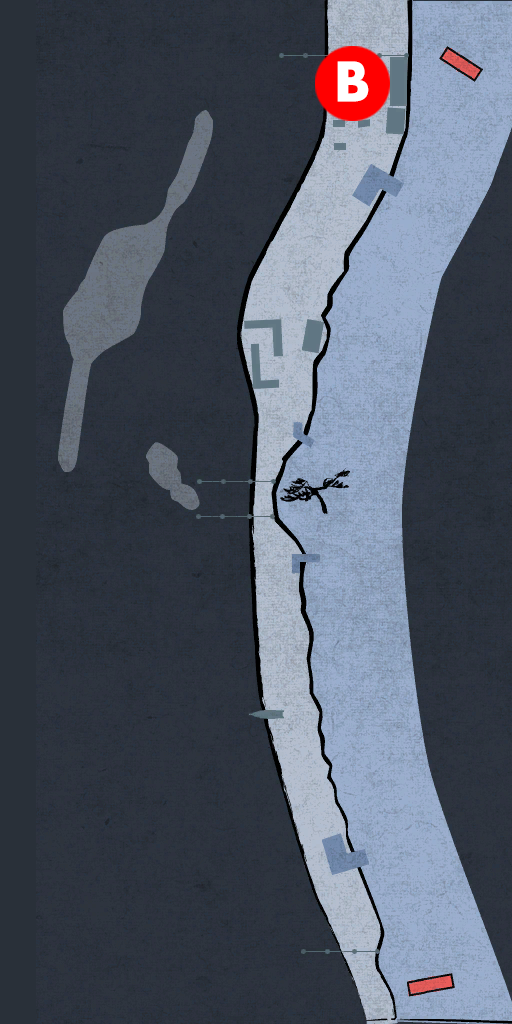
| 60 | Mysterious Piece of Paper |
| Available At: | 7-5 |
| Time: | Day / Evening |
| Prerequisites: | N/A |
Steps
- A - Listen to the conversation in the bar
- B - Speak to thief and select the TOP OPTION
- C - Interact with area near where the chain used to be
- Fight thieves
| 1: Listen to the conversation in the bar |
A - Go inside the pub and interact with the thieves around the table at the back. The 3 of them have been having some fun in Gion, which apparently cost them quite a bit. One moans that their boss, Shishido, doesn't pay them much, which is why it seems like they didn't have enough money to spend with the yujo. He says he found a very old piece of paper while he was cleaning out Shishido's room, but he can't read so he has no idea what it says. One of the others says he can read, so he looks at it. Seems to be some kind of riddle and they don't understand what it means. One of them remembers hearing some rumour about a commander long ago who buried a treasure in the cave. They wonder if this old paper is supposed to be a hint as to where it is buried.
After hearing all this, speak to them again. They recognise Kiryu as the guy who defeated Shishido. Then they tell him about the paper and how they think it might be a hint pointing towards a buried treasure. The hint is nonsensical, but when read "correctly" (as we see later in the substory) it makes sense. After this short conversation, they leave.
| 2: Speak to thief and select the TOP OPTION |
B - Go here and you'll see one of the thieves from the bar. Speak to him and he asks if Kiryu has worked out the riddle. Select the TOP OPTION to enter the cave.
| 3: Interact with area near where the chain used to be |
C - When you were here during the main story, you broke a chain to open the gate. Go to where the chain used to be and interact with the area. Kiryu starts piecing things together. Kiryu realises the last part, "Skipping is one character", probably means the reader is supposed to skip every other character in the message. When he does this, the hint is no longer nonsensical, but it says: "Under the chain that binds heaven and earth". Kiryu realises the treasure is probably buried here, under where this chain was. Kiryu digs and discovers a money box. But then the thieves show up. They say they knew Kiryu would work out the secret behind the note, so they've been following him. Now they want to take it for themselves.
| 4: Fight thieves |
You are against 2 archers, 2 brawlers, and a brigand type. None of them have much health so this should be simple. Personally, I'd try taking out the archers first because they love to stun you with their arrows.
After the fight, the say Kiryu can have the treasure, but they are really curious about what's inside, so they ask if they can take a look before they leave. Inside is Shishido's eyepatch. They realise the note must have been written by Shishido. This eyepatch is probably a valuable treasure to him, but is worthless to anyone else. Kiryu receives Shishido's Eyepatch. After this, Kiryu leaves the cave and the request ends with the COMPLETE result. You don't get any EXP for completing this substory.


| 112 | Judgment |
| Available At: | 7-5 |
| Time: | Day / Evening / Night |
| Prerequisites: | Complete Commission 107 |
Steps
- A - Read letter at Kiryu's house
- B - Speak to liquor store owner
- C - Enter debter's house, speak to man and select the BOTTOM OPTION
- Examine the plate in the house and select the TOP OPTION (x2), then the BOTTOM OPTION
- D - Speak to Koetsu and ask him to value the items
- B - Speak to liquor store owner
NOTEIf you are following this guide and completing these as they become available during the main story, I recommend completing all other available substories at this point, including commission 113. This is because commission 112 will progress the main story. Even if you do progress the story, you can still complete the other substories available at this point, so you can disregard this warning if you like. But if you prefer to complete everything before moving on, then this substory must be completed last at this point in the story.
| 1: Read letter at Kiryu's house |
A - Examine the letters in Kiryu's house. The highlighted letter below is the trigger for this commission.

The letter is a commission for work from the owner of the Gion liquor store. It seems there is a man who has built up a debt and won't pay.
| 2: Speak to liquor store owner |
B - Speak to the woman in the liquor store. She is the owner and talks a bit more about the commission. Some guy has built up a 3 Ryo debt and wants Kiryu to collect it.
| 3: Enter debter's house, speak to man and select the BOTTOM OPTION |
C - Enter the house here. Inside is a man. Speak to him and Kiryu confronts him about the debt. He says he's got no money, so Kiryu should just leave. Select the BOTTOM OPTION to refuse to leave.
If you select the TOP OPTION you leave the house. You can go back in again to continue the substory when you're ready.
| 4: Examine the plate in the house and select the TOP OPTION (x2), then the BOTTOM OPTION |
Examine the plate in the corner of the room (see below)
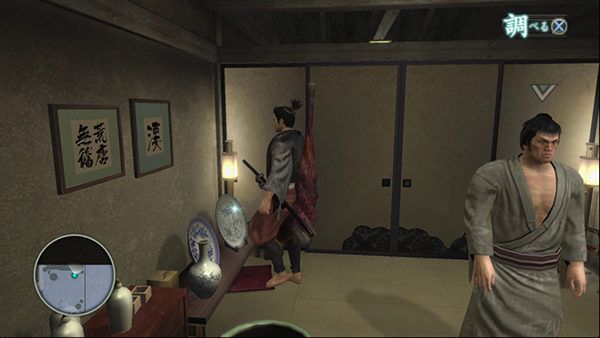
Select the TOP OPTION twice to confirm you want the plate. Then select the BOTTOM OPTION to take the pot and hanging scroll instead of the plate. After this you automatically leave the house.
NOTEIf you are following the main story guide, doing the next step of this substory will progress the story to 7-6. When you regain control after the cutscene inside Koetsu's mansion finishes, go back inside again to continue this substory
| 5: Speak to Koetsu and ask him to value the items |
D - Enter the mansion and speak to Koetsu. Kiryu asks him about the items he's got. He shows Koetsu the scroll, who decides to buy it off Kiryu for 2 Ryo. Kiryu then shows him the pot. Koetsu is particularly impressed with this item and buys it off Kiryu for 10 Ryo.
| 6: Speak to liquor store owner |
B - Speak to the owner again. She asks about the debt and says it's okay if Kiryu just gives her 1 Ryo of the money that guy owed (so Kiryu can have the rest as payment). Kiryu gives her 1 Ryo. After this, the commission ends and you also receive 1500 EXP as a reward.
| ALTERNATE ENDINGS |
In Step 4, the item you end up taking determines what you get from Koetsu. You will always receive the 1500 EXP reward in the end, but if you didn't get at least 1 Ryo from the item you take from the debter, the outstanding amount comes out of your pocket.
If you chose to take the pot (by examining the pot directly - not via the method outlined above, by first looking at the plate and taking the pot and scroll in the end), you get 10 Ryo from Koetsu.
If you take the hanging scroll (again, not via the plate first), you get 2 Ryo from Koetsu.
If you take the sword, you get 500 Mon from Koetsu.
The plate is worthless, so if you take that with you (by selecting the TOP OPTION in the third dialogue choice in Step 4, to take the plate instead of the pot and scroll) you get nothing from Koetsu.


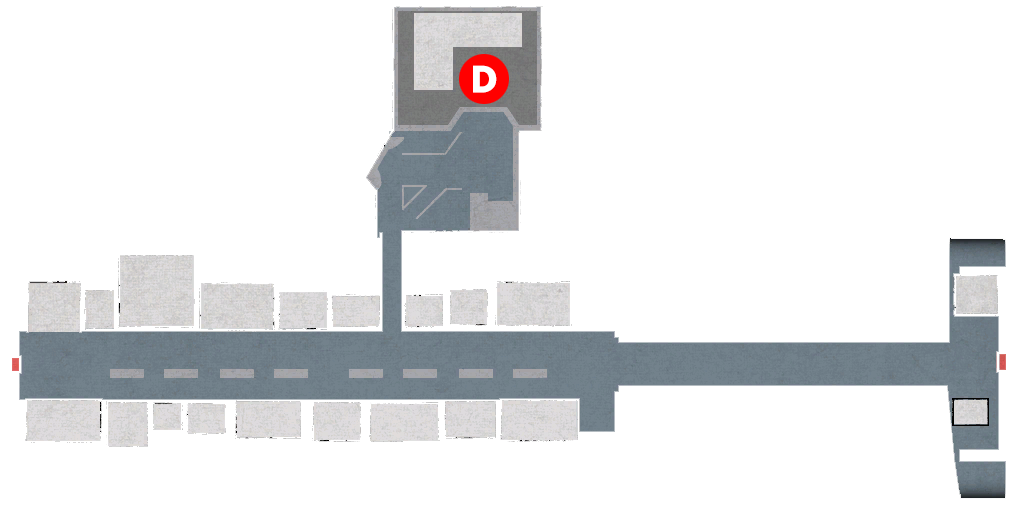
| 113 | The Shadow Star |
| Available At: | 7-5 |
| Time: | Day / Evening / Night |
| Prerequisites: | Complete Commission 111 |
Steps
- A - Read letter at Kiryu's house
- B - Speak to Kamuro in liquor store and select the TOP OPTION
- C - Speak to man and select the BOTTOM OPTION
- A - Read letter at Kiryu's house
- B - Speak to Kamuro in liquor store and select the BOTTOM OPTION
- C - Speak to man and select the BOTTOM OPTION
- A - Read letter at Kiryu's house
- B - Speak to Kamuro in liquor store
- C - Speak to man
- A - Read letter at Kiryu's house
| 1: Read letter at Kiryu's house |
A - Examine the letters in Kiryu's house. The highlighted letter below is the trigger for this commission.

The letter is a commission for work from a Kamuro. Apparently the number 1 client of the yujo she serves hasn't been showing up recently and the kamuro wants Kiryu to help.
NOTEThere are a lot of dialogue options in this substory, but nothing you say has any effect on the outcome or reward. They only provide alternative dialogue in the conversations. The options provided below are the ones suggested by the official guide, so I've used them here as well, but I wouldn't worry too much about what you say.
| 2: Speak to Kamuro in liquor store and select the TOP OPTION |
B - When you enter the liquor store after reading the letter, the kamuro (called Tsubaki) will automatically speak to you. Kiryu says he'll do the job, then he asks her some questions about this guy. The backstory is that he asked the yujo about what kind of men she likes. She said she's into strong samurai. The man, being a merchant and no fighter, took this the wrong way. She says she'll send 3 letters to him in the hopes that he'll come back, but if he still doesn't return she'll give up. Kiryu asks to check out this first letter before they send it to him. In it, she explains that the whole samurai thing was supposed to be a joke - she didn't mean it. Tsubaki asks what changes Kiryu would make. Select the TOP OPTION to suggest adding in something like the yujo was embarrassed to tell the truth so she lied.
| 3: Speak to man and select the BOTTOM OPTION |
C - Speak to the man sat on the steps here. It's the merchant who hasn't been coming to see the yujo. He received the letter from the yujo that Kiryu helped rewrite. He mentions that she says she really likes him and was embarrassed to say it so she lied. He wonders if it's true. Select the BOTTOM OPTION to say you think it is.
| 4: Read letter at Kiryu's house |
A - Return to Kiryu's house and look at the letters. There is a new one from the kamuro. Read it to learn that the man still has not returned. She asks Kiryu to help with the second letter.
| 5: Speak to Kamuro in liquor store and select the BOTTOM OPTION |
B - Like before, when you enter the liquor store Tsubaki will automatically speak to Kiryu. In the second letter, the yujo is asking the man to come and save her or she'll be downgraded (made a lower rank of yujo). Apparently the logic is that when someone they love is in danger, men will jump in to save them. Select the BOTTOM OPTION to say the letter comes across more like she needs him to come back because she needs the money rather than because she's genuinely in trouble. Tsubaki says she'll rewrite it with that in mind.
| 6: Speak to man and select the BOTTOM OPTION |
C - Speak to the man again. He says he got another letter from the yujo. This time she says she misses him so much that she can't concentrate on her work. He wonders if this is true. Select the BOTTOM OPTION to say you think it is.
| 7: Read letter at Kiryu's house |
A - Return to Kiryu's house and look at the letters. There is a new one from the kamuro. Read it to learn that the man still has not returned. She asks Kiryu to help with the final letter.
| 8: Speak to Kamuro in liquor store |
B - Like before, when you enter the liquor store Tsubaki will automatically speak to Kiryu. This time, the kamuro has no letter ready to send. This is the last chance and she's not sure what to do. Kiryu asks her what she would say if she were in her yujo's position. She says she wouldn't want to fight over something so small and never see him again. Kiryu encourages her to write like that - just be straightforward.
| 9: Speak to man |
C - Speak to the man on the steps again. He says he got another letter but this one really made him want to go back and see her again.
| 10: Read letter at Kiryu's house |
A - Return to Kiryu's house and look at the letters. There is a new one from the kamuro. Read it to learn that the man has finally returned. Tsubaki thanks Kiryu for his help, saying she's attached his reward in the envelope. You receive a Edo Women's Sachet. After exiting out of the letter menu and back into the game, the commission ends and you also receive 1500 EXP as a reward.
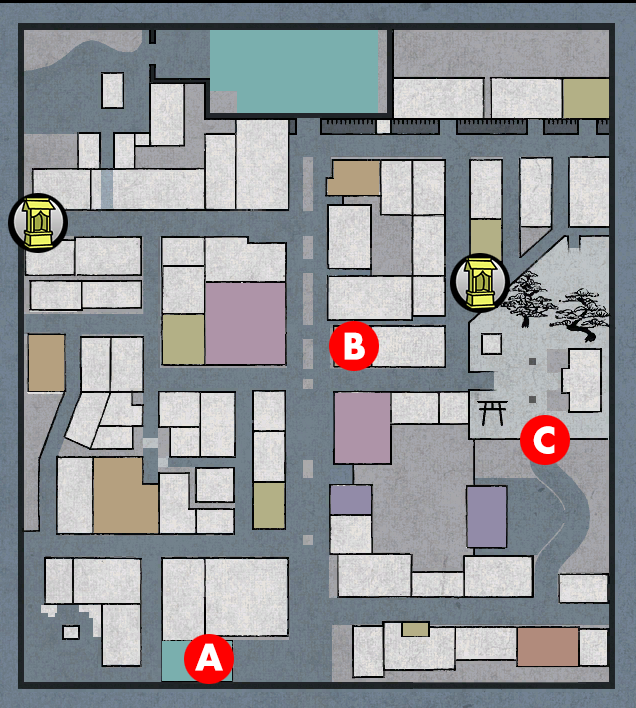
| 125 | Hikozaemon the Blade |
| Available At: | 7-5 |
| Time: | Day |
| Prerequisites: | N/A |
Steps
- See Hikozaemon's poster on the notice board
- A - At noon, speak to Hikozaemon
- Fight Hikozaemon
| 1: See Hikozaemon's poster on the notice board |
Examine the notice board by the police box in Rakugai and see Hikozaemon's poster.
| 2: At noon, speak to Hikozaemon |
A - Speak to Hikozaemon. When you get near him Kiryu will recognise him. Obviously, he's not going to just let Kiryu take him in, so a fight begins.
| 3: Fight Hikozaemon |
Like many other of the bounty enemies, this guy is the Boss enemy type, so he's immune to some heat actions. He has quite a lot of health and fights and moves like a ninja type (including the use of smoke bombs), so he's pretty tough. The guy also uses a fire breath attack which will knock Kiryu to the ground if it hits.
After beating him, an official shows up and confirms it is Hikozaemon. He gives Kiryu the 1 Ryo reward. The bounty ends and you receive 1500 EXP as a reward.

| 61 | Chili Pepper Seller’s Ingredient Collection |
| Available At: | 7-6 |
| Time: | Day / Evening / Night |
| Prerequisites: | Complete Request 49 |
Steps
- A - Speak to Chili Pepper Girl's Father
- Hand over ingredients (see table below)
| 1: Speak to Chili Pepper Girl's Father |
A - Speak to the Chili Pepper Girl's Father. He thanks Kiryu again for his help before and talks about wanting to make a new seasoning using chili peppers. He asks Kiryu if he'll help him gather various ingredients he can use to create this new flavour.
| 2: Hand over ingredients (see table below) |
See table below for the ingredients you need to complete this request. Speak to the Chili Pepper Girl's Father (if you speak to the girl, you can buy Chili Pepper Wet Cloths and Chili Peppers, but can't do anything for the substory here). Speak to the father and select the TOP OPTION. Hand over one of the ingredients listed in the table.
NOTEHe will not accept the same item more than once. You do have to give him one of each item.
After handing over 2 ingredients, he gives you the 3-Pepper item. After giving him 4, he'll give you the 5-Pepper item. Finally, after giving him 6 items, he'll give you the 7-Pepper item. He thanks Kiryu for his help. The request ends with the COMPLETE result and you also receive 10000 EXP as a reward.
Required Ingredients
| Item | Where to buy | Price |
|---|---|---|
| Shisho | Ecchuya | 10 Mon |
| Pepper | Ecchuya | 20 Mon |
| Ginger | Ecchuya | 25 Mon |
| Sesame | Ecchuya | 30 Mon |
| Nori | Turtle Seller | 40 Mon |
| Mandarin | Arigataya (Rakugai) | 10 Mon |
| 62 | Udon Spice |
| Available At: | 7-6 |
| Time: | Day / Evening / Night |
| Prerequisites: | Complete Request 49 |
Steps
- A - Speak to udon restaurant employee and select the BOTTOM OPTION
- Hand over the 3-Pepper, 5-Pepper, and 7-Pepper items
- B - Speak to Chili Pepper Girl's Father
- C - Speak to the udon restaurant employee
| 1: Speak to udon restaurant employee and select the BOTTOM OPTION |
A - Speak to the man standing around in the restaurant (not the guy standing behind the counter). He's worried about the fact they haven't been getting many customers lately and wonders what they should do. Select the BOTTOM OPTION to suggest using new spices.
Nothing happens when you select the other two options. Just a brief bit of dialogue from the employee then you regain control. When you speak to him again you get the same 3 options..
| 2: Hand over the 3-Pepper, 5-Pepper, and 7-Pepper items |
He asks if you have anything they can try. Select the TOP OPTION to give him something. You now need to give him the 3 items you receive by completing request 61. This means you cannot go any further until you complete that request. Each time you give him an item, speak to the employee again and select the TOP OPTION to give him another.
When you give him the 3-Pepper item, you receive 33 Mon as a reward. For the 5-Pepper item, you receive 555 Mon. For the 7-Pepper item, you receive 7777 Mon. In total, you'll end up with 8365 Mon after giving him all 3 items.
NOTEYou actually only need to give him the 7-Pepper item to complete the request, so if you just want to get through the substory quickly skip the 3 and 5-Pepper items and just give him the 7-Pepper item. You obviously miss out on the extra money if you do this, but you barely get anything for those anyway.
| 3: Speak to Chili Pepper Girl's Father |
B - After giving the 7-Pepper item to the employee, he talks about how it was a massive success and would love to speak with the guy who made it. Speak to the Chili Pepper Girl's Father. Kiryu tells him about the udon restaurant using his spice and the father rushes off to the restaurant.
| 4: Speak to the udon restaurant employee |
C - You'll see the Chili Pepper Girl and her Father, along with the udon restaurant employee, standing outside the restaurant. Speak to the employee and he thanks Kiryu for sending the chili pepper guy over here. He thanks Kiryu by giving him a Copper Plate. After this, the request ends with the COMPLETE result and you receive 1500 EXP as a reward.

| 63 | The Monk's Secret |
| Available At: | 7-6 |
| Time: | Day / Evening / Night |
| Prerequisites: | Complete Request 27 |
Steps
- A - Go near monk and select the TOP OPTION
- B - Speak to the thief
- C - Speak to the thief
- D - Speak to the thief
- Fight thief
- A - Speak to the monk
| 1: Go near monk and select the TOP OPTION |
A - Go here and you'll see a monk being bumped by some guy. The monk says that guy stole something from him and asks Kiryu if he'll help get it back. Select the TOP OPTION to agree to help.
| 2: Speak to the thief |
B - Speak to the thief (in black) here. He's literally just chilling there, so he'll be easy to spot. Kiryu confronts him about the thing he took, then he runs off.
| 3: Speak to the thief |
C - Speak to the thief sat at a table here. He's sat just outside the shogi parlour. Kiryu confronts him again and he runs off again.
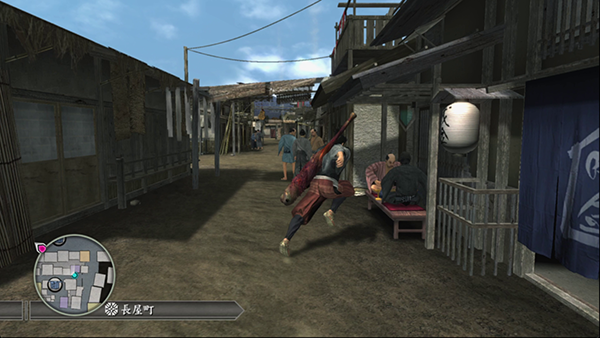
| 4: Speak to the thief |
D - Speak to the thief again. He's hiding between a couple of buildings. Kiryu demands the thief give back what he stole. The thief decides to fight for it instead of give it up.

| 5: Fight thief |
This guy is a brawler type with very little health, so this will be a very simple fight. You can perform the Gion Martial Arts - Bowl Crusher heat action in this area, if you want to one-shot him with that attack.
After the fight, you get the monk's package back and the thief runs off.
| 6: Speak to the monk |
A - Speak to the monk. Kiryu gives him the package. The monk thanks Kiryu by giving him a Hermit Stone. After this the request ends with the COMPLETE result and you also receive 1500 EXP as a reward.

| 64 | Sujitaro 2 |
| Available At: | 7-6 |
| Time: | Day / Evening / Night |
| Prerequisites: | Complete Request 59 |
Steps
- A - Speak to Kumagoro and select the TOP OPTION
- Fight Kumagoro
- Walk away
| 1: Speak to Kumagoro and select the TOP OPTION |
A - Go near the guy on the bridge (Kumagoro). He says no one is allowed to pass him. Select the TOP OPTION to tell him you're gonna pass anyway. This leads to a fight with him.
| 2: Fight Kumagoro |
He is a brigand type, so he's armed with a sword. His health is slightly higher than most enemies you've encountered in requests, but he still shouldn't be a problem.
| 3: Walk away |
After the fight, walk away from him. It doesn't matter if you walk past him or turn around and walk away. But when you get a certain distance away from him, he will try to attack Kiryu from behind. But Sujitaro (from request 39) jumps in to stop him. After a brief chat, with Kiryu thanking him for his help, Sujitaro heads back to town. The request ends with the COMPLETE result and you also receive 1000 EXP as a reward.
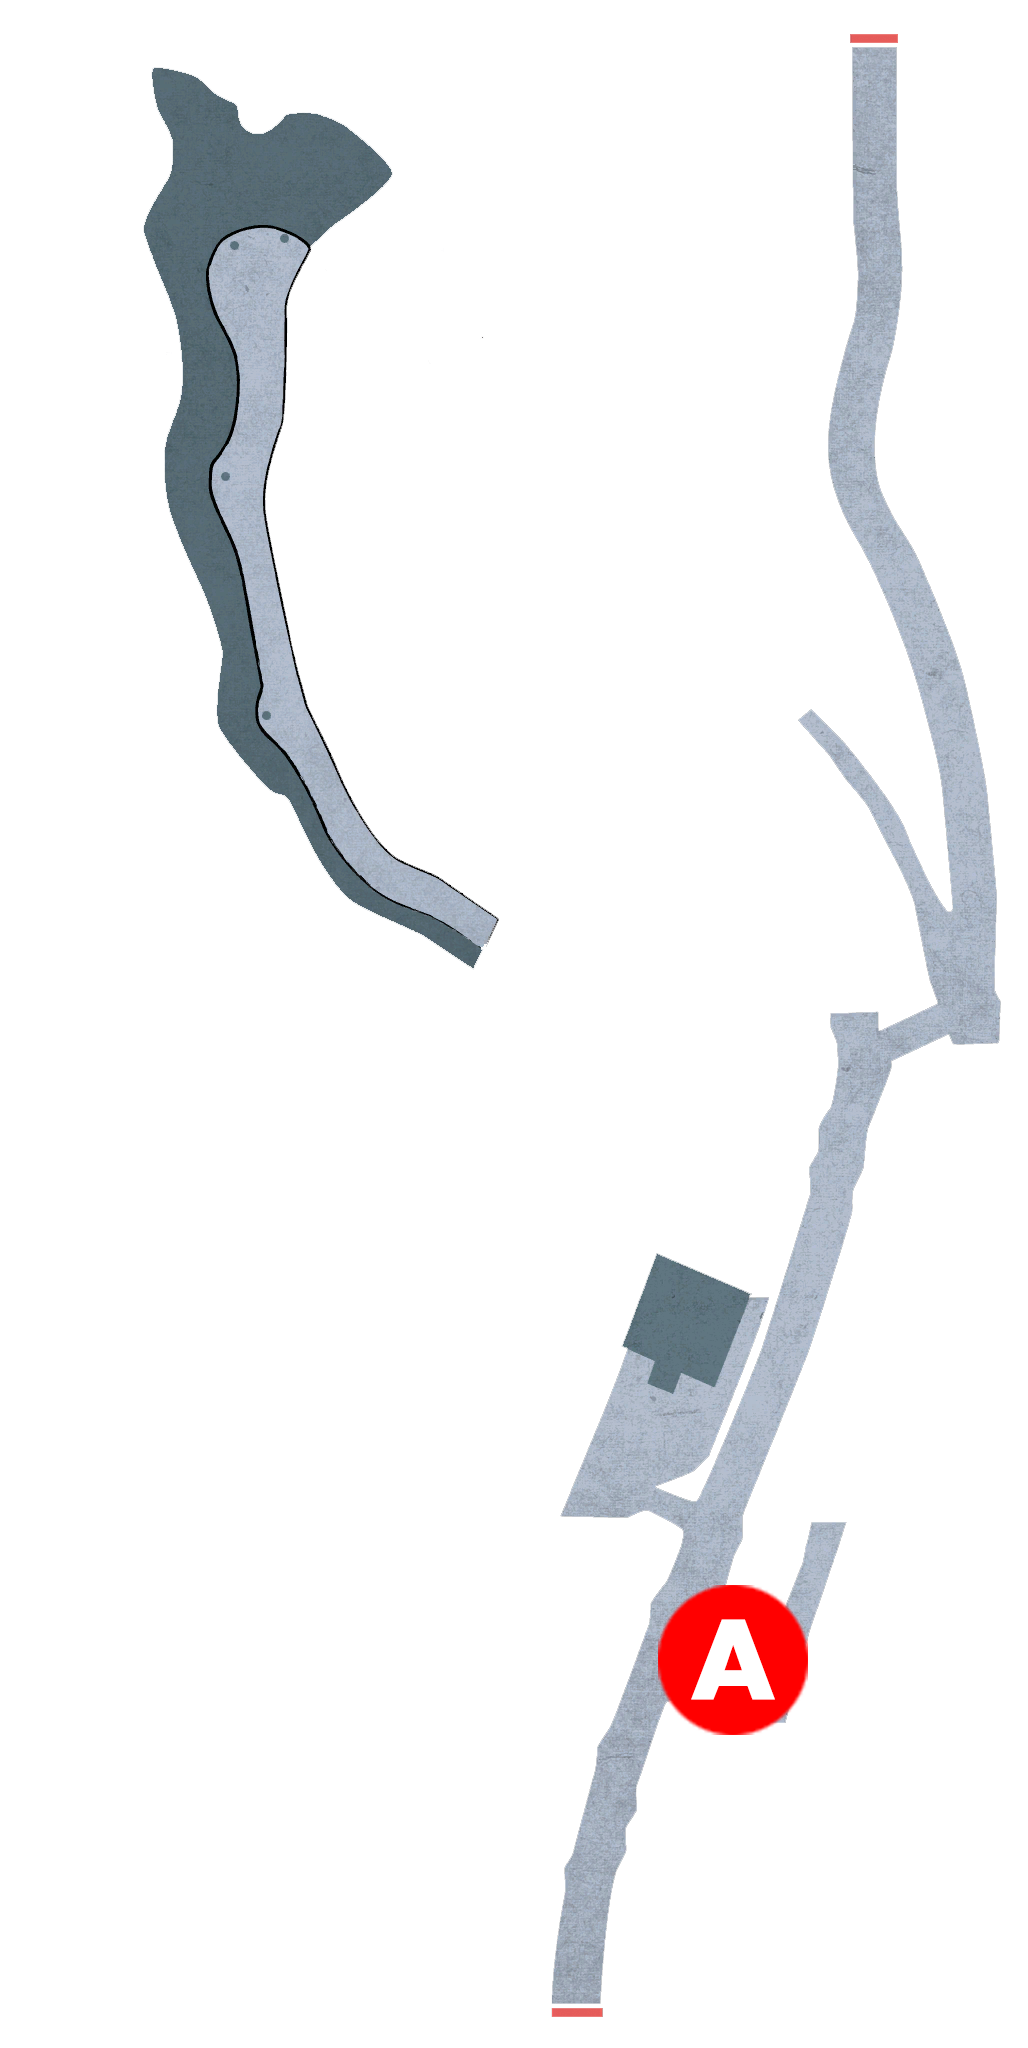
| 65 | The Dog |
| Available At: | 7-6 |
| Time: | Day / Evening / Night |
| Prerequisites: | Complete Request 54 |
Steps
- A - Listen to the samurai about to kill the dog and select the TOP OPTION (x2)
- Fight samurai
- B - Buy 3 Chicken Meat from the merchant
- A - Give 3 Chicken Meat to the dog
- C - Speak to dog and select the TOP OPTION
| 1: Listen to the samurai about to kill the dog and select the TOP OPTION (x2) |
A - Speak to the samurai here standing over a dog. He's got his sword back from the blacksmith and wants to test it out on this dog. Select the TOP OPTION to step in and save the dog. Kiryu says it's his dog. The samurai isn't convinced, saying it looks like a stray dog to him, then ask Kiryu if it's his dog then what is its name. Select the TOP OPTION to say "Hanako". After this, the samurai says he'll just test his sword on Kiryu instead.
Selecting the BOTTOM OPTION puts the request on hold. Speak to the samurai to continue. I guess the samurai just politely stands there looking at the dog until you decide to come back. It doesn't matter what name you select in the second dialogue choice.
| 2: Fight samurai |
You fight 2 basic swordsman enemies. This is a simple fight and has a couple of environmental heat actions - Stair Mastery and Secret Sword Swallow's Dance.
After the fight, the samurai run off and Kiryu looks at the weak dog. Kiryu says he should get him something to eat.
| 3: Buy 3 Chicken Meat from the merchant |
B - Speak to the merchant here. Select the TOP OPTION to buy something. He only sells one item - Chicken Meat. Buy 3 of them from him.
| 4: Give 3 Chicken Meat to the dog |
A - Return to the dog. A menu will pop up showing the 3 chicken meat you just bought. Select one of them (then select the left option to confirm) to feed the dog. You'll need to do this 3 times.
| 5: Speak to dog and select the TOP OPTION |
C - After giving the dog 3 chicken meat, he'll wander off. Follow him to the next location (C). He sits down there. Speak to the dog and select the TOP OPTION. The dog will dig. He finds an item - you receive a Jomon Pottery. The dog then wanders off again. After this, the request ends with the COMPLETE result and you also receive 1500 EXP as a reward.
| ALTERNATE ENDINGS |
In Step 4, if you give the dog 3 Leftovers instead of 3 Chicken Meat, you end up with the Chipped Bowl item. You also finish the request with the FINISHED result. You still get the 1500 EXP reward though. To get the leftovers, you need to speak to the old lady roughly half-way between locations A and B on the map - you'll see her standing around on her own near some seats. Speak to her and select the TOP OPTION 3 times to get leftovers (you can't get all 3 at once - you have to do it one at a time).
If you give the dog any 3 food items (including a mix of chicken meat and leftovers), you end up with the Old Greatsword weapon. You also finish the request with the FINISHED result. You still get the 1500 EXP reward though.

| 66 | Water from the Ladle #3 |
| Available At: | 7-6 |
| Time: | Day / Evening / Night |
| Prerequisites: | Complete Request 56 |
Steps
- A - Go near the man smoking a pipe and select the BOTTOM OPTION
NOTEThis request seems to be bugged. Sometimes the guy smoking the pipe doesn't spawn which means you can't trigger the request. I have experimented but I'm not sure exactly why sometimes he won't trigger. I have discovered two ways that seem to reliably force him to spawn:
1: Continue through to 7-8 in the main story. After the events of 7-7 where you speak with the mistress of Tsuruya at the back of Tsuruya, head back to Rakugai and the man should be there now, allowing you to trigger this request.
2: Do not complete request 56 in 7-5, when it is first available. It seems that when you wait until 7-6 to do this request, the guy will spawn straight away. After that request you end up outside the blacksmith, which is right next to the trigger point for 66 so you should see the man straight away.
| 1: Go near the man smoking a pipe and select the BOTTOM OPTION |
A - You'll see a man smoking a pipe standing around here. Go near him to trigger an event. After bumping into each other, Kiryu realises he is on fire thanks to the pipe! Select the BOTTOM OPTION to ask him to call a fireman (if you select any other option you receive damage and get the dialogue options again until you select the correct option). Suddenly, water is thrown on Kiryu and the fire is put out. The young lady from requests 18 and 40 is the one who saved Kiryu. The man apologises to Kiryu for what happened and gives him a Gold Leather Tobacco Case. After the man leaves, Kiryu thanks the woman and encourages her, saying this shows she is not useless like she thought - she just saved his life. She says it was just a coincidence - after all, she only threw water on him by accident, because as usual she was flinging water clumsily, but Kiryu says whether it was an accident or not, she did save him and he's glad she was there. The request then ends with the COMPLETE result and you also receive 1500 EXP as a reward.

| 67 | Double Suicide |
| Available At: | 7-8 |
| Time: | Evening / Night |
| Prerequisites: | N/A |
Steps
- A - Go near crowd and select the TOP OPTION
- Select, in order: BOTTOM OPTION - TOP OPTION - BOTTOM OPTION - TOP OPTION - TOP OPTION - BOTTOM OPTION - TOP OPTION - TOP OPTION
| 1: Step 1 |
A - There is a crowd of people here. Go near them to trigger an event. It seems a samurai is preparing to kill a yujo and then himself. The crowd say they saw Kojiro, a famous swordsman, enter the brothel. They say it would be great if someone could stop him, but they've heard Kojiro is a master swordsman, so what can they do? Select the TOP OPTION to enter.
| 2: Select, in order: BOTTOM OPTION - TOP OPTION - BOTTOM OPTION - TOP OPTION - TOP OPTION - BOTTOM OPTION - TOP OPTION - TOP OPTION |
After going inside, we learn this isn't the Kojiro Kiryu was expecting. It's not Sasaki Kojiro, but rather it is someone called Akimoto Kojiro. He asks who Kiryu is. Select the BOTTOM OPTION to say you're just someone who was passing by.
Akimoto says despite giving up everything for her, she never loved him - she never once sent him a letter. Mizuki explains that she never learned to read or write, so she's not able to send letters. Select the TOP OPTION to say she can still convey her feelings without letters.
Next, he asks about an extremely rare kimono he bought for her. Apparently it's the only one of its kind in existence. He asks why she has never worn it. Select the BOTTOM OPTION to say there's a sad story behind it so he shouldn't pry. Apparently when she wore it, it started raining and the kimono got mud on it, which ruined it. She thought Akimoto would get angry so she hid it from him.
Next, he says he saw her with a man recently. Apparently this guy was buying her freedom. Select the TOP OPTION to say it wasn't her. Mizuki says it must have been her twin sister he saw.
After that, you get a cutscene in which Akimoto is about to kill Mizuki and himself but then Mizuki's kamuro barges in, addressing Akimoto as "dad" and telling him not to fight with "mum". Mizuki reveals that this kamuro is their child. Apparently she's been keeping her a secret from him all this time.
Akimoto says they've never even had sex, so how can this be possible? Mizuki says she can't believe he doesn't remember "that night". Select the TOP OPTION to say it's like when you lose your virginity. Akimoto can't believe he forgot something so important.
Akimoto then points out that this girl is pretty big. But he only came to Gion for the first time about 6 months ago! Select the BOTTOM OPTION to say that kids grow up really fast these days.
The kamuro asks Akimoto if he'll come and visit every day. He says it might be a bit difficult to come that often. She then complains, saying her dad doesn't like her. Select the TOP OPTION to say it's disgraceful for a father to neglect his family.
Akimoto agrees to come every day. Mizuki then asks if, instead of addressing him as "Akimoto", she can address him as "dear". Select the TOP OPTION to say you're envious of him.
After all that, we get the last cutscene. It ends happily and Akimoto literally dances with joy out of the room. After he leaves, we learn that this was all an act. Mizuki was teaching her kamuro how to deceive men. After this, you end up back on the streets of Gion and the request ends with the COMPLETE result and you also receive 10000 EXP as a reward.
| ALTERNATE ENDINGS |
There are 8 dialogue options in Step 2. If you select the wrong option (i.e. not the ones listed above in Step 2) 5 times, the request ends with the FINISHED result. You still receive the 10000 EXP reward though. Also, if you get this ending you will see a completely different ending cutscene.

| 126 | Kinta the Brawler |
| Available At: | 7-8 |
| Time: | Day / Evening / Night |
| Prerequisites: | N/A |
Steps
- See Kinta's poster on the notice board
- A - Speak to Kinta
- Fight Kinta
| 1: See Kinta's poster on the notice board |
Examine the notice board by the police box in Rakugai and see Kinta's poster.
| 2: Speak to Kinta |
A - When you get close to this area, Kiryu will spot Kinta. Speak to him and Kiryu will challenge him. Kinta seems happy, saying he's bored of fighting weaklings, but Kiryu looks tough.
NOTERemember - if you want the best reward your finishing blow must be without a sword. Use the brawler style to finish him.
| 3: Fight Kinta |
Kinta is a boss enemy type (so some heat actions won't work on him) and he has a lot of health, so it will be tedious to do the entire fight using the brawler style. Drop his health down using your swords, then switch to brawler to finish him off. Having said that, I was able to beat him quickly and easily by spamming (kick) with the brawler style. It doesn't always work and can be tricky to pull off, but it is possible to stun-lock him using that attack.
After beating him, Kiryu summons an official, who confirms this is Kinta. If your finishing blow was using the brawler style, you receive a reward of 2 Ryo. If you finished him off with a sword, you receive a reward of 1 Ryo. You also receive an Aramitama Jewel item as a reward (you receive this regardless of whether you finishing Kinta off with a sword or unarmed). The bounty ends and you receive 1500 EXP as a reward.

Chapter 8: Hozoin
| 8-1 | 68 | Day / Evening / Night | The Vow | > |
| 8-1 | 114 | Day / Evening / Night | The Grudge | > |
| 8-1 | 115 | Day / Evening / Night | Ohi the Swift | > |
| 8-1 | 127 | Day | Monnosuke of Rakugai | > |
| 8-1 | 128 | Day | Seitakichi the Palanquin Killer | > |
| 8-1 | 129 | Night | Matsu the Discerning | > |
| 8-2 | 69 | Day / Evening / Night | The Udon Soul | > |
| 8-2 | 70 | Day / Evening | Sujitaro 3 | > |
| 8-2 | 71 | Day / Evening / Night | The Troubled Foreigner | > |
| 8-2 | 72 | Day / Evening / Night | The Master Swordsman | > |
| 8-2 | 73 | Day / Evening | The Master's Apprentice | > |
| 8-5 | 74 | Day / Evening | Osaki's Situation | > |
| 68 | The Vow |
| Available At: | 8-1 |
| Time: | Day / Evening / Night |
| Prerequisites: | Complete Request 50 |
Steps
- A - Speak to the men and select the TOP OPTION
- B - Speak to man and select the BOTTOM OPTION
- A - Speak to man and select the BOTTOM OPTION
- B - Speak to Yosaburo and select the TOP OPTION
- A - Listen to men
- C - Speak to attendant
- Fight men
| 1: Speak to the men and select the TOP OPTION |
A - Go here and you'll see two men. Speak to them and they'll ask for Kiryu's opinion on something. They ask Kiryu if he knows who they mean when they speak of the "most innocent girl in Gion". Select the TOP OPTION to say you do know - they are talking about "Kobai". Quickly, the two men end up arguing about who is better suited to be Kobai's partner.
| 2: Speak to man and select the BOTTOM OPTION |
B - One of the men (Yosaburo) from Step 1 is standing here. Speak to him. He shows something to Kiryu and asks if he knows what it is. Select the BOTTOM OPTION to ask what it is. Yosaburo says it's a vow - basically a written declaration of love, involving a vow to the gods and buddha. I guess it's a bit like wedding vows you get in the western tradition (particularly in the church, which involves vowing before God to love your partner "til death do us part"). Anyway, this vow is from Kobai. Then he says he feels bad for Manta (the other guy from Step 1), then disappears.
| 3: Speak to man and select the BOTTOM OPTION |
A - Go back to this location again. Speak to Manta, who is now standing here. He shows something to Kiryu and asks if he knows what it is. Select the BOTTOM OPTION to ask what it is. Just like Yosaburo, he has received a vow from Kobai. After saying he feels sorry for Yosaburo, he dissapears.
| 4: Speak to Yosaburo and select the TOP OPTION |
B - Go back here and speak to Yosaburo again. Kiryu wonders if he should tell him about Kobai's vow, which Manta also received. Select the TOP OPTION to tell him. He doesn't take the news very well, then rushes off to find Manta.
| 5: Listen to men |
A - Back here again. Interact with the men to hear their conversation. They both agree each of them has received a real vow from Kobai. They are both very angry and rush off to Gion to kill Kobai.
| 6: Speak to attendant |
C - Go here and speak to the man standing around. Kiryu asks if Kobai is here. She is, but a couple of angry-looking guys arrived just before him and asked to see Kobai, so she's busy at the moment. Then, the attendant suggests one of the other girls at the brothel. Kiryu demands he be allowed to go up to see Kobai. Inside, Kiryu steps in to stop the two men, which leads to a fight.
| 7: Fight men |
Both are brawler types with little health, so this shouldn't be a problem. There is a weapon on the ground if you want to use it, but beating their asses with square combos or kicks will be enough to quickly take them down.
After the fight, Kiryu defends the yujo by pointing out that kind of deception is what they all have to do to survive in this world and they have only themselves to blame for letting themselves get tricked. They leave, then the head clerk of the brothel thanks Kiryu by giving him 3 Ryo. Then Kobai thanks Kiryu and tries to give him one of those vows (like the ones she gave those two guys) but Kiryu refuses. After that, the request ends with the COMPLETE result and you also receive 1500 EXP as a reward.


| 114 | The Grudge |
| Available At: | 8-1 |
| Time: | Day / Evening / Night |
| Prerequisites: | Complete Commission 113 |
Steps
- A - Speak to man
- Fight (x3)
| 1: Speak to man |
A - There's a guy standing around outside Kiryu's house. Speak to him and he will take Kiryu to the owner of the brothel where he works, who wants Kiryu to do a job for him. Apparently some guys keep showing up to his brothel, but they can't pay to get in so he refuses to allow them entry. Because of this, they seem to have a grudge against him and keep showing up making a commotion outside his brothel. Kiryu's job will be to drive them away if they show up again. The brothel owner is willing to pay Kiryu 2 Ryo for the work. Kiryu accepts. Right after this, some samurai shows up and starts a fight with Kiryu.
| 2: Fight (x3) |
This is the first of a series of 3 fights. You fight a swordsman enemy type. He's nothing different to other swordsman types you've been fighting up to now, so he shouldn't be a problem. However, he is using a real sword while you cannot use your swords in Gion. You should be able to easily grab him and beat his ass with grab combos, which will ensure you don't get hit by his sword attacks.
After beating his ass, Kiryu thinks that was an easy 2 Ryo he just earned. But the brothel owner says Kiryu needs to wait around for others - after all, there is more than 1 guy showing up causing problems. Another guy shows up and fights Kiryu.
This is easier than the first fight simply because this is a brawler enemy type you are dealing with now, so you don't have to worry about sword attacks.
Kiryu asks for payment, but the owner says there are still 3 more guys to watch out for. Then 3 more guys show up and start a fight.
You are dealing with 2 brawlers and a swordsman. Take out the swordsman first because his sword attacks will deal the most damage to you. You can use weapons lying on the battlefield if you like, but these guys are weak so you should be fine with just your fists.
Finally, the brothel owner seems happy, saying that takes care of all the guys, then gives Kiryu the agreed 2 Ryo. After this, the commission ends and you receive 10000 EXP as a reward.
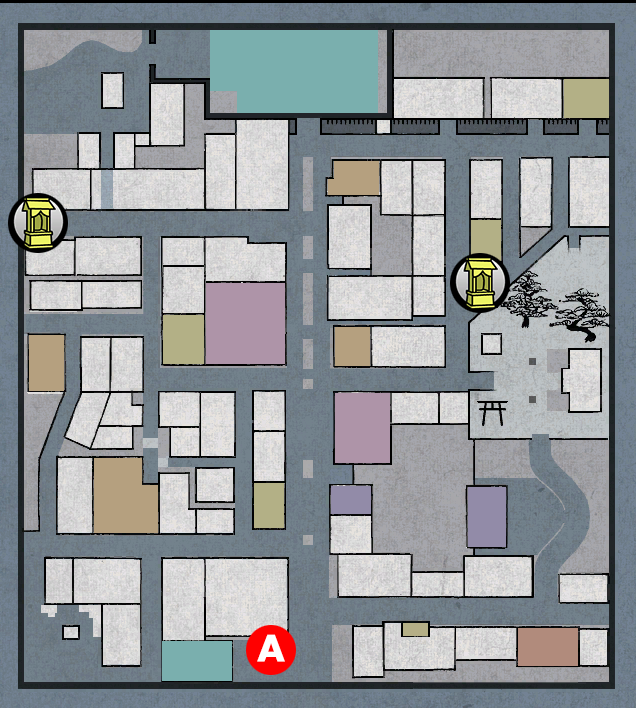
| 115 | Ohi the Swift |
| Available At: | 8-1 |
| Time: | Day / Evening / Night |
| Prerequisites: | Complete Commission 110 |
Steps
- A - Read letter from Kikuya's head clerk
- B - Speak to Kikuya's head clerk and select the BOTTOM OPTION
- C - Speak to Ohi
- D - Speak to Ohi
- E - Catch Ohi
- F - Go near man and Ohi and select the BOTTOM OPTION
- Fight men
- G - Catch Ohi
| 1: Read letter from Kikuya's head clerk |
A - Examine your post box in Kiryu's house. There is a letter from the head clerk of Kikuya commissioning Kiryu for some work. Apparently one of their yujo is trying to make a run for it and wants Kiryu to help catch her. He says he'll give him more details in person.
| 2: Speak to Kikuya's head clerk and select the BOTTOM OPTION |
B - Speak to the guy standing here. He asks if Kiryu saw his letter, saying he has work for him. Select the BOTTOM OPTION to take on the job. The clerk explains that one of their yujo, Ohi, is a very fast runner and they are having trouble catching her. Whenever they think they have finally pinned her down she makes another run for it. Kiryu's job is to catch her. Suddenly, we see Ohi nearby - she is wearing a peach-coloured Kimono - and she runs off.
| 3: Speak to Ohi |
C - You'll find Ohi standing here. Speak to her and she says if Kiryu wants to take her back to the brothel, he'll have to catch her first.
| 4: Speak to Ohi |
D - She has run off to this area. Speak to her and she'll run off again.
| 5: Catch Ohi |
E - The map I've provided shows the route she takes. She will continue to run in a loop until you trigger the next event. Just run in the opposite direction and bump into her to "catch" her. She runs off yet again.
| 6: Go near man and Ohi and select the BOTTOM OPTION |
F - Go near the man and Ohi to trigger an event. The man wants Ohi to join his brothel. When he sees Kiryu chasing after her, he tells him to go away. Select the BOTTOM OPTION to tell the guy to go away, leading to a fight.
| 7: Fight men |
You are up against 3 enemies in this fight. One brawler type, one brigand type, and one martial artist type. Even without your swords, this shouldn't be a problem. I would take out the brigand first to eliminate the sword threat (though it is only a wooden sword, so it's not as much of a threat as usual), but watch out for the martial artist while you do so (because he can grab you). Then you can deal with the unarmed enemies. By the way, when you deal with the brigand you can pick up his wooden sword when he drops it, which is another advantage of defeating him first.
After the fight, Ohi thanks Kiryu for his help, but then runs off again.
| 8: Catch Ohi |
G - This is just like Step 5, but Ohi's route is slightly different (see map). Again, run in the opposite direction and bump into her to catch her. She finally concedes defeat and goes back to the brothel. You automatically transport back to the head clerk, who thanks Kiryu and gives him a 1 Ryo reward. After this, the commission ends and you receive 1500 EXP as a reward.


| 127 | Monnosuke of Rakugai |
| Available At: | 8-1 |
| Time: | Day |
| Prerequisites: | N/A |
Steps
- See Monnosuke's poster on the notice board
- A - Speak to Monnosuke
- Fight Monnosuke
| 1: See Monnosuke's poster on the notice board |
Examine the notice board by the police box in Rakugai and see Monnosuke's poster. If you've been following the main story guide, there will be 3 new posters at the start of Chapter 8, so you will need to examine the notice board 3 times to get them all. Monnosuke is the 2nd poster you see.
| 2: Speak to Monnosuke |
A - Monnosuke is standing around here. When you get near him, Kiryu will notice him. Speak to him to confront him.
| 3: Fight Monnosuke |
Besides Monnosuke, you also have to fight 5 of his henchmen. Thankfully, all 5 of them are quite weak and are just brawler types so they are easy to take down (however, they do have slightly more health than the typical brawler you have faced before now). I would get rid of them first so you can then fully focus on fighting Monnosuke 1-on-1. Since you are in Gion, you cannot use your swords, which could be a challenge since Monnosuke is using a real sword against you. You might want to use a weapon (e.g. a special weapon like a kiseru) or at least make use of the 2 weapons on the battlefield you can pick up. To add to the challenge, the battlefield is quite narrow so you might find it difficult to create space and keep your distance from Monnosuke while you take out his henchmen.
After the fight, Kiryu summons an official who confirms this is Monnosuke. He gives Kiryu the promised reward of 1 Ryo. After this, the bounty ends and you receive 1500 EXP as a reward.

| 128 | Seitakichi the Palanquin Killer |
| Available At: | 8-1 |
| Time: | Day |
| Prerequisites: | N/A |
Steps
- See Seitakichi's poster on the notice board
- A - Speak to Seitakichi
- Fight Seitakichi
| 1: See Seitakichi's poster on the notice board |
Examine the notice board by the police box in Rakugai and see Seitakichi's poster. If you've been following the main story guide, there will be 3 new posters at the start of Chapter 8, so you will need to examine the notice board 3 times to get them all. Seitakichi is the 3rd poster you see.
| 2: Speak to Seitakichi |
A - Seitakichi is standing around here. When you get close to him, Kiryu recognises him. Speak to him to confront him.
| 3: Fight Seitakichi |
Seitakichi uses an arquebus and his shots can do a lot of damage. Best strategy here is to stay as close to him as possible - keep grabbing him and using grab combos to take him out safely. Alternatively, you can try spamming the kick attack, which sometimes stun-locks him. Though he is pretty good at blocking, so this doesn't always work, but it can help to chip away at some of his health.
After the fight, Kiryu summons an official who confirms this is Seitakichi. He gives Kiryu the promised reward of 1 Ryo. After this, the bounty ends and you receive 1500 EXP as a reward.
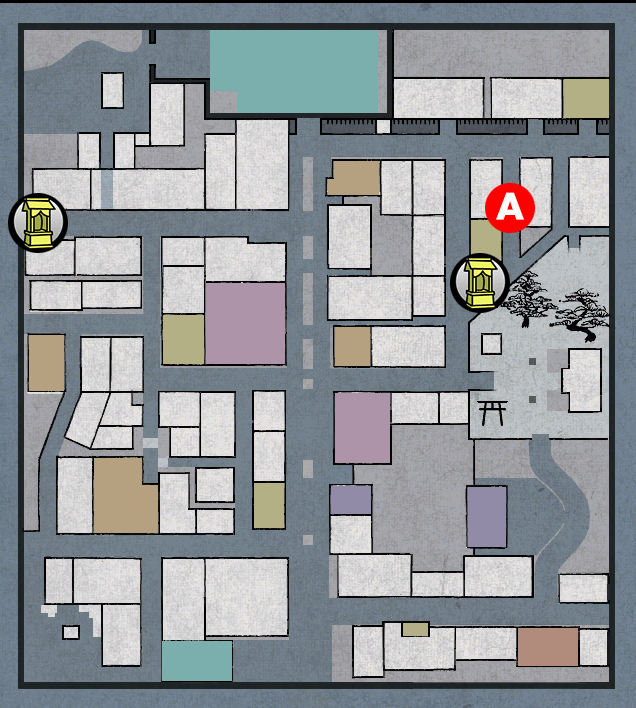
| 129 | Matsu the Discerning |
| Available At: | 8-1 |
| Time: | Night |
| Prerequisites: | N/A |
Steps
- See Matsu's poster on the notice board
- A - At night, bump into Matsu and select the BOTTOM OPTION
- Fight Matsu
| 1: See Matsu's poster on the notice board |
Examine the notice board by the police box in Rakugai and see Matsu's poster. If you've been following the main story guide, there will be 3 new posters at the start of Chapter 8, so you will need to examine the notice board 3 times to get them all. Matsu is the 1st poster you see.
NOTEEven though you can get his poster now and therefore trigger the bounty substory, Matsu will not show up until it is night time. It will not be night during the main story again until 9-4, so you'll have to wait until then before you can move to the next step.
| 2: At night, bump into Matsu and select the BOTTOM OPTION |
A - At night, when you get near this area some guy will run towards Kiryu. Bump into him to trigger an event. He says he's injured and demands that Kiryu give him some kind of compensation. However, Kiryu recognises the man. Select the BOTTOM OPTION to identify him as Matsu the Discerning. This leads to a fight with him and Kiryu remembers that he needs to take him in alive for the greatest reward (i.e. defeat him without using a sword).
NOTERemember - if you want the best reward your finishing blow must be without a sword. Use the brawler style to finish him.
If you misidenfity him (select the TOP OPTION or MIDDLE OPTION), the bounty comes to a halt. You can speak to the man again (he'll just be standing around here) and select another option until you get the right one.
| 3: Fight Matsu |
Matsu is the boss enemy type, so some heat actions won't work on him. Also, he has quite a lot of health. Because of this, I would suggest using a sword to hack away at his health, then when he is low on health, switch to the brawler style and finish him off for the best reward. Having said that, spamming the brawler style kick seems to be effective - I was able to stun-lock him for the whole fight by spamming that attack.
After the fight, Kiryu summons an official who confirms this is Matsu. For bringing him in alive, he gives Kiryu the bonus reward of 2 Ryo (if you defeat him with a sword you only get 1 Ryo). He also rewards Kiryu with the Star Steel Legend weapon recipe book (you get this regardless of whether you beat him with a sword or not). After this, the bounty ends and you receive 1500 EXP as a reward.

| 69 | The Udon Soul |
| Available At: | 8-2 |
| Time: | Day / Evening / Night |
| Prerequisites: | Complete Request 62 |
Steps
- A - Speak to the restaurant owner
- Eat all the items on the experimental menu
| 1: Speak to the restaurant owner |
A - Speak to the owner in the udon restaraunt. He wants to create a new dish and asks Kiryu if he'll help - Kiryu can try out the new dishes he makes. Then a menu of experimental dishes shows up. Select any item from this list (may as well start from the top). It is not a nice dish at all - in fact, Kiryu loses health when he eats it! The owner realises it was a failure and says he'll keep working on new dishes.
| 2: Eat all the items on the experimental menu |
Now you need to work your way through the menu until he creates a successful new dish. You must leave the restaurant an re-enter each time to try a new dish. The good news is that the dishes you already tried will disappear and be replaced with new dishes, so you don't have to worry about selecting the same dish twice. Just keep working through the list. Note that all the items on this menu will damage you (lower your current HP).
Eventually, the successful dish will appear on the list at the bottom - it's the "Ultimate Udon Meal". The picture below shows what it looks like. When this dish appears, order it to end the substory. Unlike the other dishes, this will restore your health.

The owner realises he has finally succeeded in creating a new dish. He pays Kiryu 1000 Mon for his help. After this, the request ends with the COMPLETE result and you also receive 3000 EXP as a reward. Also, the "Ultimate Udon Meal" can now be ordered from this restaurant.
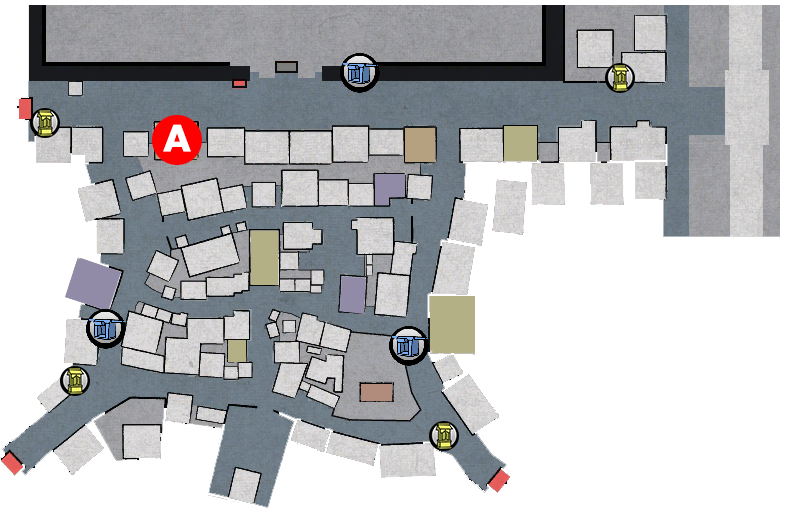
| 70 | Sujitaro 3 |
| Available At: | 8-2 |
| Time: | Day / Evening |
| Prerequisites: | Complete Request 64 |
Steps
- A - Speak to Sujitaro and select the TOP OPTION
- B - Speak to child
| 1: Speak to Sujitaro and select the TOP OPTION |
A - You'll see Sujitaro surrounded by some kids here. Speak to him and we learn he is being bullied by the kids. Select the TOP OPTION to tell them off. After Kiryu yells at them, the kids run off.
After they leave, speak to Sujitaro again. He says he's been trying to be of use to people, helping people out when they are in need of assistance, but it turns out he just makes a mess of everything. He then runs off crying.
| 2: Speak to child |
B - You'll see a child trapped under a log here. Speak to him and he asks Kiryu for help. Kiryu tries to move the log but it won't budge. Kiryu says he'll get him out somehow, but then Sujitaro shows up. He single-handedly picks up the log to free the child, while others watch on in amazement. Looks like Sujitaro has made himself a lot of friends now and this could be the start of his new reputation as a local hero. He thanks Kiryu for believing in him, rewarding him with an Talisman. After this, the request ends with the COMPLETE result and you also receive 1500 EXP as a reward.


| 71 | The Troubled Foreigner |
| Available At: | 8-2 |
| Time: | Day / Evening / Night |
| Prerequisites: | Complete Request 55 |
Steps
- A - Speak to foreigner and select, in order: TOP OPTION - BOTTOM OPTION - TOP OPTION
| 1: Speak to foreigner and select, in order: TOP OPTION - BOTTOM OPTION - TOP OPTION |
A - You will see a foreign man dressed in green standing around here. He speaks in extremely broken Japanese which is very difficult to understand. May God have mercy on whoever tries to translate this mess. Anyway, the correct responses are, in order: TOP OPTION - BOTTOM OPTION - TOP OPTION.
He thanks Kiryu by rewarding him with a Foreign Coin. After that, the request ends with the COMPLETE result and you also receive 1000 EXP as a reward.
| ALTERNATE ENDINGS |
If you select any options besides the ones listed above, the request ends with the FINISHED result and you get no reward (including EXP). This does not lock you out of any future substories though (including Amon).

| 72 | The Master Swordsman |
| Available At: | 8-2 |
| Time: | Day / Evening / Night |
| Prerequisites: | Complete Request 63 |
Steps
- A - Listen to conversation between man and woman
- B - See the master swordsman
- C - See the master swordsman
- D - Witness the master swordsman entering the house
- D - Examine the house and select the TOP OPTION
- Select the BOTTOM OPTION
- Fight swordsman
| 1: Listen to conversation between man and woman |
A - Interact with the man and woman standing around here. They are talking about a local swordsman. Apparently, even though this man is blind, he is a master swordsman. The man mentions he has been spotted near the market area in Rakugai.
| 2: See the master swordsman |
B - Go to this area to trigger an event. It seems the blind swordsman we heard about just sexually assaulted a woman. He claims he heard a cat meow and wanted to stroke it, but the woman is not convinced, pointing out he reached pretty high (grabbing her ass) if he was trying to pet a cat. Then he walks off.
| 3: See the master swordsman |
C - Go to this area to trigger another event. The blind swordsman is causing trouble again. This time, a shopkeeper is moaning at him for kicking his products on display. The blind swordsman says he can't see and moans at the shopkeeper for leaving his stuff in the way like that. The shopkeeper isn't convinced, saying he obviously kicked his products over deliberately, but the swordsman ends up making him feel guilty, then walks off laughing.
| 4: Witness the master swordsman entering the house |
D - Go here to trigger the next event. Kiryu sees the blind swordsman enter a house.
| 5: Examine the house and select the TOP OPTION |
D - Interact with the house the swordsman just entered. Select the TOP OPTION to go inside.
| 6: Select the BOTTOM OPTION |
Inside, Kiryu catches the "blind" swordsman enjoying some shunga (Edo-period porn, basically). Kiryu says he heard he was blind. The fraud realises the game is up and says he will give Kiryu 2 Ryo to stay silent. Select the BOTTOM OPTION to refuse. The swordsman then decides he'll have to keep Kiryu quiet by force.
Even if you accept his offer with the TOP OPTION he decides he doesn't want to give Kiryu any money after all and just fights him.
| 7: Fight swordsman |
He has a reputation for being a blind "master swordsman" but he's just a regular swordsman type, so this is nothing to worry about. In this battlefield, you can use the special environmental heat action Certain Death - Tatami Flip.
Kiryu mocks his ability, saying he's not much of a "master swordsman". The man says when he went around saying he was blind, people started coming up with a story about him being an amazing swordsman and he played along because it made him feel good. He apologises to Kiryu by giving him Shunga. After this, the request ends with the COMPLETE result and you also receive 1500 EXP as a reward.
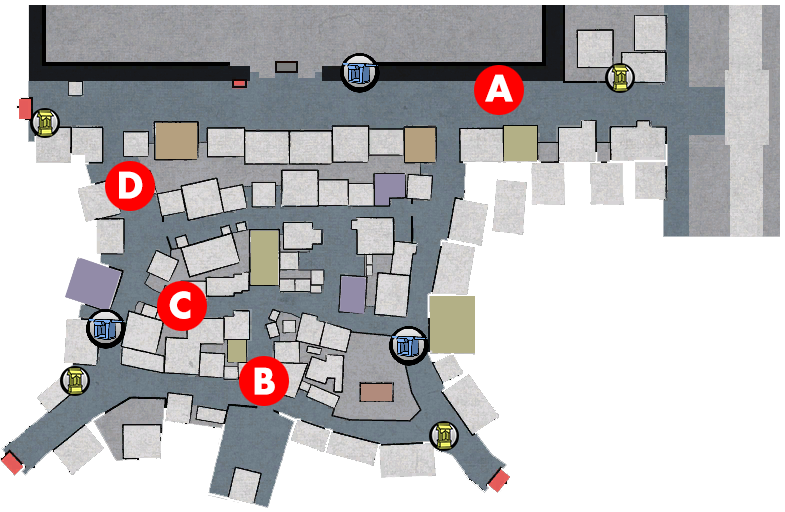
| 73 | The Master's Apprentice |
| Available At: | 8-2 |
| Time: | Day / Evening |
| Prerequisites: | Complete Request 65 |
Steps
- A - Speak to apprentice
- B - See apprentice arguing with samurai
- Fight samurai
| 1: Speak to apprentice |
A - The boy Kiryu made his apprentice back in request 54 is standing around here. Go near him to trigger an event. He asks his master for a lesson and Kiryu decides he probably should comply. After the training, a couple of young boys show up and start bullying the kid for being poor (we learn the apprentice's name is Sotaro). They realise he's been doing sword training and are surprised, but then suggest the style he's learning is a load of crap because he can't afford lessons at a proper school. The kid gets angry, telling them not to insult his master's sword style. The boys leave, then the apprentice thanks Kiryu for the lesson and says he looks forward to the next one.
| 2: See apprentice arguing with samurai |
B - The apprentice is here with a samurai. Go near them to trigger an event. The boy is angry because this samurai is insulting Kiryu and his sword style, saying the boy's master is not a real swordsman. Eventually, Kiryu steps in and, after the boy identifies him as his master, fights Kiryu to prove how insignificant this "master" is compared to himself.
| 3: Fight samurai |
This guy is just a regular swordsman type, so this is a simple fight. Beat his ass in whatever way you see fit.
The samurai runs off, then the two boys from earlier (who bullied the apprentice) say the whole thing. Very impressed with Kiryu's skill, they ask if they can be his apprentices as well. He refuses, then tells them to bugger off and warns them not to bully his apprentice again. Kiryu scolds his apprentice and warns him not to go looking for trouble like that again. After this, the request ends with the COMPLETE result and you also receive 1500 EXP as a reward.
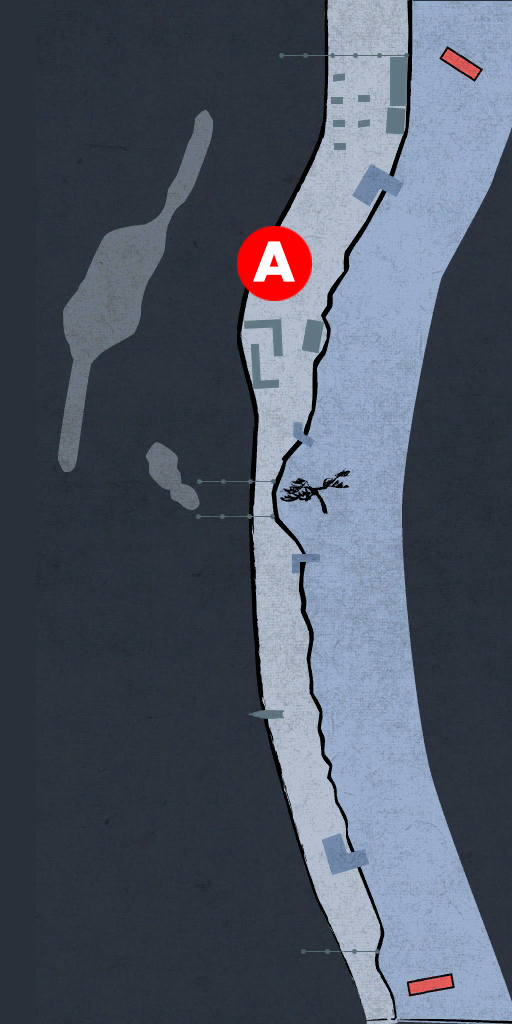

| 74 | Osaki's Situation |
| Available At: | 8-5 |
| Time: | Day / Evening |
| Prerequisites: | Complete Request 73 |
Steps
- A - Go near women
- B - See Osaki and select the BOTTOM OPTION
- Fight men
- Select the BOTTOM OPTION (x2)
- C - Speak to young man
- D - Speak to Osaki and Kisuke
NOTEIf you want to get the COMPLETE result for this substory, make sure you have at least 2 Ryo before starting it.
| 1: Go near women |
A - Go near the two women standing near the cafe. There is a women in a fancy-looking kimono (Osaki) also standing near here (close to the bottom of the stairs) but going near her doesn't do anything so ignore her. The women are commenting on Osaki's impressive new Kimono and how rich she is, but then talk about a rumour that the man she's seeing is very suspicious.
| 2: See Osaki and select the BOTTOM OPTION |
B - Go near Osaki (with 2 men around her) to trigger an event. They want to take her away and asks Kiryu for his help. Select the BOTTOM OPTION to help.
| 3: Fight men |
One of these guys is a martial artist type and the other is a martial arts expert type. So, the latter will be able to counter your attacks. But you can use your swords in this fight so it should be straightforward.
| 4: Select the BOTTOM OPTION (x2) |
After the fight, we learn they are here to collect the money she owes someone (they are debt collectors). It turns out that this "rich girl" image she has is only because she has borrowed so much money from someone. So, they are only trying to do their job. Select the BOTTOM OPTION to help her out.
Kiryu asks what will become of her if she can't pay her debt. She is still young so they could sell her to a brothel for a good fee. Kiryu asks if they can overlook this just for today. The men say if Kiryu gives them 2 Ryo they'll drop the issue for now. Select the BOTTOM OPTION again to offer to pay 2 Ryo.
Osaki thanks Kiryu for his help. We hear her backstory. Osaki's father died about 6 months ago, and now the family is broke. She mentions a man called "Kisuke", a young master of a successful business in Edo called "Fugetsudo". He used to live in Kyoto and it seems the two go on really well.
| 5: Speak to young man |
C - Go near here to see an event involving the debt collectors from earlier. After they go, speak to the young man. He talks about how he is in a lot of debt and, until recently, was living a simple life in Edo. We learn he is Kisuke from "Fugetsudo". Like Osaki, he's not actually rich like he used to be and is borrowing money so he is as Osaki remembers him. Kiryu realises what's going on with these two idiots, then orders Kisuke to meet him at the shrine in Rakugai, in the market area.
We then transport back to River Road, where Kiryu tells Osaki to go to the same place.
| 6: Speak to Osaki and Kisuke |
D - Go near the shrine (where Kisuke is standing) to trigger an event. Kiryu leaves some money on the floor, then both Kisuke and Osaki see it and dive towards it at the same time, clashing in the process. We get a massive scene where they two realise they are both broke and that both of them have been borrowing money to keep up their wealthy appearance just to impress the other. Kisuke thanks Kiryu for everything by giving him a Deer Antler Netsuke. Osaki also thanks Kiryu, giving him a Jade Obidome. After this, the request ends with the COMPLETE result and you also receive 1500 EXP as a reward.
| ALTERNATE ENDINGS |
In Step 4, if you select the TOP OPTION either the first or second time, they take Osaki away, the request ends with the FINISHED result and you get absolutely nothing as a reward.
Also, if you have less than 2 Ryo when you get to Step 4, the request likewise ends with the FINISHED result and you get absolutely nothing as a reward.


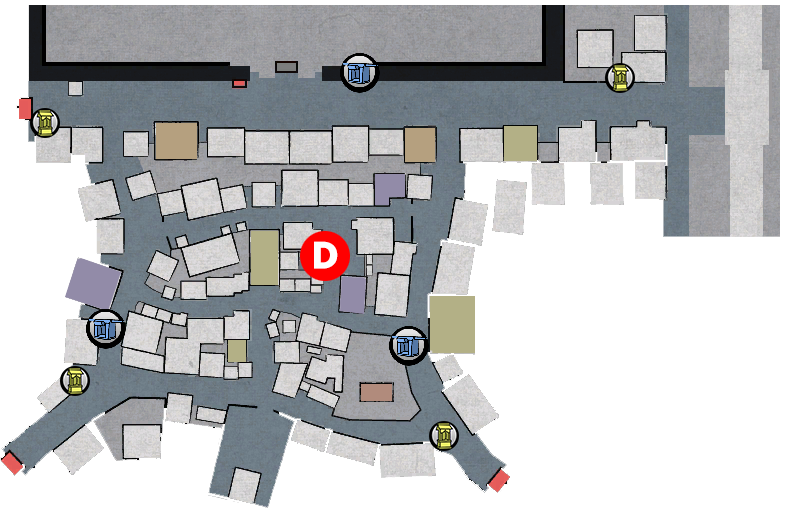
Chapter 9: The Duel
| 9-1 | 75 | Day / Evening / Night | The Refuge | > |
| 9-1 | 76 | Day / Evening | Kiryu, the Tour Guide | > |
| 9-1 | 77 | Day / Evening | The Master is also an Apprentice | > |
| 9-1 | 130 | Day | Nonbei of the Dawn | > |
| 9-2 | 78 | Day / Evening / Night | Investment Advice | > |
| 9-3 | 116 | Day / Evening / Night | The Old Man's True Colours | > |
| 9-4 | 79 | Night | The Woman | > |
| 9-4 | 131 | Night | Tatsu of the Twin Feathers | > |
| 9-4 | 132 | Night | Tetsuto the Demon Slayer | > |
| 9-5 | 80 | Day / Evening / Night | The Old Dog | > |
| 9-5 | 81 | Day | A Gift to God | > |
| 9-5 | 82 | Day / Evening / Night | The Yujo's Request 1 | > |
| 9-5 | 83 | Day / Evening / Night | The Red Diary | > |
| 9-5 | 84 | Day / Evening / Night | The Yujo's Request 2 | > |
| 9-5 | 85 | Day / Evening / Night | The Town Doctor 2 | > |
| 9-5 | 86 | Day / Evening / Night | The Castella | > |
| 9-5 | 87 | Day / Evening | The Divine Message | > |
| 9-5 | 88 | Day / Evening | The Benefit of a Swamp | > |
| 9-5 | 89 | Day / Evening / Night | The Flavour of a Rice Ball | > |
| 9-5 | 90 | Day / Evening / Night | Eggs Part 1: Got To Try Before You Die | > |
| 9-5 | 91 | Day / Evening / Night | The Bewitching House | > |
| 9-5 | 117 | Day / Evening / Night | Corruption | > |
| 9-5 | 133 | Day / Evening / Night | Kensuke the Flyer | > |
| 9-5 | 134 | Night | Kaien the Corrupt Monk | > |
| 75 | The Refuge |
| Available At: | 9-1 |
| Time: | Day / Evening / Night |
| Prerequisites: | Complete Request 72 | You must know the heat action Shortsword - Twin Bones (you get this from a revelation) |
Steps
- A - Talk to priest outside temple and select the TOP OPTION
- Fight man
- Select the TOP OPTION
- Fight man
| 1: Talk to priest outside temple and select the TOP OPTION |
A - Speak to the preist standing outside the temple. He asks Kiryu if he'll do him a favour. He needs to head off to take care of something and wants Kiryu to keep watch in his absence. He promises he will reward Kiryu for his help. Select the TOP OPTION to accept.
The priest explains what Kiryu needs to do. He says this is a "refuge" temple (specifically, it's a type of temple where women trying to escape their marriage can seek refuge). Kiryu's task is simple - protect these women from their husbands.
After the priest leaves, a woman shows up seeking refuge from her violent husband. Next, the husband shows up and demands his wife back, so he can beat her again.
| 2: Fight man |
A very simple fight. He is a brawler type with little health. You can make very quick work of him with your swords.
After the fight, Kiryu tells him to beat it. But, unexpectedly, the wife rushes to her husband to make sure he is okay. The two make up, with the husband apologising for his behaviour. He vows to never lay his hands on her again and he will also give up drinking.
| 3: Select the TOP OPTION |
Kiryu wonders if he should wait for the priest to return, or head off now. Select the TOP OPTION to stay longer.
NOTESelecting the BOTTOM OPTION here locks you out of 100% completion, so be careful!
Another woman shows up. She wants to leave her "useless" husband. Apparently he doesn't work and gambles all the time and she's had enough. Like before, he fights Kiryu to get to his wife.
| 4: Fight man |
This is even easier than the previous fight. He's another brawler type, but this guy has pretty much no health at all. A single kick from the brawler style can take this guy out.
We then get a repeat of the last couple, with the two making up and leaving together. Then the priest returns. He asks what happened while he was gone - a crowd has gathered outside the temple! It seems word has spread around that your marriages can be repaired here. He thanks Kiryu for his help and gives him the Meditating Monk Picture. After this, the request ends with the COMPLETE result and you also receive 1500 EXP as a reward.
| ALTERNATE ENDINGS |
In Step 3, if you select the BOTTOM OPTION, the priest suddenly shows up anyway. He gives Kiryu 5000 Mon as payment. After this the request ends with the FINISHED result. You do not get any EXP and, more importantly, you do not get the monk picture which means you cannot get the Certain Death - Clear Circle revelation/heat action. This means you cannot complete all heat actions if you choose this option.
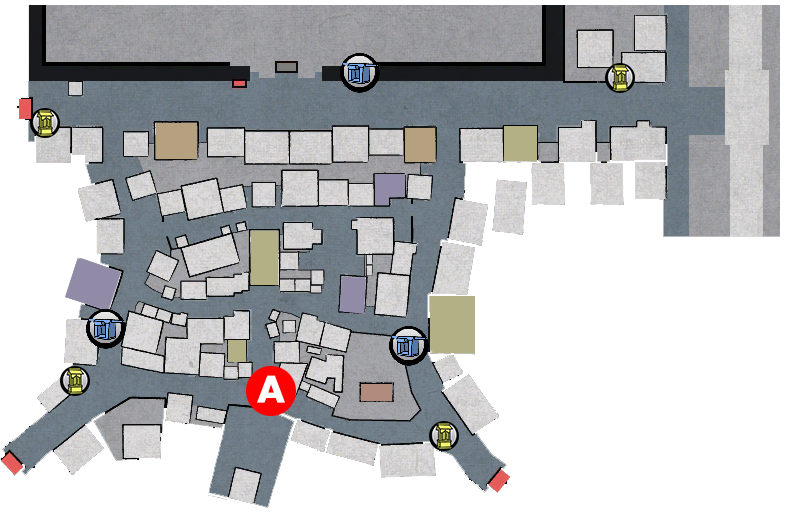
| 76 | Kiryu, the Tour Guide |
| Available At: | 9-1 |
| Time: | Day / Evening |
| Prerequisites: | Complete Request 57 |
Steps
- A - Speak to woman and select the TOP OPTION
- B - Speak to old man and select the TOP OPTION
| 1: Speak to woman and select the TOP OPTION |
A - Speak to the woman standing on the bridge. She is a tourist here and asks for Kiryu's advice. She wants to know a good location from which to view the famous Kiyomizudera. Select the TOP OPTION to say you'll help. They say they will meet Kiryu at Kiyomizudera.
| 2: Speak to old man and select the TOP OPTION |
B - Speak to the old man at this location. He asks Kiryu if he's visiting the temple, then shows him a good place from which he can view Kiyomizudera. After being shown that location, Kiryu wonders if he should tell the woman from earlier about it. Select the TOP OPTION to show her to this place (Select the BOTTOM OPTION if you want to try one of the other location options - speak to the people at C and D).
Kiryu shows the woman and her grandfather the location the old man showed him. They love it and thank Kiryu for showing that to them by giving him a Raden Ore. After this, the request ends with the COMPLETE result and you also receive 1500 EXP as a reward.
| ALTERNATE ENDINGS |
In Step 2, if you take the woman to the location the guys at location C or D show you, the request will end with the FINISHED result. You still get the 1500 EXP reward though. The only difference between these outcomes and the "correct" one above is the item you receive as a reward. If you choose location C, you receive a Phantom Thief Netsuke as a reward. If you choose location D, you receive a Hariti Amulet as a reward.
NOTEIf you don't care about whether you get a "Complete" or "Finished" result, you may as well just pick whichever item you want. It could be argued that the best reward here is the Phantom Thief Netsuke, because, when equipped, it gives you the ability to make enemies drop held items (like those pouches they sometimes carry) by grabbing them from behind. Also, this is the only way you can receive this item in the game, so it's rarer than the other two items (which can be obtained elsewhere). Note that getting a "Finished" result here does not lock you out of any future substories (including Amon), so don't worry about that.


| 77 | The Master is also an Apprentice |
| Available At: | 9-1 |
| Time: | Day / Evening |
| Prerequisites: | Complete Request 74 |
Steps
- A - Speak to apprentice
- B - Save apprentice
- Fight samurai
| 1: Speak to apprentice |
A - Go near the boy here. It's Sotaro and he asks Kiryu for another training session and Kiryu accepts. After the session, Kiryu asks the boy why he wants to become strong. Before he can answer, his little brother shows up and the apprentice has to take him back home. The boy comes back and we learn he wants to be strong so he can protect his family (like his brother).
| 2: Save apprentice |
B - Go near here to trigger another event. Sotaro and his brother are being threatened by some samurai. It's the samurai from request 73 and he wants revenge. This time, he has some backup. Sotaro defends his brother by striking the samurai, which catches him off guard. Though all this really does is anger him. Kiryu steps in before they kill the boys.
| 3: Fight samurai |
You fight 5 swordsman enemy types. They all have a relatively decent amount of health, but none of them are particularly challenging. Their strength here is in their numbers. Use the two sword style to ensure you can defend against their attacks from any direction.
After the fight, Kiryu praises Sotaro's attack against that samurai. The boy says he looks forward to more lessons and getting even stronger, but Kiryu says he has nothing left to teach him. He says Sotaro showed true strength when he protected his brother and has, in fact, taught Kiryu something. Sotaro thanks Kiryu for everything and gives him a Susanoo Orb as a thank you gift. After this, the request ends with the COMPLETE result and you also receive 10000 EXP as a reward.
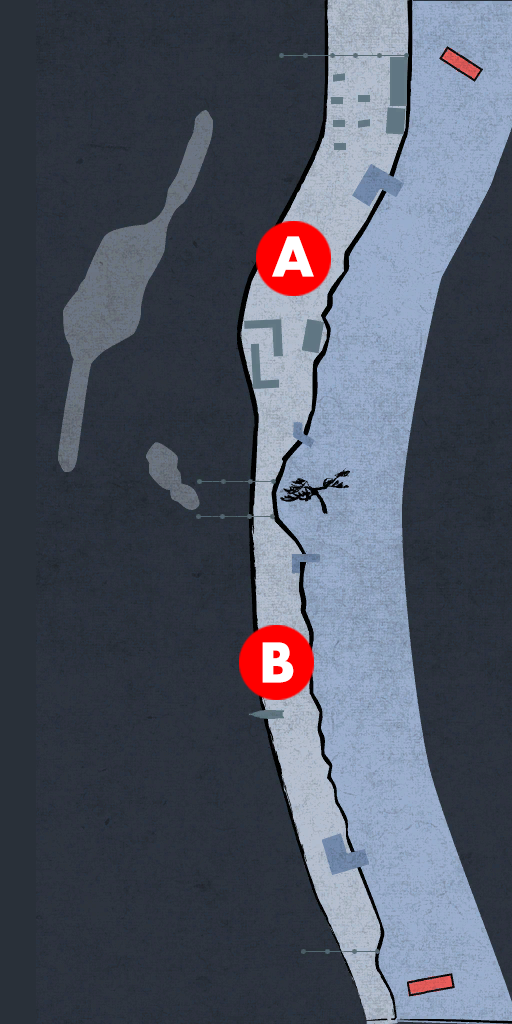
| 130 | Nonbei of the Dawn |
| Available At: | 9-1 |
| Time: | Day |
| Prerequisites: | N/A |
Steps
- See Nonbei's poster on the notice board
- A - At Day time, speak to Nonbei
- Fight Nonbei
| 1: See Nonbei's poster on the notice board |
Examine the notice board by the police box in Rakugai and see Nonbei's poster.
| 2: At Day time, speak to Nonbei |
A - At Day time, you'll find Nonbei here. When you get close, Kiryu to recognise him from the poster. Speak to him to confront him. The wanted poster mentions a greater reward for bringing him in alive. Kiryu asks if he's willing to come quietly, but inevitably it ends up in a fight.
NOTERemember - if you want the best reward your finishing blow must be without a sword. Use the brawler style to finish him.
| 3: Fight Nonbei |
Nonbei is a brute enemy type and has a colossal amount of health. He can deal some big damage to you and he doesn't often flinch when you attack him. Because of this, he could be a challenge. Take a patient approach - keep out of range of his attacks and wait for an opening. When he slams his sword into the ground he is briefly left open to your attacks, so jump in an land a few hits when he does this. Feel free to use your swords to get his health down, but remember that you need to finish him with the brawler style if you want the best reward.
After the fight, Kiryu summons an official, who confirms this is Nonbei. For bringing him in alive (defeating him unarmed) he gives Kiryu the promised 2 Ryo reward (if you defeat him with a sword you get 1 Ryo). He also reward Kiryu with Red Lion Hair. After this, the bounty ends and you receive 1500 EXP as a reward.
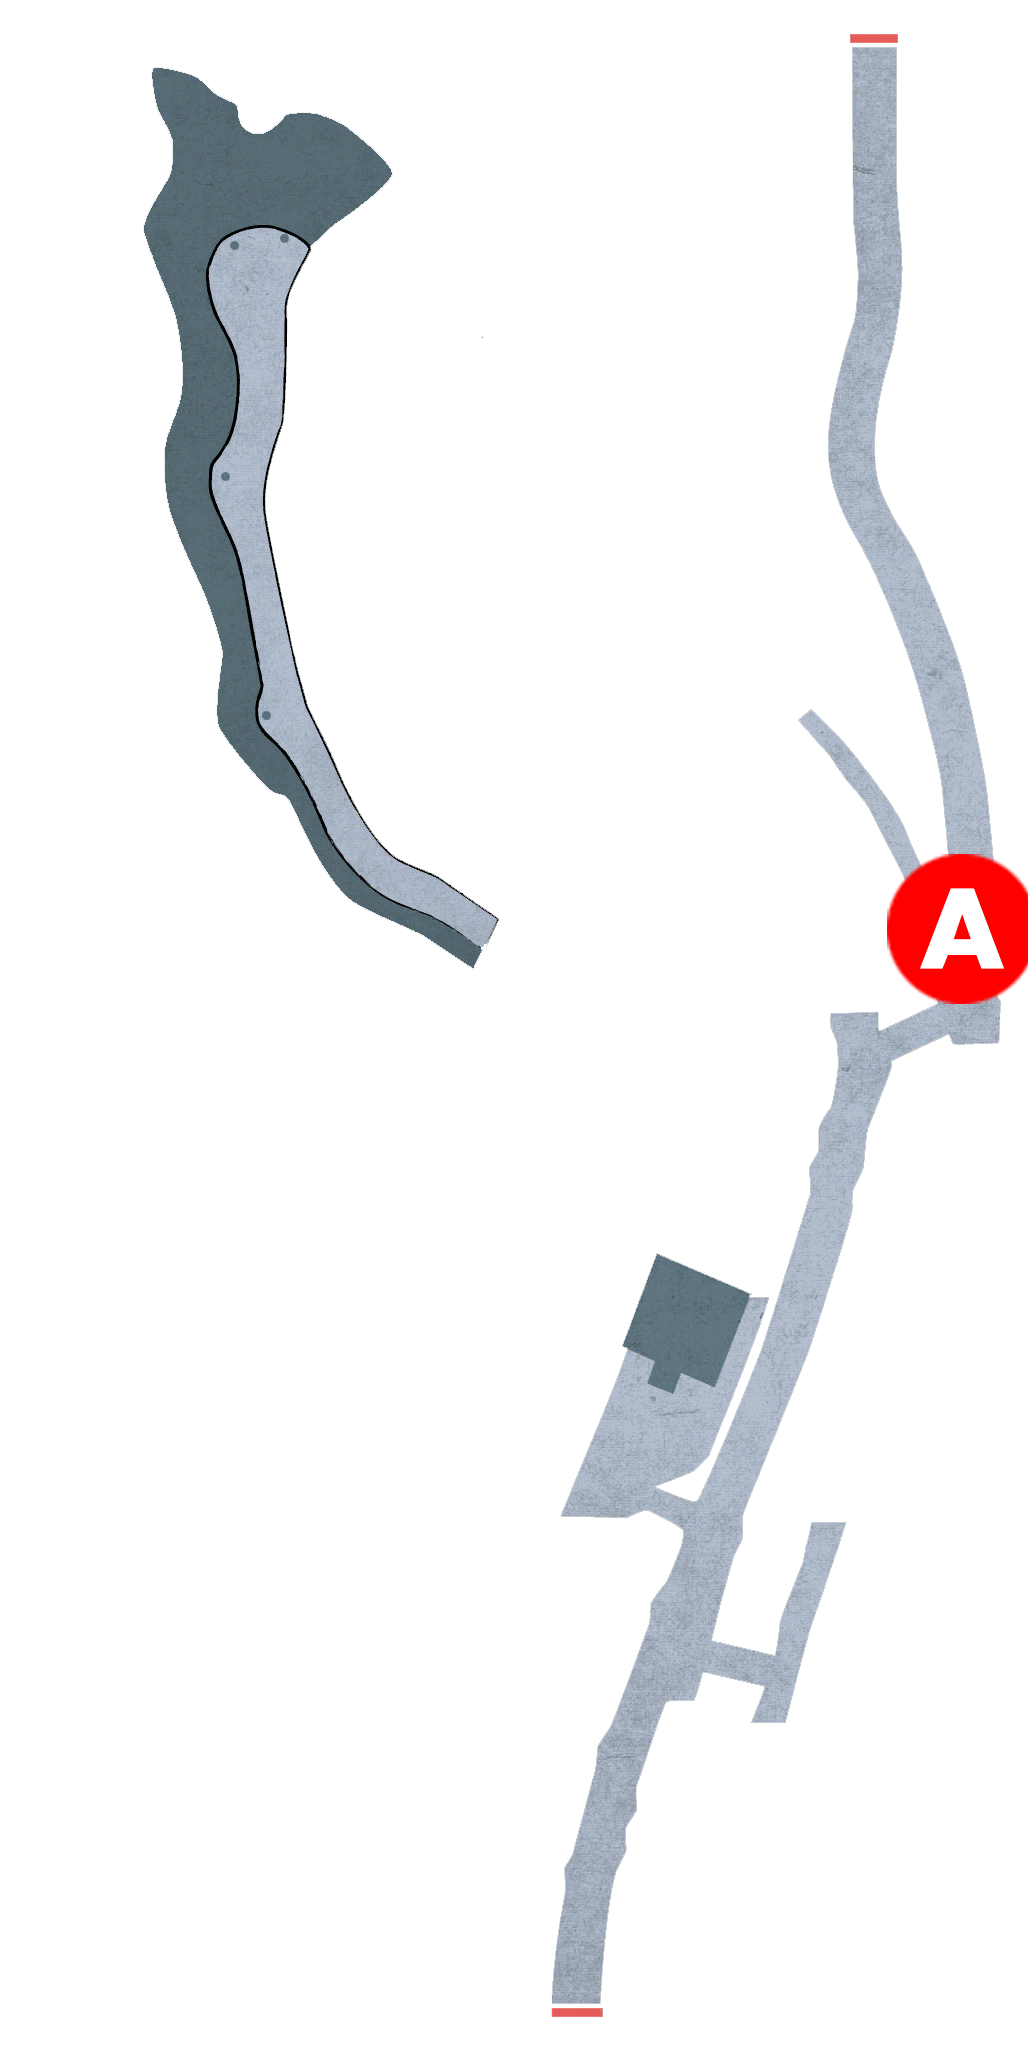
| 78 | Investment Advice |
| Available At: | 5-1 |
| Time: | Day / Evening / Night |
| Prerequisites: | Complete Request 77 |
Steps
- A - Speak to man and select the TOP OPTION
- Select the TOP OPTION then the BOTTOM OPTION
- A - Speak to man and select the TOP OPTION
- A - Speak to man and select the BOTTOM OPTION
| 1: Speak to man and select the TOP OPTION |
A - Speak to the guy at the cafe. He says he's got something awesome to tell Kiryu. Select the TOP OPTION to hear what he has to say.
| 2: Select the TOP OPTION then the BOTTOM OPTION |
He talks about an investment opportunity for Kiryu. Apparently, in Edo, soy sauce imported from Kyoto is a luxury item. They don't know how to create their own over there so they import from the west and can't keep up with demand. The dude sees a business opportunity here - he could be involved in transporting soy sauce to Edo to make money, but he needs to raise the funds to do so. He asks Kiryu if he'd like to invest in the business. Select the TOP OPTION to agree. He asks Kiryu how much he'd like to invest. Select the BOTTOM OPTION to invest 1 Ryo. The guy then heads off.
| 3: Speak to man and select the TOP OPTION |
A - Leave the area (e.g. go back to Rakugai), then re-enter the River Road area and return to the man. Kiryu moans that he hasn't heard anything since his investment and asks what's going on (it's been like 20 seconds Kiryu, take it easy...) He gives Kiryu some story about how it was all going well - he used to money to buy his stock and set off on a boat. Unfortunately, he ran into a nasty storm and lost his cargo. However, he tells Kiryu he's managed to raise more money and asks him to give him more time, promising he will be successful this time. Select the TOP OPTION to leave it in his hands.
| 4: Speak to man and select the BOTTOM OPTION |
A - Again, leave the area and return to the man. He asks if Kiryu remembers him. Select the BOTTOM OPTION to say you remember. The guy says his mission was a huge success! He thanks Kiryu for his investment and gives him 2 Ryo. He also gives Kiryu a bonus reward - a Star Steel. After this, the request ends with the COMPLETE result and you also receive 1000 EXP as a reward.
| ALTERNATE ENDINGS |
In Step 2, if you select the FOURTH OPTION to invest 5000 Mon (and then follow the rest of the steps as above) the request ends with the COMPLETE result and you get 1000 EXP as above, but this time only get 1 Ryo back from your investment and you also get a Ultimate Tamahagane.
In Step 2, if you select either the SECOND OPTION or the THIRD OPTION to invest 100 Mon or 1000 Mon, respectively, you again get the COMPLETE result and 1000 EXP reward. You don't get any item this time though. The investment return you get will be double what you gave him (so, either 200 Mon or 2000 Mon).
In Step 3, if you withdraw your investment (BOTTOM OPTION) you get back 50% of the amount you gave him. The request also ends at this step with the FINISHED result. You still get 1000 EXP though.

| 116 | The Old Man's True Colours |
| Available At: | 9-3 |
| Time: | Day / Evening / Night |
| Prerequisites: | Complete Commission 115 |
Steps
- A - Speak to man
- B - Speak to man
- C - Speak to old man
- Fight men
- D - Speak to man
| 1: Speak to man |
A - Talk to the man standing around outside, near the secret entrance to Kiryu's house. He talks about some big shot who is in Gion right now. Apparently he reserved an entire brothel for himself.
| 2: Speak to man |
B - Speak to the man standing near the gates of Gion. He tells Kiryu about some guy who reserved all the rooms of his brothel. We learn that this man is refusing to pay and asks for Kiryu's help. We transport to the brothel, where the old man is standing outside with a couple of henchmen. The head clerk warns the old man that they'll have to take action if he doesn't pay, but they threaten him with the old man's status - they reveal his crest and they bow down assuming he is some major nobleman.
After they leave, the head clerk (Hanbei) demands they track down those guys and get the money, saying he's never even heard of this lord. He notices Kiryu and asks for his help as well, formally commissioning work from him.
| 3: Speak to old man |
C - You'll find the old man and his henchmen here. Kiryu demands the money he owes, saying he doesn't care who he is - no one gets away without paying.
| 4: Fight men |
All 3 enemies are basic brawler types and have hardly any health. Beat their asses with your swords and get this over with quickly.
After the fight we learn the old man is a fraud. Kiryu gets the money from him.
| 5: Speak to man |
D - Speak to Hanbei to hand over the old man's fee. He gives Kiryu the promised 1 Ryo reward. After this, the commission ends and you receive 1500 EXP as a reward.
NOTEFun fact: the old man and his henchman are a reference to a Japanese period drama called "Mito Komon".

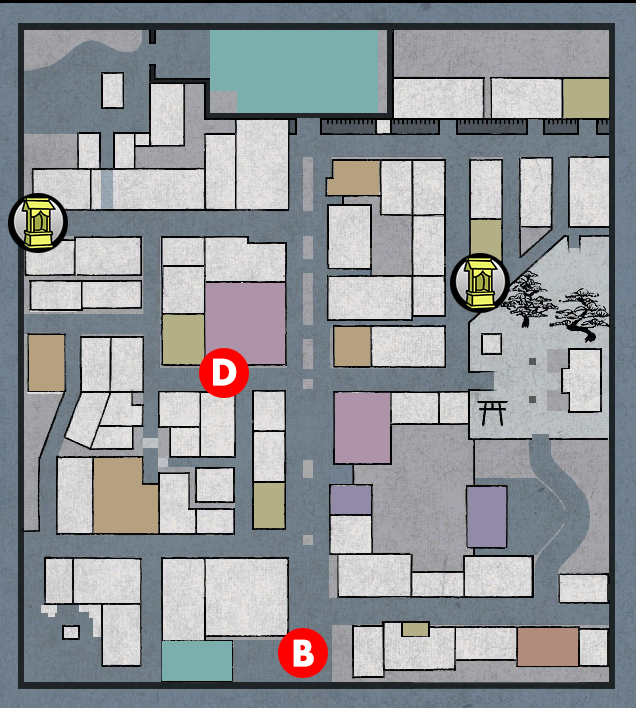
| 79 | The Woman |
| Available At: | 9-4 |
| Time: | Night |
| Prerequisites: | Complete Request 29 |
Steps
- A - Go near the woman
- Fight ninja
- B - Speak to man
- C - Examine the house
- Fight ninja
- Fight ninja boss
NOTEIf you are following the main story guide, remember that at this point in the story when you try to leave Kiryu's house (whether going into Gion or Rakugai) the first dialogue option asks if you want to rest. You must select the TOP OPTION to NOT progress the story. Then, you get the usual dialogue you get when trying to leave, where you select the BOTTOM OPTION to leave Kiryu's house (when going to Rakugai) or you can just leave as normal to go out to Gion.
Believe me, I've made this mistake a few times... I have progressed the story when I just wanted to leave the house. That's why I'm warning/reminding you now to be careful and pay attention, so you don't make the same mistake.
| 1: Go near the woman |
A - There are some ninja here surrounding a woman. Go near them to trigger an event. Kiryu asks what they are up to. They tell him to beat it, but Kiryu ends up fighting them.
| 2: Fight ninja |
You fight 5 ninja types here. As always with these enemy types, they move fast and love to dodge your attacks. Using the two sword style is very helpful because the attacks are fast (and have a wide attack span) and you can defend against attacks from all directions.
After the fight, the ninja leave. The woman (Momiji) thanks Kiryu for his help. Kiryu offers to walk her home, just to be safe. Kiryu keeps watch while she has a bath. Momiji thanks Kiryu for not only saving her earlier but also staying to keep guard while she bathed. We get a load of backstory now. She lives her alone after her parents died, leaving her with a load of debt. In fact, those ninja were trying to collect the debt from her earlier. Then she tries to get Kiryu to stay here and spend the night with her, quite literally throwing herself at him until he slaps her across the face. Kiryu tells her she should go to Gion if she needs to make some money (specifically suggesting Kamenoya, saying she can help out there).
| 3: Speak to man |
B - Speak to the guy outside Kamenoya. Kiryu asks if a woman called Momiji has shown up. The guy says she did but she didn't even last a day - apparently she kept making loads of mistakes and the owner of the brothel gave her a big telling off, then she ran off, away from Gion. The said they are all worried about her and ask Kiryu if he can help find her and bring her back. He gives Kiryu a note, saying she left it behind for him to read.
In the note, Momiji apologises to Kiryu, saying she's no good and she's going back home to prepare to leave the city and find somewhere else to live.
| 4: Examine the house |
C - Examine the house here. Momiji is not there and Kiryu wonders if she has already left the city. Suddenly, a bunch of ninja show up and fight him
| 5: Fight ninja |
This is the same as the previous fight, only this time you are up against 6 ninja instead of 5. Same strategy applies - use the two sword style.
After the fight, the ninja boss shows up and knocks Kiryu down, then tells a female ninja (kunoichi) to finish him. This kunoichi is Momiji, who is a member of this ninja group who had orders to kill Kiryu (so the incident which started this off was all a setup). We get a load of story now. The ninja boss says they've always been keeping an eye on her and knew she wanted to leave them, which cannot be allowed. He is disappointed with Momiji and says after he kills Kiryu, she is next. Kiryu asks the boss to promise to let her go if he defeats him. The boss agrees.
| 6: Fight ninja boss |
This guy is a boss enemy type. He fights exactly like the ninja type, but he is also able to breath fire, so watch out for that. He doesn't have too much health though, so you should be okay. Again, because of his speed and agility, using the two sword style is the best bet because of the faster and wider attacks.
After the fight, Kiryu encourages Momiji to go back to Kamenoya. But she says she's useless - she was a failure as a ninja and is a failure at whatever she does. But Kiryu says that's not true - her act when they first met was very convincing and encourages her to keep improving herself and become a better woman. After this, the request ends with the COMPLETE result and you also receive 10000 EXP as a reward.
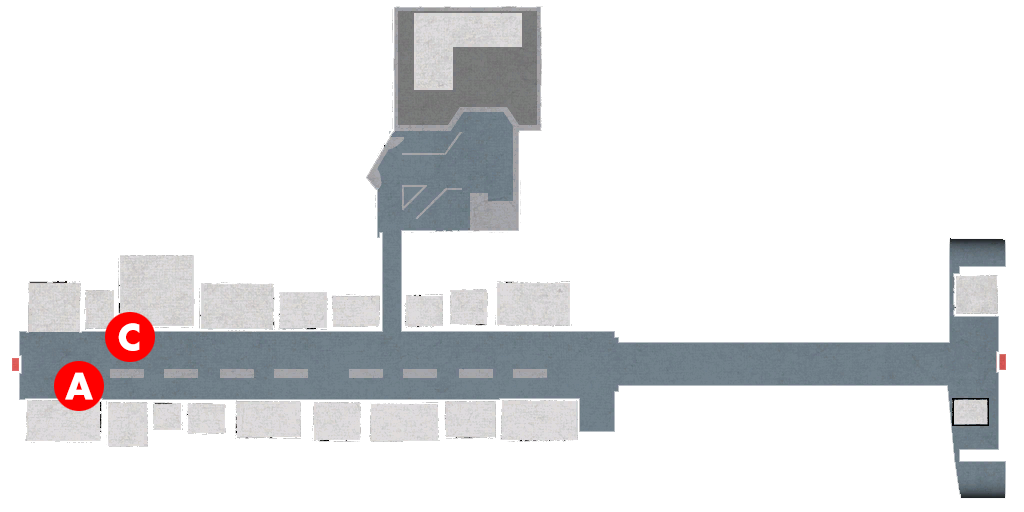

| 131 | Tatsu of the Twin Feathers |
| Available At: | 9-4 |
| Time: | Night |
| Prerequisites: | N/A |
Steps
- See Tatsu's poster on the notice board
- A - At night, walk down the street while at critical health and select the BOTTOM OPTION
- Fight Tatsu
| 1: See Tatsu's poster on the notice board |
Examine the notice board by the police box in Rakugai and see Tatsu's poster. At this point in the main story, there are 2 new posters. Tatsu is the first one you see.
| 2: At night, walk down the street while at critical health and select the BOTTOM OPTION |
A - Tatsu will only show himself when you walk down this street at night while at critical health. Eating turtle food sold by the Turtle Seller (such as Sludge Worms) will damage you. Eat harmful food items until your health bar flashes red and Kiryu is hunched over while moving around (to be precise, your health must be below 20% to get him to show up).
When you walk down the street injured, some guy calls out to Kiryu, saying he looks weak and offers to help Kiryu get back to good health with a massage. Select the BOTTOM OPTION to refuse. It doesn't change anything). Tatsu says he'll be taking payment anyway - he says Kiryu's sword will do nicely. He then calls out some of his henchmen to join him in taking down Kiryu.
NOTEIn this fight, all of the henchmen are carrying money. If you want the best reward for this bounty, you must defeat the henchmen and pick up the money they drop BEFORE you defeat Tatsu.
| 3: Fight Tatsu |
The first thing you should do in this fight is heal - you had to put yourself in critical health to encounter this guy but you don't want to do this fight with very little health. 3 of his henchmen are brawler types and 1 is a brigand type. Tatsu himself is an archer type, but has a lot more health than a typical archer. Remember to defeat the henchmen first and pick up the money they drop if you want the best reward. This could be annoying because while you are trying to deal with the henchmen you have to put up with Tatsu firing arrows at you, which will stun you and chip away at your health. Beat the henchman as quickly as possible, pick up the money, then close in on Tatsu and beat his ass.
NOTERemember, you must pick up all 4 henchmen money drops to get the best reward.
After the fight, Kiryu summons an official who confirms this is Tatsu. As a reward, he gives Kiryu 2 Ryo (you only receive 1 Ryo if you do not collect all the money from the henchmen). He also rewards Kiryu with a Wrath Talisman (you get this regardless of whether you collect all the money or not). After this, the bounty ends and you receive 1500 EXP as a reward.

| 132 | Tetsuto the Demon Slayer |
| Available At: | 9-4 |
| Time: | Night |
| Prerequisites: | N/A |
Steps
- See Tetsuto's poster on the notice board
- A - Speak to Tetsuto
- Fight Tetsuto
| 1: See Tetsuto's poster on the notice board |
Examine the notice board by the police box in Rakugai and see Tetsuto's poster. At this point in the main story, there are 2 new posters. Tetsuto is the second one you see.
| 2: Speak to Tetsuto |
A - When you get near this area, Kiryu recognises Tetsuto from the wanted poster (dressed in women's clothes). Speak to him to confront him. Kiryu says the act isn't working and calls him out as being Tetsuto, which eventually leads to Tetsuto and his henchmen fighting Kiryu.
| 3: Speak to Tetsuto |
Tetsuto is a boss enemy type and has quite a lot of health. Alongside him are 9 henchment. 7 of them are basic brawler types while 2 are swordsman types. The hechmen are simple to deal with, so take them out quickly with the two sword style (so you can defend against attacks from all directions while you do it), then you can focus solely on Tetsuto. He fights like the brute enemy type with a big-ass sword and powerful attacks. Keep your distance and jump in with attacks when he leaves himself open (e.g. right after he slams his sword into the ground).
After the fight, Kiryu summons an official who confirms this is Tetsuto. He gives Kiryu the promised 1 Ryo reward. He also gives Kiryu a White Lion Hair. After this, the bounty ends and you receive 1500 EXP as a reward.

| 80 | The Old Dog |
| Available At: | 9-5 |
| Time: | Day / Evening / Night |
| Prerequisites: | Complete Request 76 |
Steps
- A - Speak to the man with the old dog
- A - Leave the area, then speak to the boy and select the BOTTOM OPTION
- Fight thieves
| 1: Speak to the man with the old dog |
A - Speak to the old man here. He mentions some thieves showed up the other day. He says his dog would usually chase them off, but he's not much of a guard dog these days. Not surprising since the dog is over 20 years old now!
| 2: Leave the area, then speak to the boy and select the BOTTOM OPTION |
A - Leave the area (go back to Rakugai) then return here. There is a boy outside. Speak to him and we learn the master (old man from Step 1) is out. Suddenly the dog shows up and starts barking. Kiryu thinks the dog wants them to follow him. Select the BOTTOM OPTION to go with the dog. The dog leads Kiryu to his master, who is surrounded by thieves. They see Kiryu and fight him to get him out of their way.
| 3: Fight thieves |
All 3 thieves are the brawler enemy type, but 2 of them are holding a weapon (one has a hoe, one has a bamboo pole).
After the fight, the man thanks Kiryu for his help. The man thanks Kiryu for his help by giving him a Tiger Leather Obi. The man heads back home with his dog. After this, the request ends with the COMPLETE result and you also receive 1500 EXP as a reward.
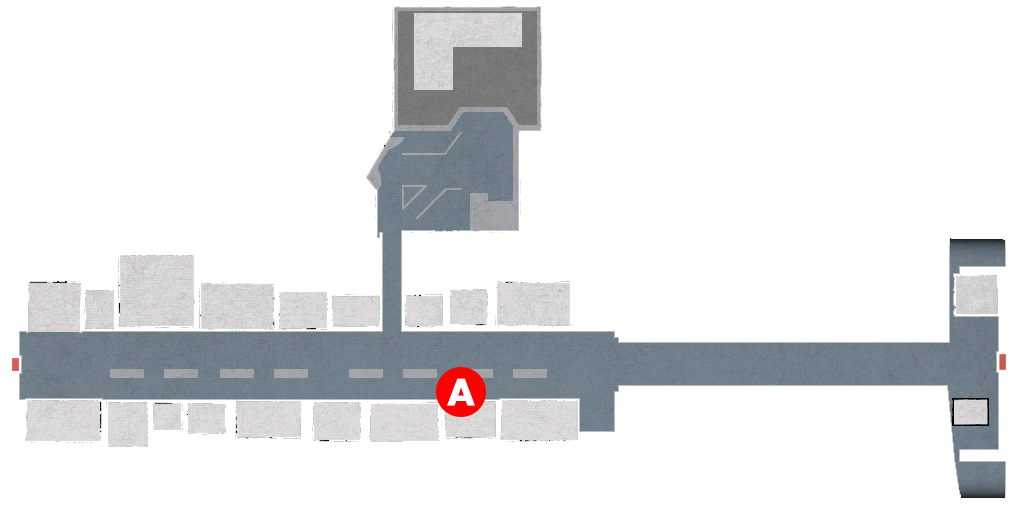
| 81 | A Gift to God |
| Available At: | 9-5 |
| Time: | Day |
| Prerequisites: | You must know the heat action Certain Death - Bull Horns (you get this from a revelation) |
Steps
- A - Go near man in the field and select the TOP OPTION
- A - In the same area, examine the paper in the field and select the TOP OPTION
- A - Speak to the man
- A - At night, listen to the conversation
- B - Go up to the mountain via the steps and go near the man
- Fight man
- A - Speak to man
| 1: Go near man in the field and select the TOP OPTION |
A - There is a man on the floor in the field here. Go near him to trigger an event. The man tells Kiryu that "Lord Yuho" has been here again. Kiryu asks who or what this Lord Yuho is. Apparently, he is some awesome god who brings a bountiful harvest to fields. You can tell when he has visited because he leaves marks/footprints in the field, as we can see here. That's not all - this time he has even left a divine message. The message says to present the following as an offering, then lists a bunch of stuff. Select the TOP OPTION when the dialogue menu pops up to ask if this Lord Yuho really exists. The two farmers find Kiryu's lack of faith disturbing.
| 2: Go near man in the field and select the TOP OPTION |
A - In the field, you'll see a piece of paper. Interact with it and select the TOP OPTION to pick it up. Kiryu wonders if he should show this to the farmer.
| 3: Speak to the man |
A - Speak to the farmer again and Kiryu will hand over the paper. The farmer says it's another divine message from Lord Yuho. It seems the god is angry because of this farmer's lack of offerings recently (because he's poor and hasn't had good harvests recently) and warns that a great curse will befall him if he doesn't get his act together. He wonders what he should do and the other farmer suggests offering his cow, Hanako, to Lord Yuho. The cow is precious to him but it seems he may have no other option. Rather suspiciously, the divine message also mentions that the offering needs to be brought to a specific place which just so happens to be on the other farmer's field...
NOTEYou cannot progress to the next step until Night time. In the main story, you can finish the substory in 10-11.
| 4: At night, listen to the conversation |
A - At night, you'll find the two farmers from earlier here, along with Hanako. It seems the farmer has finally decided to offer his beloved cow to Lord Yuho.
| 5: Go up to the mountain via the steps and go near the man |
B - Go near the stairs leading up to the mountain. Kiryu will automatically go up (you don't even get a dialogue option for it, so you have no choice). In the new area, go near the farmer and Hanako to trigger an event. The farmer says his goodbyes, then we see what appears to be Lord Yuho taking the cow away. After that, the farmer runs off thinking he has pleased this god, but then Kiryu learns the whole thing is a set up by the other farmer who just wanted the first farmer's cow. They can't let Kiryu get away now he knows their secret, so they try to take him out.
| 6: Fight man |
You are up against 4 enemies. Two brawler types, one martial artist type, and one martial arts expert type. As always, watch out for the martial arts expert's counters and the martial artist's grabs. This shouldn't be a problem since you can just use your swords, but the martial arts expert can sometimes stun you with his attacks, so it's a good idea to get rid of him first (he's the one wearing a hood over his head).
After the fight, we get a load of backstory about how he has been behind everything (including the marks in the field and the notes) and how he was always envious of the other farmer's success with farming, so he would secretly destroy the field during the night and make it look like "Lord Yuho" was angry with him. Kiryu demands he give back everything he has taken from that other farmer.
| 7: Speak to man |
A - Return to the farmer here. He tells Kiryu that his beloved cow has returned to him. Not only that, but loads of other stuff including money has returned to him. Kiryu realises the other farmer must have done as he commanded. After this, the request ends with the COMPLETE result and you also receive 10000 EXP as a reward.

| 82 | The Yujo's Request 1 |
| Available At: | 9-5 |
| Time: | Day / Evening / Night |
| Prerequisites: | N/A |
Steps
- A - Speak to yujo and select the TOP OPTION
- B - Speak to old lady
- C - Look at house
- A - Speak to yujo and select the TOP OPTION
| 1: Speak to yujo and select the TOP OPTION |
A - Speak to the yujo standing here (called Suisen). She talks about how she's from a farming family, from a small village (her father sold her off to the brothel). Her parents are old , so she's worried about them. She asks Kiryu if he'd be willing to go and see how her family are doing. Select the TOP OPTION to say you'll do it. She says Kiryu will find her parents on the farms beyond Yoshioka Dojo.
| 2: Speak to old lady |
B - Speak to the old lady standing on the path. She points to an old house, saying the man living there sold his daughter off to a brothel and has been using the money to live a life of debauchery.
| 3: Look at house |
C - Go to the edge of the farm and press the interaction prompt when it appears (top-right). Kiryu walks up to the house to take a closer look. Kiryu hears the father happily talking about how much money they got from selling their daughter and how having a loyal daughter is clearly better than slaving away on a farm.
| 4: Speak to yujo and select the TOP OPTION |
A - Speak to Suisen again. She asks how her family are doing. Select the TOP OPTION to tell her they are living an honest life. Kiryu (lying to her) tells her they are continuing their farm work. She thanks Kiryu for checking on them and rewards him with 1 Ryo. After this, the request ends with the COMPLETE result and you also receive 1500 EXP as a reward.
| ALTERNATE ENDINGS |
In Step 4, if you select the BOTTOM OPTION to tell her the truth, the request will still end with the COMPLETE result and you still get 1500 EXP as a reward. However, you only get 5000 Mon when you select this option.
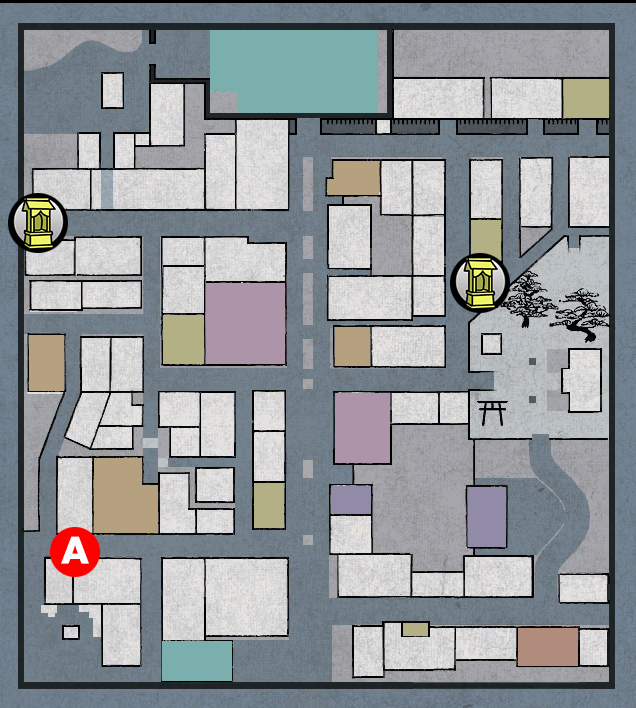

| 83 | The Red Diary |
| Available At: | 9-5 |
| Time: | Day / Evening / Night |
| Prerequisites: | Complete Request 82 |
Steps
- A - See diary and select the TOP OPTION
- Select the TOP OPTION
- B - Speak to yujo
- C - Speak to yujo
- D - Speak to kamuro and select the TOP OPTION (x2)
- E - Buy red hairpin
- Fight man
- D - Speak to kamuro
| 1: See diary and select the TOP OPTION |
A - There is a red diary on the ground near the shrine. Interact with it and select the TOP OPTION to pick it up.
| 2: Select the TOP OPTION |
Kiryu checks the contents and determines this was likely written by a yujo here in Gion. He wonders if he should track down the owner. Select the TOP OPTION to find the owner.
| 3: Speak to yujo |
B - Speak to the yujo here (she's behind the wooden fencing of the building). Kiryu asks her if she recognises the diary. She says she thinks she saw someone at Yoshidaya with a diary like that.
| 4: Speak to yujo |
C - Speak to the yujo here (again, she's sat behind the wooden fencing). Kiryu asks about the diary. The yujo doesn't recognise it, but says she'll ask around to see if anyone knows anything. When she returns she says it seems it doesn't belong to anyone here. But apparently someone has seen a girl at Waseya with the diary.
| 5: Speak to kamuro and select the TOP OPTION (x2) |
D - When you get near this area, Kiryu spots a kamuro from Waseya standing around and supposes he should ask her about the diary. Speak to her and she immediately recognises the diary as that of the mistress of Waseya. Kiryu gives her the diary so she can pass it on. The kamuro asks Kiryu what was written inside. Kiryu says he didn't really read anything - just enough to work out it belonged to a yujo. The girl asks Kiryu if he'll read some of it (she can't read it because her kanji knowledge isn't good enough). Kiryu is uneasy about reading someone's personal diary, but the kamuro begs him, saying the mistress has been harsh with her recently and wonders if she just hates her - maybe the mistress wrote something about her in the diary. Select the TOP OPTION to read it. She introduces herself as Omayu and Kiryu tries to find a mention of her name.
The entry starts off moaning about the fact that Omayu still has a long way to go and her progress isn't great so far. However, the mistress says she sees a bright future for her at the brothel. It is because of this high expectation that she is much harder on Omayu than the other kamuro. Omayu says she'll keep working hard for the mistress' sake. Then she mentions that it is in fact the mistress' birthday today. She wants to gift her a red hairpin but apparently they are only sold at Arigataya in Rakugai. She says she has been saving up and has enough money to buy it, but needs someone to get it for her. Select the TOP OPTION to buy it for her. She gives Kiryu 3000 Mon to cover the cost.
| 6: Buy red hairpin |
E - Speak to the shopkeeper in Arigataya. The red hairpin is not normally sold here, but at this point in the substory a special dialogue option appears just for the hairpin. Select the THIRD OPTION to bring up this menu. It's another purchase menu like the others, but there is only a single item to buy (the red hairpin).
When you exit the shop, some guy confronts Kiryu. He moans at him for buying the last red hairpin on sale and asks him to hand it over. Kiryu refuses to do so, leading to a fight.
| 7: Fight man |
This guy is very easy. A simple brawler type. Just kick his ass. The dude runs off right after you beat him, then you can go ahead and get back to Omayu.
| 8: Speak to kamuro |
D - Return to Omayu. Kiryu gives her the red hairpin. She thanks Kiryu, saying the mistress will be delighted. Right on cue, the mistress shows up. Omayu wishes her happy birthday and gives her the red hairpin. The mistress is delighted that Omayu remembered her birthday and loves the hairpin. After learning Kiryu went out of his way to get the hairpin for Omayu, the mistress thanks Kiryu by giving him a Gold Plate. After this, the request ends with the 1500 EXP as a reward.
| ALTERNATE ENDINGS |
In Step 2 or 5, if you select any option other than the one listed above, the request ends with the FINISHED result and you get no reward at all (not even EXP). If you don't care about the complete result (or the rewards) and just want to get the substory done quickly, you could end it at Step 2 to get it over with right away (and this won't lock you out of any future substories).
The Step 2 end involves Omayu and the mistress showing up at the shrine where you find the diary and Kiryu gives it to the mistress when she recognises it as her diary, which she lost somewhere. In Step 5, Kiryu either just refuses to read the diary or go to get the hairpin and the substory ends there.


| 84 | The Yujo's Request 2 |
| Available At: | 9-5 |
| Time: | Day / Evening / Night |
| Prerequisites: | Complete Request 83 |
Steps
- A - Examine the brothel and select the TOP OPTION
- Fight men
| 1: Examine the brothel and select the TOP OPTION |
A - Go here and examine the brothel. Kiryu says he can hear the voice of the yujo he helped before (Suisen from request 82) and wonders if something is going on in there. Select the TOP OPTION to go inside.
Inside, Kiryu sees Suisen angry with her father (who came with another man). It turns out her father wanted to have some fun with yujo in Gion and didn't realise she was at this one! Suisen is not happy that he's using the money he got from selling her to spend time with yujo. The father blames the other man, saying he's the one who brought him here, but the man says that isn't true. After a massive argument between the two, Suisen asks Kiryu to stop them.
| 2: Fight men |
The father is a brawler type. The other man is a swordsman type who has a decent amount of health. Remember, you have to fight unarmed here (can't use swords at least. You can still use special weapons if you have any equipped). There is a weapon on the battlefield you can pick up and use if you like though. The swordsman can do the most damage to you, so try getting rid of him ASAP. The father is surprisingly good at defending against your attacks. Because of this, you will need to either grab him or use a weapon heat action (e.g. the heat action for the weapon on the ground in this battlefield).
After the fight, the man runs off. Suisen tells her father she still believes in him - that he can go back to being like he used to be and one day buy her freedom. The father realises he let the money get to his head and promises Suisen he will work hard and buy her freedom one day. The father thanks Kiryu for beating some sense into him, them heads back home.
Outside, Suisen thanks Kiryu for his help, rewarding him with 3 Ryo. After this, the request ends with the COMPLETE result and you also receive 1500 EXP as a reward.
| 85 | The Town Doctor 2 |
| Available At: | 9-5 |
| Time: | Day / Evening / Night |
| Prerequisites: | Complete Request 34 |
Steps
- A - Speak to man and select the TOP OPTION
- B - Speak to employee
- C - Go near Ken
- Fight men
| 1: Speak to man and select the TOP OPTION |
A - Speak to the man here (he is part of the crowd of people gathered around there). Apparently one of the yujo at that brothel has fallen ill. She has some kind of strange illness of unknown origin and no one is sure what's going on - not even Wakamatsu, the best doctor in Gion. Kiryu hears Wakamatsu from inside saying he doesn't know what to do about this illness. Kiryu wonders if Ken (the doctor from request 33) can help. Select the TOP OPTION to look for him.
NOTESelecting the BOTTOM OPTION here locks you out of 100% completion, so be careful!
| 2: Speak to employee |
B - Speak to the employee standing around in the middle of the restaurant. Kiryu asks if he's seen Ken. Apparently Ken was here - he just left a few moments ago. He said he was heading out of Gion, so if Kiryu's quick he might catch him.
| 3: Go near Ken |
C - You'll see Ken standing near the gate. Go near him to trigger an event. Kiryu says there is someone who needs his help, but Ken says he's lost all his confidence and doesn't believe there's anyone here who would want him to help them. Kiryu manages to convince him to come along with him.
Inside the brothel, Kiryu asks the owner if he'll let this doctor take a look. The owner recognises the doctor as "Ken the Killer Doctor" and doesn't want his help. Suddenly, a man enters. This man just so happens to be the man who was saved by Ken back in request 33. It turns out this man is the president of some kind of association involving the brothel. He was worried when he heard the brothel's top yujo fell ill but he is relieved to see Ken here and demands that the owner and mistress allow him to tend to the yujo.
Ken has a look at her and gives her something to drink. Her temperature drops and she sleeps. Ken says she'll be fine now, after a good rest, then says it's not some strange illness - it's actually quite common. They all thank Ken for his help and say they will tell everyone in Gion about his skill.
Outside, Kiryu says he no longer needs to leave Gion. Wakamatsu shows up and is not happy that Ken made him look bad. He said his plan was almost a success, considering Ken had almost left Gion. Next, we learn that Wakamatsu is responsible for Ken's reputation as the killer doctor - he put poison in Ken's medicine. He wants to get rid of all his competition and this leads to a fight.
| 4: Fight men |
Wakamatsu is joined by 2 partners. You are up against 1 brigand type and 2 brawler types (though one is carrying a weapon). None of them have much health so this shouldn't be a problem. Take out the brigand type first so you don't have to worry about sword attacks.
After the fight, Ken thanks Kiryu for saving him and rewards him with a Fly Picture (used for a revelation). He asks Kiryu to leave Wakamatsu to him - he'll personally take him to the police. After this, the request ends with the COMPLETE result and you also receive 1500 EXP as a reward.
| ALTERNATE ENDINGS |
In Step 1, if you select the BOTTOM OPTION, Kiryu figures Ken has likely already left Gion so he won't bother looking for him. The substory ends right here with the FINISHED result and you get absolutely nothing as a reward. This means you miss out on the Fly Picture reward so it becomes impossible for you to get 100% heat action completion since you miss out on that revelation.

| 86 | The Castella |
| Available At: | 9-5 |
| Time: | Day / Evening / Night |
| Prerequisites: | Complete Requests 35 and 71 |
Steps
- A - Speak to woman and select the TOP OPTION
- B - Speak to man and select the TOP OPTION
- C - Speak to man and receive sugar
- D - Speak to candy seller and receive mizuame
- E - Buy egg (700 Mon)
- F - Speak to woman and receive udon flour
- A - Speak to foreigner
- G - Go near man and daughter
| 1: Speak to woman and select the TOP OPTION |
A - Speak to the woman standing here, just outside Arigataya. She says her father is dying soon so she wants to do something for him in the little time he has left. He said he once had something called a "castella" and would love to eat it again. She has never heard of it (neither has Kiryu) but apparently the father received it from a foreigner. She asks Kiryu if he knows any foreigners who might be able to tell them about it. Select the TOP OPTION to say you know someone.
NOTEI wrote it as "castella" - which indeed is what it is, as we learn by the end - but the father actually mispronounces it. The mispronunciation is something along the lines of "kwastelya".
| 2: Speak to man and select the TOP OPTION |
B - The foreinger from request 71 is here. Speak to him and Kiryu asks if he's heard of this "castella" (or "kwastelya", to use the mispronunciation) food. It seems he does know about it and goes with Kiryu back to the woman.
The woman asks what this food is. This is where we learn the correct pronunciation is "castella". He then lists, in his usual very broken Japanese, 4 ingredients that are required to make the food. The woman has no idea what he just said and asks Kiryu if he has any idea. Select the TOP OPTION to say you do. The woman asks if you would be willing to collect the required ingredients for her.
NOTEYou don't have to collect the ingredients in the order listed below - Steps 3 to 6 can be completed in any order you want.
| 3: Speak to man and receive sugar |
C - Speak to the guy here (he's the confectioner from request 35). After talking about the ingredients for this castella, the confectioner realises one of the ingredients is "sugar" and gives Kiryu some for free.
| 4: Speak to candy seller and receive mizuame |
D - Speak to the candy seller (from the flavour of candy request series, such as 14). After talking about the ingredients, the candy seller realises one of them is "mizuame" and gives Kiryu some for free.
| 5: Buy egg (700 Mon) |
E - Speak to the woman standing around on her own, next to the chicken. After talking about the ingredients, she realises one of them is "egg". Buy one from her for 700 Mon (TOP OPTION).
| 6: Speak to woman and receive udon flour |
F - Speak to the woman here standing just outside the udon restaurant. After talking about the ingredients, she realises one of them is "Udon Flour" and gives Kiryu some for free.
NOTEHere's an interesting fact. You only get the udon flour for free if you have completed request 62 - she gives it for free out of appreciation for what Kiryu has done for the restaraunt. But if you have not completed this request, she will charge you 100 Mon for it (select the TOP OPTION when speaking with her).
| 7: Speak to foreigner |
A - Once you have all 4 ingredients, speak to the foreigner. He now explains how to make the castella using the ingredients (or tries to, at least). When he's done, the woman says she has no idea what he just said but no matter what she will make this for her father.
Inside the woman's house, she gives her father the castella, who recognises it and is delighted he is able to have it one last time. He then falls to sleep and Kiryu leaves because he doesn't want to disturb him.
| 8: Go near man and daughter |
G - Here you will see the daughter and her father. Go near them to trigger an event. It seems eating the castella has made the father well again and he seems to think if he keeps eating castella he will be cured. The daughter thanks Kiryu for his help and gives him a Castella. After this, the request ends with the COMPLETE result and you also receive 10000 EXP as a reward.


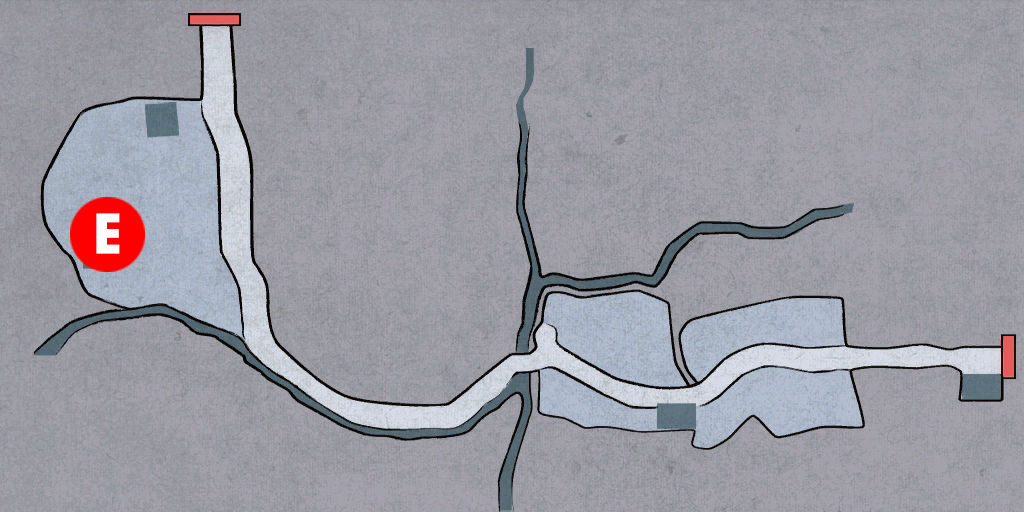
| 87 | The Divine Message |
| Available At: | 9-5 |
| Time: | Day / Evening |
| Prerequisites: | N/A |
Steps
- A - Speak to old man
- B - Examine statues and select the TOP OPTION (x2)
- B - Examine statues again and select the TOP OPTION (x3)
- A - Speak to old man
NOTEYou will need 2 ohagi (food item) to complete this substory. You can buy them at Nonaka, the tea house by Yoshioka Dojo. Speak to the woman there and select the MIDDLE OPTION to buy an item (instead of just ordering food like a restaurant). The ohagi is the 4th item on the list (costs 18 Mon).
| 1: Speak to old man |
A - Speak to the old man here. He talks about the nearby jizo statues and says when you offer an ohagi (food item) to them, you will hear a divine message.
| 2: Examine statues and select the TOP OPTION (x2) |
B - Examine the statues here. Select the TOP OPTION to offer an ohagi. Kiryu hears a voice from the statues saying he must close his eyes to receive the divine message. Select the TOP OPTION to close your eyes (if you select the BOTTOM OPTION the dialogue will keep looping back to the options until you select the right one). Apparently some trouble will befall Kiryu in his future, but before the statues can reveal more details about his future he must offer another ohagi. After opening his eyes, Kiryu notices the ohagi has gone.
| 3: Examine statues again and select the TOP OPTION (x3) |
B - Examine the statues again and offer another ohagi (TOP OPTION). Again, the voices tell Kiryu to close his eyes. Select the TOP OPTION to do so (again, if you select the BOTTOM OPTION the dialogue will keep looping back to the options until you select the right one). Yet again, before they can reveal any details about Kiryu's future, they say Kiryu must offer another ohagi. Kiryu is suspicious about what's going on here and wonders if he should open his eyes. Select the TOP OPTION to do so. Kiryu spots the old man from earlier running off.
| 4: Speak to old man |
A - Return to the old man. Kiryu calls him out on the statue situation - he knows the old man is making this up and eating the ohagi. The evidence is on his face (flour from the ohagi can be seen around his mouse). The man apologises, saying he just really wanted to experience the taste of ohagi once again. He gives Kiryu a Talisman as an apology. After this, the substory ends with the COMPLETE result and you also receive 1500 EXP as a reward.
| ALTERNATE ENDINGS |
In Step 3, if you select the BOTTOM OPTION in the last (3rd) dialogue choice, so Kiryu does not open his eyes, you will need to interact with the statues a third time - again you will need to offer another ohagi (TOP OPTION). This time, nothing happens. No voices from the statues at all. The request ends here with the FINISHED result. You don't get any item reward but you do still get the 1500 EXP reward.

| 88 | The Benefit of a Swamp |
| Available At: | 9-5 |
| Time: | Day / Evening |
| Prerequisites: | Complete Request 87 |
Steps
- A - Speak to man
| 1: Speak to man |
A - Speak to the man here. He came here to sell vegetables but he doesn't know his way around. He has ended up losing all his vegetables due to various reasons (was attacked by a bear at one point, apparently) and has now dropped the last of his stock in this compost next to him. He is worried about going back home having made no money at all.
A monk then shows up asking the man for something to eat, but the man says all he had left fell into this compost. The monk doesn't care - he's so hungry he will eat it regardless. It turns out it's delicious! A local farmer has been using rice bran as a fertiliser and this bran-based fertiliser seems to pickle vegetables and create a nice taste. The monk wants to introduce the vegetable seller to a picked vegetable salesman he knows.
We transport to the picked vegetable guy, who tries one of the picked vegetables and loves it. He wants to buy all his stock and tells him to come back to him whenver he makes more. We then transport back to the original location (A). The man says his luck turned around once he met Kiryu. He thanks Kiryu by giving him a share of the money he made. Kiryu receives 2500 Mon. After this, the request ends with the COMPLETE result and you also receive 1000 EXP as a reward.

| 89 | The Flavour of a Rice Ball |
| Available At: | 9-5 |
| Time: | Day / Evening / Night |
| Prerequisites: | Complete Request 88 |
Steps
- A - Speak to father and select the TOP OPTION
- B - Speak to Okiku
- Fight men
| 1: Speak to father and select the TOP OPTION |
A - Speak to the old man here. He is the father of a woman called "Okiku". She has gone missing and the father is worried she was kidnapped because of a debt they owe. He asks Kiryu if he would be willing to help him find her. Select the TOP OPTION to agree to help. To thank Kiryu, he gives him 3 Rice Balls.
| 2: Speak to Okiku |
B - Okiku is here, surrounded by 3 men. Interact with them and Kiryu hears them address her as "Okiku" and wonders if she's the man's daughter. Interact with them again and her father will appear and tell her to come home with him. It seems this wasn't a kidnapping after all, but she was just getting herself mixed up with some bad guys. They say she's coming with them, even though she decides she wants to go back with her father. Kiryu steps in to stop them.
| 3: Fight men |
You are up against 3 basic swordsman types. They are all weak and have little health, so this is another simple fight. Worth mentioning you can use the Gion Martial Arts - Bowl Crusher heat action in this battlefield, if you want to use that.
After the fight, the men leave and then we get a scene between Okiku and her father. She says she's tired of the farmer life and the fact they are always in debt no matter how hard they work, so she wanted to get away from it all. But the father reminds her that her mother made the decision to focus on the farming business when she saw how happy Okiku was when she tried a rice ball for the first time as a small child. Okiku agrees to return home. Okiku thanks Kiryu for what he has done and gives him a Maiden's Hairpin and a Gold Lacquer Comb. After this, the request ends with the COMPLETE result and you also receive 1500 EXP as a reward.


| 90 | Eggs Part 1: Got To Try Before You Die |
| Available At: | 9-5 |
| Time: | Day / Evening / Night |
| Prerequisites: | N/A |
Steps
- A - Speak to old lady
- B - Receive egg
- A - Give egg to old lady
| 1: Speak to old lady |
A - Speak to the old lady who looks to be in pain. Kiryu asks if she's okay. She says she doesn't care if she dies, but there is one thing she wants to do before she dies - she wants to eat an egg. Kiryu says he'll get her an egg.
| 2: Speak to old lady |
B - Go near the man with the chickens. Kiryu wonders if he'll be able to give him an egg. Speak to him and he will generously give Kiryu a freshly boiled egg.
| 3: Give egg to old lady |
A - Speak to the old lady. Kiryu gives her the boiled egg. She eats it and says it's as delicious as she's heard. After this, the request ends with the COMPLETE result and you also receive 1000 EXP as a reward.


| 91 | The Bewitching House |
| Available At: | 9-5 |
| Time: | Day / Evening / Night |
| Prerequisites: | Complete Request 90 |
Steps
- A - Speak to old man and select the BOTTOM OPTION
- Select the TOP OPTION (x3)
- Fight man
| 1: Speak to old man and select the TOP OPTION |
A - Speak to the old man. He says he's dropped a crystal talisman out here somewhere. Kiryu spots it on the ground, then picks it up and gives it to the man. He wants to thank Kiryu and asks if he'd like to join him for a drink. Select the BOTTOM OPTION to accept the offer.
| 2: Select the TOP OPTION (x3) |
Inside, the man presents Kiryu with a very fancy buffet and tells him not to hold back. After eating for a bit, Kiryu wonders if he should head off now. Select the TOP OPTION to stay. The old man then offers Kiryu some sake. After drinking, Kiryu again wonders if he should leave. Select the TOP OPTION to stay. The old man then offers Kiryu his bath so he can wash himself. After taking a bath, Kiryu again wonders if he should leave. Select the TOP OPTION to stay. Now, the old man brings his daughter into the room and wants Kiryu to marry her. Kiryu refuses, then the old man loses his temper and fights Kiryu.
Selecting the BOTTOM OPTION at any point in this step doesn't actually make a difference. Kiryu tries to leave but the old man insists that Kiryu stays.
| 3: Fight man |
Now you have to beat the ass of an old man. A brawler type with hardly any health. Try to have mercy on the poor old guy.
After the fight (if you can call it that), the daughter moans at the father, explaining that Kiryu isn't even her type so she doesn't want to marry him. After everyone makes up, the old man gives Kiryu 1 Ryo. After this, the request ends with the COMPLETE result and you also receive 1500 EXP as a reward.
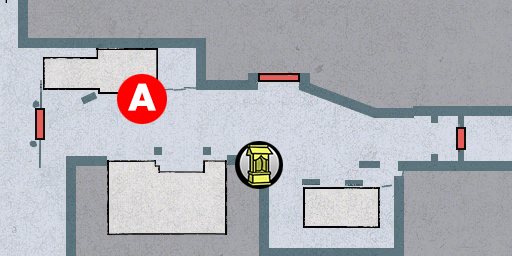
| 117 | Corruption |
| Available At: | 9-5 |
| Time: | Day / Evening / Night |
| Prerequisites: | Complete Commission 112 |
Steps
- A - Speak to man and select the TOP OPTION
- B - See zegen
- Fight zegen
- C - Go near zegen
- Fight zegen (x2)
| 1: Speak to man and select the TOP OPTION |
A - Speak to the man standing outside Kiryu's house. He says the head clerk of his brothel has some work to commission from Kiryu. They go to see the clerk, who explains that a bunch of nasty zegen have been operating in the area recently. They have been kidnapping girls and selling them on to brothels. They discovered this when many of their girls spoke of being kidnapped and brought here and, after investigation, they realised that was true. If word of this reaches the government, Gion will be in big trouble. They want Kiryu to deal with these zegen and will reward Kiryu well for his efforts (promising a 5 Ryo reward). Select the TOP OPTION to accept the commission (if you refuse with the BOTTOM OPTION the dialogue will just loop back to the options until you select the right one). Outside, the a clerk from Minoya (who was part of the meeting) expresses a lot of concern about Kiryu getting involved and tries to warn him against it.
NOTEIn the Edo period, a "Zegen" was someone who made a living selling girls to brothels (i.e., into prostitution). A typical story of the time is a poor farmer with a young daughter would sell the daughter to the zegen to save the family, then the zegen would go on to sell the girl to a brothel. Officially, human trafficking was illegal even back at this time, but there were loopholes (such as the process of buying the daughter from the father) and the shogunate was pretty lenient with this anyway because they benefited from red-light districts (the most famous one - Yoshiwara - was established by the Tokugawa shogunate themselves). However, due to the official taboo surrounding trafficking, the zegen couldn't get away with kidnapping girls just to sell them off for profit. This is why the clerk is concerned - if the brothel is buying girls who have been kidnapped rather than obtained via their fathers, then they are operating illegally and the government could punish them severely.
| 2: See zegen |
B - Go here to trigger an event. Kiryu sees a zegen trying to take away a girl, who is calling out for help. Kiryu steps in.
| 3: Fight zegen |
This guy is a martial arts type, so he can grab you. But he's still unarmed so you can beat his ass with your swords.
After the fight, Kiryu demands to know where his group are hiding out - where their base is. Apparently they are based on Mountain Road.
| 4: Go near zegen |
C - Go near the group of zegen. They've been expecting him - it seems they heard he was on his way to get them.
| 5: Fight zegen (x2) |
You have to deal with 2 waves of fights here. In the first fight, there are 2 archer types, 2 brigand types, and a brawler type. As always, the archer types are a pain in the ass since they stun you with their arrows. It's a good idea to get rid of them ASAP and then focus on the rest.
After the fight, Kiryu asks how they knew about him and his coming. Suddenly, the clerk from Minoya shows up. It turns out he's behind all of this.
After this, the second fight starts. This time you are up against 2 brawler types, 3 brigand types, and an archer type. Again, get rid of the annoying archer first, then you can focus on the rest without having to worry about being stunned.
After this fight, you are transported back to Gion where you speak with the clerk who commissioned the job. He can't believe the clerk from Minoya was behind it all. He thanks Kiryu for completing the task and gives him the promised reward of 5 Ryo. The clerk says they will be returning all the kidnapped girls back to their villages. After this, the commission ends and you receive 1500 EXP as a reward.


| 133 | Kensuke the Flyer |
| Available At: | 9-5 |
| Time: | Day / Evening / Night |
| Prerequisites: | N/A |
Steps
- See Kensuke's poster on the notice board
- A - Speak to Kensuke
- Speak to the okappiki at the police box in Rakugai
- B - Speak to Kensuke's mother and select the TOP OPTION
- Fight Kensuke
| 1: See Kensuke's poster on the notice board |
Examine the notice board by the police box in Rakugai and see Kensuke's poster. At this point in the main story, there are 2 new wanted posters. Kensuke is the second poster.
| 2: Speak to Kensuke |
A - When you get near here, Kiryu will spot Kensuke. Speak to him to confront him. The man admits his name is Kensuke but swears he's not the man in the wanted poster. He says just because he has some similarities and the same name as the wanted man that doesn't mean he is this man Kiryu is looking for. Kensuke demands that Kiryu prove he is the Kensuke from the wanted poster. Kiryu wonders how he can get proof and supposes he could go and speak to the okappiki at the police box.
| 3: Speak to the okappiki at the police box in Rakugai |
Go back to the police box where you saw the wanted poster and speak to the okappiki (policeman manning the box). He says Kiryu is pretty naive - Kensuke would say anything to get out of that situation and even if he went, Kensuke would just come up with other excuses to throw them off. But the okappiki says Kensuke's mother lives on the farm nearby and she would be able to confirm beyond doubt that this is the Kensuke we are looking for.
| 4: Speak to Kensuke's mother and select the TOP OPTION |
B - Speak to the old lady here. She is Kensuke's mother and, after Kiryu explains the situation, she agrees to come with Kiryu to see her son, but only if Kiryu promises he will not kill him. Select the TOP OPTION to promise you'll spare him (she will not go with you until you make this promise). We transport to location A with the mother. Kensuke admits he is "Kensuke" and this is indeed his mother but says this doesn't prove he is "Kensuke the Flyer". His mother gives him a massive telling off, then a bunch of guys from Kensuke's gang show up. It seems Kensuke summoned them to deal with Kiryu.
| 5: Fight Kensuke |
This is a fun one... Because of the promise you made to the mother, you are restricted to the brawler style in this fight. This wouldn't usually be a problem but you are up against 30 enemies (including Kensuke) in this fight. Most of them are brawlers but there are a load of enemies with swords too. Thankfully, most of them (including Kensuke) are only using wooden swords, so it's not as bad. Only 7 swordsman type enemies in this fight use a real sword. Despite the huge numbers, every enemy besides Kensuke himself is extremely weak, you'll be pleased to know. They have almost no health so a single hit will take them out. Kensuke has a lot of health so he can be a pain. My advice would be to use the 2 branch weapons lying on the battlefield floor to take out many enemies quickly - or perhaps even use heat actions with those weapons to quickly take out Kensuke. Also, note that at first you are only up against Kensuke plus 5 gang members - the rest will arrive one at a time as reinforcements during the fight.
After that gauntlet, Kiryu summons an official who confirms this is Kensuke. He gives Kiryu the promised reward of 1 Ryo. After this, the bounty ends and you receive 1500 EXP as a reward.


| 134 | Kaien the Corrupt Monk |
| Available At: | 9-5 |
| Time: | Night |
| Prerequisites: | N/A |
Steps
- See Kaien's poster on the notice board
- A - At night, speak to Kaien
- Fight Kaien
| 1: See Kaien's poster on the notice board |
Examine the notice board by the police box in Rakugai and see Kaien's poster. At this point in the main story, there are 2 new wanted posters. Kaien is the first poster.
NOTEEven though you can get his poster now and therefore trigger the bounty substory, Kaien will not show up until it is night time. It will not be night during the main story again until 10-11, so you'll have to wait until then before you can move to the next step.
| 2: At night, speak to Kaien |
A - When you get near here, Kiryu will recognise Kaien from the wanted poster. Speak to him to confront him. They have some discussion about his "corrupt" nature then eventually they fight.
| 3: Fight Kaien |
Kaien is a brute type, so he can deal a lot of damage. As usual with these guys, a good strategy is to keep your distance and wait for an opening. The best chance you have to land some hits is right after he slams his club into the ground.
After the fight, Kiryu summons an official who confirms this is Kaien. He gives Kiryu the promised reward of 1 Ryo. After this, the bounty ends and you receive 1500 EXP as a reward.

Chapter 10: The Old Fox's Request
| 10-11 | 92 | Evening / Night | The Masseuse and the Swordmaster | > |
| 10-11 | 93 | Day / Evening / Night | The Evil Flute | > |
| 10-11 | 94 | Day / Evening / Night | The Witch of the Mountain | > |
| 10-11 | 95 | Night | Ghostbuster | > |
| 10-11 | 97 | Day / Evening / Night | Wings to the Future | > |
| 10-11 | 118 | Day / Evening / Night | The Runaway Customer's Motive | > |
| 10-11 | 119 | Day / Evening / Night | Eat Up | > |
| 10-11 | 120 | Day / Evening / Night | Gift Request | > |
| 10-11 | 135 | Night | Arashiyama Matasaburo | > |
| 10-11 | 136 | Night | Heinosuke the Crow | > |
| 10-11 | 137 | Night | Golden Gun Rikukane | > |
| 10-11 | 138 | Night | Toyokichi of the Kuromon Family | > |
| 92 | The Masseuse and the Swordmaster |
| Available At: | 10-11 |
| Time: | Evening / Night |
| Prerequisites: | Complete Request 75 |
Steps
- A - Listen to conversation
- B - Speak to man, then walk away to trigger an event
- B - Speak to man
- C - Enter house
- Fight men
| 1: Listen to conversation |
A - There is a man and woman standing here. Interact with them to hear the woman talking about a blind swordmaster who apparently lives around here. The man points out the last time she spoke of a blind swordmaster, it turned out to be a lie.
| 2: Speak to man, then walk away to trigger an event |
B - Speak to the man sitting down. He talks about the masseuse called "Gozo". Apparently he has a reputation for being the best in the land. They also mention his daughter - "Okei" - who is apparently due to be married soon (she's the woman standing nearby). Now walk away from the area. Just head west for a bit and when you get a certain distance away, an event will trigger. A guy called Inoyama shows up with a henchman wondering what the gathering is all about. He barges his way through to Gozo and gets a massage, but he claims he is deliberately hurting him. He says Gozo, to make up for this offence, has to let him take his daughter away.
| 3: Speak to man |
B - After they all leave, speak to the man again. They mention that Gozo must have gone after them to save his daughter. We learn that Inoyama lives on Kawara Street.
| 4: Enter house |
C - Interact with the house here. Kiryu will enter. He sees a load of guys laid out on the floor. We see Gozo demanding his daughter back from Inoyama, who is shocked this blind guy took out all his guys. Then some reinforcements show up. Kiryu jumps in to help Gozo fight them off.
| 5: Fight men |
You have 5 enemies. 3 swordsman types and 2 brigand types. But in this fight, you have an ally. Gozo fights alongside you and will help you chip away at their health, so this should be an easy fight. But it's worth using the two sword style to ensure you can defend against attacks from any direction. This is a pretty confined battlefield so using the two sword style is also a good way to deal damage to multiple enemies at once.
After the fight, Inoyama tells them where the daughter is. Gozo thanks Kiryu for his help by giving him a Kogarasumaru. After this, the request ends with the COMPLETE result and you also receive 1500 EXP as a reward.

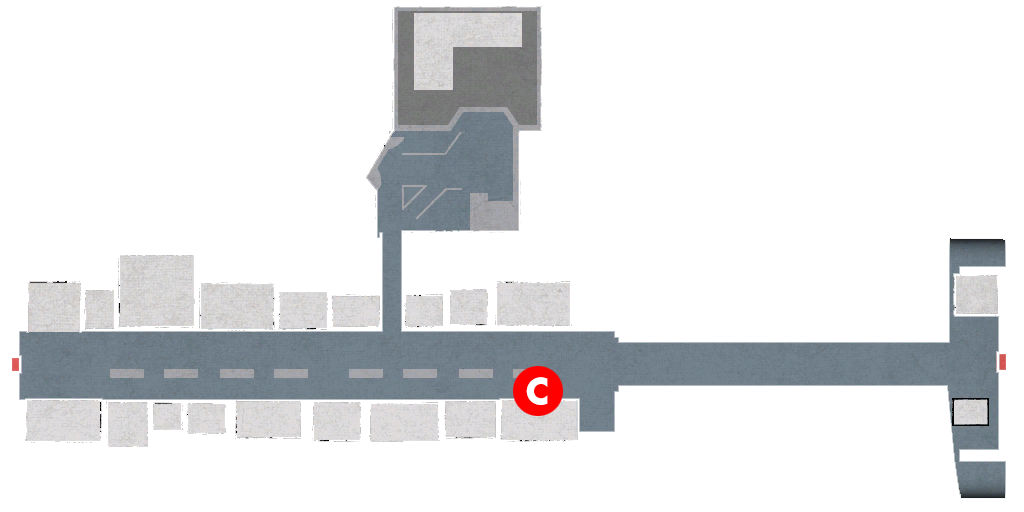
| 93 | The Evil Flute |
| Available At: | 10-11 |
| Time: | Day / Evening / Night |
| Prerequisites: | N/A |
Steps
- A - Speak to man and select the TOP OPTION
- B - Speak to monk and select the TOP OPTION then the BOTTOM OPTION
- Fight monk
- A - Speak to man
| 1: Speak to man and select the TOP OPTION |
A - Go near this area and a man will call out to Kiryu. He tells him the cliff area is cursed. Apparently a komuso (a type of monk) appears, playing a flute. It is said that the sound of the flute causes people to lose their minds. But the man says Kiryu looks tough so he might be able to get rid of this komuso for them. Select the TOP OPTION to agree to deal with the monk.
| 2: Speak to monk and select the TOP OPTION then the BOTTOM OPTION |
B - Speak to the monk. He asks if Kiryu has come to hear him play. Select the TOP OPTION to listen to him play. He makes a racket and Kiryu (thinking to himself) says the noise is making his head feel funny. After the monk finishes, he asks what Kiryu thought. Select the BOTTOM OPTION to say it sucked ass. The monk gets angry and attacks Kiryu.
If you select any other option for the 2nd choice (when he asks what you think), you'll have to speak to him again, then select the TOP OPTION again to listen to him, then you get the dialogue options back again. The exception to this is when you select the FOURTH OPTION - if you choose this, he will play the tune again, then you get the "what did you think?" dialogue options back again. The request will only proceed when you select the BOTTOM OPTION.
| 3: Fight monk |
An easy fight. He's just a brawler type. If you want to have a good laugh, you can throw him off the side of the bridge into the valley below here (the Throwdown Mastery heat action can be performed on the bridge on this battlefield).
After the fight, the monk admits he does suck at the flute. Kiryu tells him he should practice more. The monk agrees, then heads off saying he'll practice a lot then come back to play again some day.
| 4: Speak to man |
A - Speak to the man. Apparently he already knows Kiryu has dealt with the komuso because he hasn't heard any flute playing recently (as in, the last 10-20 seconds or so, I guess). He thanks Kiryu by giving him a Hermit Stone. After this, the request ends with the COMPLETE result and you also receive 1500 EXP as a reward.

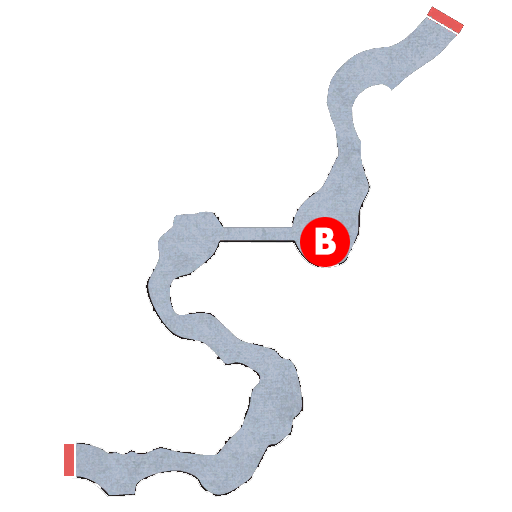
| 94 | The Witch of the Mountain |
| Available At: | 10-11 |
| Time: | Day / Evening / Night |
| Prerequisites: | Complete Request 93 |
Steps
- A - Go near men and select the TOP OPTION
- Walk towards sanjusangendo
- B - Go near witch
- Fight witch
| 1: Go near men and select the TOP OPTION |
A - There are a couple of men confronting an old woman. They accuse her of being the mountain witch people have been hearing about - the one who has been killing people. She denies it but they persist. Select the TOP OPTION to help her. Kiryu tells them to back off and eventually they do leave. Kiryu asks the old lady about the mountain witch legend. Apparently she's a monstrous old woman with the face of a demon. According to the legends, she appears in this area and kills people. Recently, people have been killed around here and witnesses say it's the mountain witch who is responsible.
NOTESpecifically, the mountain witch is the "Yamauba" - a supernatural being in Japanese folklore.
| 2: Walk towards sanjusangendo |
After the conversation with the old lady, start walking towards sanjusangendo (north - in the direction of location B). You soon hear a scream for help - apparently the mountain witch has appeared.
| 3: Go near witch |
B - Go near the witch. Kiryu steps in to save the man.
| 4: Fight witch |
The witch is a basic swordsman type, so this is a simple fight.
After the fight, we learn this "witch" was just some guy wearing the mask to appear like the mountain witch. He tries to justify his actions by saying he had no money so he wanted to rob people of theirs. He took advantage of the mountain witch legend and dressed like her so people wouldn't know it was him. The man who was attacked thanks Kiryu and gives him a Mizuchi Stone. He says he'll take this guy to the police. When they leave, the old lady from before shows up and says hopefully this means people will stop suspecting her now. After this, the request ends with the COMPLETE result and you also receive 1000 EXP as a reward.
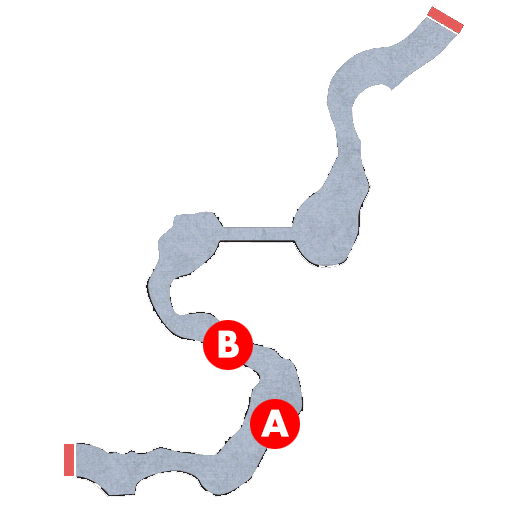
| 95 | Ghostbuster |
| Available At: | 10-11 |
| Time: | Night |
| Prerequisites: | N/A |
Steps
- A - Speak to men and select the TOP OPTION
- Fight man
| 1: Speak to men and select the TOP OPTION |
A - Speak to the people standing here. They talk about a ghost who lives in the shrine and at this time every year they are supposed to provide offerings/tributes of money and food to appease him. Apparently, one time they didn't give any offerings and it ended badly for their village. For whatever reason, young women are the ones who have to take the offerings, but none of the ones who have gone have returned safely. This is why the girl is crying - she's the last one left so she'll have to go next. They ask Kiryu if he would be willing to accompany her to make sure she gets there and back safely. Select the TOP OPTION to help.
They arrive at the shrine entrance and Kiryu watches on from afar. The "ghost" appears, then the girl's father shows up and tells the ghost he can't take her. Then Kiryu joins the party right after that. The ghost says he'll kill them all.
| 2: Fight man |
The ghost is a brigand type. He also doesn't have much health. It's another simple fight.
After the fight, the ghost for some reason gives an unnecessarily long speech about the old days of war (e.g. sengoku-jidai, which included the battle of sekigahara) and how warriors like him have lost their place in this world, because of this time of peace. When he finally shuts up, the villagers thank Kiryu for helping and give him the Village Tribute. After this, the request ends with the COMPLETE result and you also receive 1500 EXP as a reward.

| 97 | Wings to the Future |
| Available At: | 10-11 |
| Time: | Day / Evening / Night |
| Prerequisites: | Invent the following items: All-Purpose Pill - Ultimate, Sobering Pill, Empty Stomach Pill |
Steps
- A - Listen to conversation and select the TOP OPTION
- B - Pick up rake
- A - Give rake to Gyotensai
- C - Pick up bamboo sticks
- A - Give bamboo sticks to Gyotensai
- A - Give Washi Bundle to Gyotensai
- Select the BOTTOM OPTION
- D - At noon, speak to men
- E - Examine area
- A - Go to Gyotensai's house
| 1: Listen to conversation and select the TOP OPTION |
A - Enter Gyotensai's house to trigger an event. An official is talking with the inventor. It seems there have been a lot of complaints about the inventor and he is being told he must stop his inventing. After he leaves, Gyotensai asks Kiryu what he thinks of his new invention idea - something that will enable people to fly. Select the TOP OPTION to say it sounds amazing. He asks Kiryu if he can help by bringing him the things he needs to complete the job. The first item he needs is a rake.
NOTEIf for whatever reason the event doesn't trigger when you enter (for some reason it sometimes doesn't), speak to Gyotensai, then leave and re-enter. It should trigger now.
| 2: Pick up rake |
B - When you get near here, Kiryu spots the rake and says it can be used by Gyotensai. Pick it up.
| 3: Give rake to Gyotensai |
A - Speak to Gyotensai and select the TOP OPTION to give him the rake. He says now he needs bamboo sticks.
| 4: Pick up bamboo sticks |
C - When you get near here, Kiryu spots the bamboo sticks and says it can be used by Gyotensai. Pick them up.
| 5: Give bamboo sticks to Gyotensai |
A - Speak to Gyotensai and select the TOP OPTION to give him the bamboo sticks. He says now he needs some kind of paper to use as wings (the Washi Bundle item).
NOTEYou get the Washi Bundle item you need to do the next step in request 47. If you haven't already done that substory, you'll need to complete it before you can continue to the next step.
| 6: Give Washi Bundle to Gyotensai |
A - Speak to Gyotensai and select the TOP OPTION to give him the Washi Bundle.
| 7: Select the BOTTOM OPTION |
The invention is now complete. Gyotensai asks if Kiryu would be the one to test it out for the first time. Select the BOTTOM OPTION to test it. Gyotensai says they need somewhere with lots of space to fly, so he tells Kiryu to go to Cliff Road. He also mentions that it would be dangerous to fly this thing at evening or night and they should wait until it's lighter (Day time).
NOTEYou cannot do any more until it is Day time. You can proceed to the next step at 11-2 in the main story.
| 8: At noon, speak to men |
D - At noon, speak to the men gathered around here. A child has fallen off the side of the cliff and is hanging on for his life. But no one can reach him. Kiryu asks Gyotensai if they can use his invention to save the child. Gyotensai says he's sure it will work, but they need to fine somewhere they can take full advantage of the strength of the wind.
| 9: Examine area |
E - Go here and press the interaction button when it appears at the top-right of the screen. Gyotensai says this place will work great and sets Kiryu off with the flying contraption. After saving the child, they thank Kiryu and everyone returns to Gion.
| 10: Go to Gyotensai's house |
A - Enter Gyotensai's house to trigger an event. Gyotensai thanks Kiryu for helping make his dream come true. Then the official from earlier enters. Gyotensai supposes he's here to arrest him for refusing to stop inventing. But it turns out the child who was saved thanks to Gyotensai's invention is the son of a nobleman. So, everything seems to have worked out in the end and we hear a big speech about "wings to the future" of this country and how it takes people willing to jump into the unknown to create the future of the country. After all this, the request ends with the COMPLETE result and you also receive 10000 EXP as a reward.
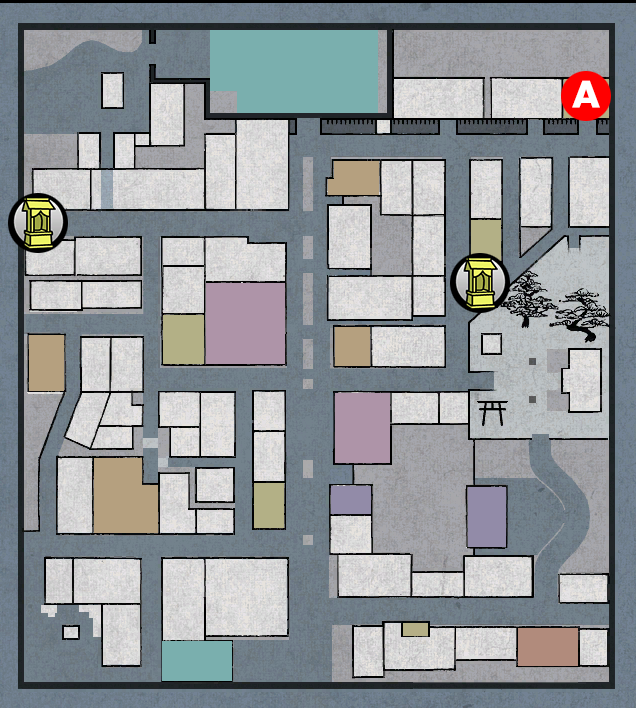


| 118 | The Runaway Customer's Motive |
| Available At: | 10-11 |
| Time: | Day / Evening / Night |
| Prerequisites: | Complete Commission 114 |
Steps
- A - Speak to clerk
- B - Speak to man
- Fight men
| 1: Speak to clerk |
A - Speak to the clerk standing around outside Kiryu's house. He says there's some guy who ran off, refusing to pay his bill. Apparently he'll pay up if the best kakemawari in Gion meets him outside the udon restaurant in Rakugai. Kiryu says he'll get the money.
| 2: Speak to man |
B - Speak to the guy standing just outside the udon restaurant. He's the guy who didn't pay his bill and says he promises he'll pay the money he owes, he just needs to go back home to get it. Kiryu goes with him to make sure he doesn't run off.
He leads Kiryu all the way out to Cliff Road and then calls out a bunch of guys to attack Kiryu. It seems the plan right from the start was to lure Kiryu out of Gion to kill him. These guys all have a grudge against Kiryu and want to get back at him.
| 3: Fight men |
5 enemies in this fight. 3 brawlers, a brigand, and a martial artist. I would get rid of the martial artist first so you don't have to worry about his grabs. You can use the environment to your advantage if you want - the Throwdown Mastery heat action is available on this battlefield.
After the fight, the runaway customer pays the money he owes. We automatically transport back to the clerk in Gion. Kiryu gives him the money, then the clerk pays Kiryu 1 Ryo for his work. After this, the commission ends and you receive 1500 EXP as a reward.


| 119 | Eat Up |
| Available At: | 10-11 |
| Time: | Day / Evening / Night |
| Prerequisites: | Complete Commission 118 |
Steps
- A - Receive letter from pigeon
- B - Examine wall and hand over food
| 1: Receive letter from pigeon |
A - Go here and you will receive a letter via pigeon. It's from some guy called "Imakita" who has apparently been shut in a brothel for 3 days and is starving, so wants Kiryu to bring him something to eat. He's in a brothel down the alley to the east of the main gates of Gion.
NOTEAny food item will work. Grab something like a manju from Arigataya nearby before going to Imakita.
| 2: Examine wall |
B - Interact with the wall of the building here. A menu will pop up from which you can select a food item to give him (if you have any on you). Imakita pays Kiryu 2000 Mon. After this, the commission ends and you receive 1500 EXP as a reward.

| 120 | Gift Request |
| Available At: | 10-11 |
| Time: | Day / Evening / Night |
| Prerequisites: | Complete Commission 119 |
Steps
- A - Receive letter from pigeon
- B - With a hairpin in your inventory, examine the wall
- C - Speak to yujo
- D - Speak to Imakita
| 1: Receive letter from pigeon |
A - Go here and you will receive a commission from a pigeon. It is from Imakita again (from commission 119). This time, he wants Kiryu to bring him a hairpin that he can gift to a yujo.
NOTEYou can get various hairpins from Arigataya and Ebisuya in Gion. However, note that having the Maiden's Hairpin doesn't count, for some reason. Any other hairpin will work. When you interact with the door when you either have no hairpin on you, or just the Maiden's Hairpin, Kiryu comments that the guy wanted him to bring a hairpin here.
| 2: With a hairpin in your inventory, examine the wall |
B - With a hairpin in your inventory, examine the wall here. Kiryu spots a note on the ground. It's from Imakita and it asks Kiryu to give the hairpin to the yujo outside the dojo. He also asks Kiryu to pass on a message: "The weather is nice again today."
| 3: Speak to yujo |
C - When you get near the yujo, Kiryu spots her and wonders if she's the one Imakita mentioned. Speak to her and Kiryu gives her the message. She hits Kiryu (and you lose a bit of health) saying he must be the one the letter mentions. She gives Kiryu the letter. It's from Imakita and is addressed to the mistress of the brothel and asks if he can have the cat she looks after. She's not very impressed with the whole situation, saying for one thing she's not even the mistress of the brothel (she's just a yujo) and she can't believe he's more interested in the cat than he is in her.
| 4: Speak to Imakita |
D - Speak to Imakita here, hiding behind the shrine. Kiryu confronts him about what just happened. He explains the reason he came to Gion is because he loves cats and hear there are loads here. It seems he just made some incorrect assumptions and apologises for getting Kiryu in that mess - it wasn't his intention. He gives Kiryu 1 Ryo as payment for his work. After this, the commission ends and you receive 1500 EXP as a reward.

| 135 | Arashiyama Matasaburo |
| Available At: | 10-11 |
| Time: | Night |
| Prerequisites: | N/A |
Steps
- See Arashiyama's poster on the notice board
- A - At Night, speak to Arashiyama and select the TOP OPTION
- Fight Arashiyama
| 1: See Arashiyama's poster on the notice board |
Examine the notice board by the police box in Rakugai and see Arashiyama's poster. At this point in the story, there are 4 new bounties here. However, 3 of them will only appear now if you meet the prerequisites. To ensure you have definitely seen Arashiyama's poster, just keep examining the notice board until no more wanted posters pop up on your screen.
NOTEBefore proceeding to the next step, buy a bottle of sake. Speak to the employee in the liquor store in Gion (Nakanokura) and select the MIDDLE OPTION to buy a drink to take away. Anything in here should work. I just buy the first item on the menu.
| 2: At Night, speak to Arashiyama and select the TOP OPTION |
A - When you get near here, Kiryu will recognise Arashiyama. Speak to him to confront him. He asks Kiryu if he'll give him a drink before taking him in. Select the TOP OPTION to give him a drink (the bounty won't progress until you give him a drink). Select a drink from your inventory when the menu pops up. Kiryu wonders if it was a mistake to give him a drink, because now he's getting violent and wants to fight Kiryu.
| 3: Fight Arashiyama |
He is a boss enemy type, so some heat actions don't work on him. He is also using a sword, while you are still forced to use the brawler style in Gion. He does have a decent amount of health, but not that much, so it should be fine.
After the fight, Kiryu summons an official who confirms this is Arashiyama. He thanks Kiryu for his help and gives him the promised 1 Ryo 5000 Mon reward. He also gives Kiryu Demon Remains. After this, the bounty ends and you receive 1500 EXP as a reward.

| 136 | Heinosuke the Crow |
| Available At: | 10-11 |
| Time: | Night |
| Prerequisites: | Must be at least level 30 |
Steps
- See Heinosuke's poster on the notice board
- A - Speak to man, then walk away
- Fight Heinosuke
| 1: See Heinosuke's poster on the notice board |
Examine the notice board by the police box in Rakugai and see Heinosuke's poster. His poster will only appear if Kiryu is at least level 30.
| 2: Speak to man, then walk away |
A - Speak to the man standing here at Night. Kiryu says he's heard a killer has escaped to this area. The man asks if he knows who it is and Kiryu says it's someone called "Heinosuke".
After this, start walking away. When you get a certain distance away, the man attacks Kiryu from behind (you get a QTE prompt - if you fail it, you will take damage). A fight begins immediately after the QTE.
| 3: Fight Heinosuke |
This guy is a boss enemy type and weilds the enchanted sword Sesuimaru. This guy is quite skilled - he fights like a swordmaster type and can use iaido techniques. He's also good at defending against your attacks.
After the fight, he gives Kiryu his sword, saying it's up to Kiryu whether he uses the sword or whether the sword uses him. You receive the Sesuimaru sword. Kiryu summons an official who confirms this is Heinosuke. He gives Kiryu the promised reward of 1 Ryo. After this, the bounty ends and you receive 1500 EXP as a reward.
NOTEAt this point in the story, it is now possible to complete request 20.

| 137 | Golden Gun Rikukane |
| Available At: | 10-11 |
| Time: | Night |
| Prerequisites: | Must be at least level 35 |
Steps
- See Rikukane's poster on the notice board
- A - Get ambushed
- Fight Rikukane
| 1: See Rikukane's poster on the notice board |
Examine the notice board by the police box in Rakugai and see Rikukane's poster. His poster will only appear if Kiryu is at least level 35.
| 2: Get ambushed |
A - When you enter the Rendai Field area, Kiryu will mention that Rikukane has been seen in this area and that he needs to watch out for a possible sneak attack. When you get a bit further, Kiryu says he feels like Rikukane is near. Go right to the back of the area and you will be attacked by Rikukane (you get a QTE - if you fail, you'll take damage). The fight begins immediately after this.
| 3: Fight Rikukane |
Rikukane is a boss enemy type, but he fights like an arquebusier type. He will try to keep his distance and shoot you from afar. Just keep getting close to him and attacking him - his defence isn't very good, so this should be a simple fight.
After the fight, Kiryu summons an official who confirms this is Rikukane. He gives Kiryu the promised reward of 1 Ryo. After this, the bounty ends and you receive 10000 EXP as a reward.
| 138 | Toyokichi of the Kuromon Family |
| Available At: | 10-11 |
| Time: | Night |
| Prerequisites: | Have been in at least 80 random encounters |
Steps
- See Toyokichi's poster on the notice board
- A - Examine gate and select the TOP OPTION
- Speak to yakuza and select the MIDDLE OPTION then the TOP OPTION
- Fight Kuromon family
NOTEFor the 80 random encounters requirement to trigger this bounty, this just means the random enemies you bump into on the streets of the game. This count does not include any fights during the main story, or in substories, or the arena, etc.
If you have not been in 80 random encounters at this point in the story, you will not be able to do this bounty right now because there are no random encounters available. The next time random encounters are available in the main story is at the start of Chapter 11. But the next time it is Night during the story (during free-roam time at least) is 12-2, so that is the earliest you can complete the bounty if you still need to get into more random encounters.
Unfortunately, there is no way to see how many random encounters you have been in - nowhere in the game reveals this information, so if the wanted poster doesn't show you'll have to keep getting into fights and trying again until it shows.
| 1: See Toyokichi's poster on the notice board |
Examine the notice board by the police box in Rakugai and see Toyokichi's poster. His poster will only appear if you have been in at least 80 random encounters.
| 2: Examine gate and select the TOP OPTION |
A - Examine the gate of sanjusangendo and select the TOP OPTION to enter.
| 3: Speak to yakuza and select the MIDDLE OPTION then the TOP OPTION |
Inside, speak to the yakuza standing around on his own. Select the MIDDLE OPTION to say you're here to fight the Kuromon family. Next, select the TOP OPTION to demand he takes him to the boss (though the BOTTOM OPTION will also lead to the same end result). This leads to a fight against the whole family.
| 4: Fight Kuromon family |
This is a massive fight. You are up against 58 enemies, including Toyokichi himself. However, Toyokichi only joins the fight later on (he arrives as the 47th reinforcement). The enemy types are a mix of brawler, brigand, and shortswordsman. Toyokichi is a swordsman type. The family members don't have much health, but it will likely still take more than 1 hit to take them out. Because you'll be surrounded for most of this fight, you might prefer to use the two sword style to ensure you can defend against attacks from all directions.
After the fight, Kiryu summons an official who confirms this is Toyokichi. He gives Kiryu the promised reward of 1 Ryo. He also gives Kiryu a Great King's Magatama. After this, the bounty ends and you receive 10000 EXP as a reward.

Chapter 11: The Truth
| 11-1 | 96 | Day / Evening | Eggs 2 – High Quality Eggs | > |
| 11-2 | 98 | Day / Evening / Night | The Baby | > |
| 11-2 | 99 | Day | A Man's Pride | > |
| 11-2 | 139 | Day | Enryu the Kamaitachi | > |
| 96 | Eggs 2 – High Quality Eggs |
| Available At: | 11-1 |
| Time: | Day / Evening |
| Prerequisites: | Complete Request 91 |
Steps
- A - Speak to old lady
- B - Speak to chicken farmer and buy egg (BOTTOM OPTION)
- A - Speak to old lady and select the BOTTOM OPTION
- A - Speak to old lady and select the TOP OPTION
NOTEIf you are following the main story guide, remember that at this point in the story when you try to leave Kiryu's house (whether going into Gion or Rakugai) the first dialogue option asks if you want to rest. You must select the TOP OPTION to NOT progress the story. Then, you get the usual dialogue you get when trying to leave, where you select the BOTTOM OPTION to leave Kiryu's house (when going to Rakugai) or you can just leave as normal to go out to Gion.
Believe me, I've made this mistake a few times... I have progressed the story when I just wanted to leave the house. That's why I'm warning/reminding you now to be careful and pay attention, so you don't make the same mistake.
| 1: Speak to old lady |
A - The old lady from 90 seems to be in pain again. Speak to her and she says she needs another egg to make her well again.
| 2: Speak to chicken farmer and buy egg (BOTTOM OPTION) |
B - Speak to the chicken farmer and Kiryu will ask for another egg. The farmer says he can't keep giving these out for free - they are high quality eggs, after all. He says he'll sell it for 500 Mon. If you just want to get the egg quickly instead of dicking around, select the BOTTOM OPTION to buy it for 500 Mon and move on to the next step.
If you don't mind dicking around with dialogue options, you can get the price of the egg down to 100 Mon. First, select the TOP OPTION to haggle the price down to 200 Mon (select the BOTTOM OPTION for this - top goes down to 400, middle goes down to 300). The farmer will accept whichever price you select. Select the TOP OPTION to haggle the price even further, down to 100 Mon (select the MIDDLE OPTION for this - top is 200 Mon and bottom is 50 Mon). You then buy the egg for 100 Mon. Considering that 500 Mon is such a small amount (especially by this point in the game) it seems like a waste of time to haggle the price, but if you're feeling really stingy then go ahead and cut the price down.
NOTEIf you try to haggle down to 50 Mon, he gets angry and then refuses to sell it for anything less than 500. You then either don't buy at all (BOTTOM OPTION) or buy for 500 Mon (TOP OPTION). Speaking to him again doesn't change this.
| 3: Speak to old lady and select the BOTTOM OPTION |
A - When you enter this area, Kiryu notices the old lady seems to be well. She notices Kiryu and suddenly she's in bad condition again. Speak to her and select the BOTTOM OPTION to accuse her of faking her condition. She admits she's not really in pain, she just really wanted to eat an egg. While she apologises, suddenly she looks to be in pain again. Kiryu comments that this seems different to before - it looks like it is genuine this time.
NOTEAfter completing this step, if you do not give her an egg within 2 Minutes you cannot get the COMPLETE result for this substory.
Also, if you give the old lady the egg (TOP OPTION) at Step 3, you then need to leave the area and return. You will find the old lady in pain again and she yet again asks you to get an egg for her. You then buy another egg (it will always be for the same price you bought it in Step 2 - no haggling this time) and then return to the old lady. This will go in an infinite loop until you call her out on faking her illness.
| 4: Speak to old lady and select the TOP OPTION |
A - Within 2 minutes of completing Step 3, speak to the old lady again and select the TOP OPTION to give her the egg. She thanks Kiryu for saving her even though she lied to him. She gives him a Ninigi Orb. After this, the request ends with the COMPLETE result and you also receive 1500 EXP as a reward.
| ALTERNATE ENDINGS |
After completing Step 3, if you do not speak to the old lady and give her the egg within 2 Minutes, you need to return to the Yoshioka Dojo area and speak to the 2 people standing near where the old lady used to be. You hear them talk about the old lady, then the request ends here with the FINISHED result. You get no reward (including EXP).
By the way, the 2 minute timer by itself won't lead to this outcome. It's only if you are not in the Yoshioka Dojo map after 2 minutes expires that you end up with this result. So, as long as you stay in the Yoshioka Dojo map, it doesn't matter if the 2 minute timer expires because you can still talk to her. But if you leave after 2 minutes and return, she won't be there and you need to speak to the 2 people nearby to finish the substory.
| 98 | The Baby |
| Available At: | 11-2 |
| Time: | Day / Evening / Night |
| Prerequisites: | Complete Request 94 |
Steps
- A - See baby and select the TOP OPTION
- B - Speak to old man and select the BOTTOM OPTION
- C - Speak to loanshark and select the TOP OPTION
- Fight yakuza
- A - Speak to mother
| 1: See baby and select the TOP OPTION |
A - When you get near this area, Kiryu spots a baby left alone. We then get a scene where a couple of guys show up and demand Kiryu pays what he owes, but then end up leaving him alone because he has a baby with him. Then a woman shows up and says a woman came here and dropped off the baby, then left. She says she will watch over the baby if Kiryu will track down the mother. Select the TOP OPTION to look for the mother.
| 2: Speak to old man and select the BOTTOM OPTION |
B - Speak to the old man standing here (there's 2 guys standing here, so make sure you talk to the right one - the old man is standing closest to the river. The other guy is a younger man). He tells Kiryu a woman just went out into the river and is going to drown. He would save her himself, but he can't swim. Select the BOTTOM OPTION to save her.
If you chose not to save her, nothing happens. She will not drown and the substory will patiently wait for you to go back to the old man and select the option to save her.
After saving her, we learn she is the mother of the baby found at the tea house. We get a bit of her backstory and how after losing her husband she had to borrow money to get by, but the interest on the loan was insane. She was hoping that by leaving her baby lying around someone would take them in. Kiryu asks where the loanshark is and she says they are based in Rakugai, near the smithy.
| 3: Speak to loanshark and select the TOP OPTION |
C - Go near the building here and Kiryu goes inside and confronts the guy. Apparently the mother borrows 1 Ryo, yet somehow with the interest the amount she owes has now gone up to 1000 Ryo! The loanshark says if Kiryu is a friend of hers, he can cover the fee if he wants. Select the TOP OPTION to refuse to pay. Kiryu says the interest rates are bullshit - how the hell does 1 Ryo end up as 1000 Ryo? He then fights Kiryu.
| 4: Fight yakuza |
It's the loanshark plus 2 henchmen and all 3 are the brawler enemy type. So, this is a very simple fight. Use your swords to beat their asses.
After the fight, the loanshark says he thinks there may have been an error in the ledger and actually the debt is already paid. Kiryu demands he hand over some kind of document proving the debt has been paid. He gives Kiryu a page torn out of his ledger showing the money is paid.
| 5: Speak to mother |
A - Return here and speak to the mother. Kiryu gives her the page showing her debt is paid, much to her delight. She thanks Kiryu and allows him to name her baby. You now get to name the baby. However, this is not free-typing. You are limited to a few possible variations. You first pick the first kanji of the baby's name, then the ending of the baby's name. It makes absolutely no difference what you pick for the name. She thanks Kiryu again and gives him a Dosojin Stone. After this, the request ends with the COMPLETE result and you also receive 1500 EXP as a reward.
| ALTERNATE ENDINGS |
In Step 3, if you select the BOTTOM OPTION to pay the 1000 Ryo debt, you get a receipt showing the debt is paid. You skip Step 4 and go straight to Step 5. The rest plays out as above and you still get all the rewards (the stone and EXP). However, the request will end with the FINISHED result.
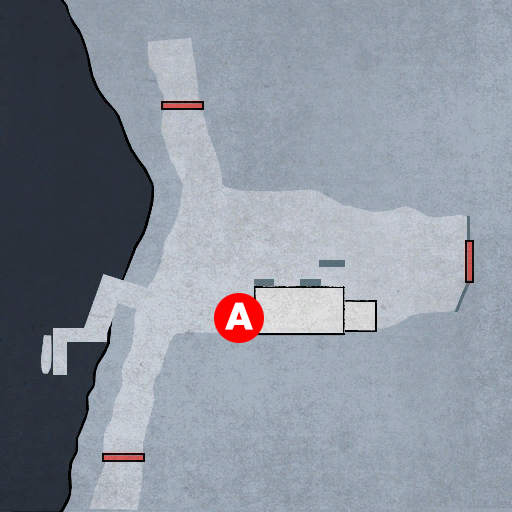


| 99 | A Man's Pride |
| Available At: | 11-2 |
| Time: | Day |
| Prerequisites: | N/A |
Steps
- A - Bump into thieves
- Fight thieves
- B - Listen to conversation
- C - Go near Seizo
| 1: Bump into thieves |
A - Go near the thieves to trigger an event. The theieves are talking about a recent success they have had. The boss gives one of the thieves (Seizo) some crappy-looking sword. They see Kiryu watching and want to get rid of him, but they tell Seizo to stay out of the fight.
| 2: Fight thieves |
You fight 3 enemies. A brawler, a martial artist, and a swordsman. A simple fight, but you might want to get rid of the martial artist first so you don't have to worry about being grabbed.
After the fight, the thieves run off, then Seizo recognises Kiryu as a wanted man. Kiryu mentions that Seizo's sword is a top-quality sword - in fact, it is too good to be in the hands of a mere thief.
| 3: Listen to conversation |
B - Go near Yumejiya to trigger an event. Kiryu notices the thieves from the forest earlier. Go closer to them to trigger another event. Seizo talks about how, with his sword, they can intimidate anyone into giving up their money, which they can then use to have fun in Gion. One of the thieves tells him not to let things get to his head and they end up falling out, with the other thief saying he's not going drinking with him again. After Seizo is left by himself, he says with his sword he can be more than just a thief - in fact, he believes with his sword he can defeat the wanted man, Miyamoto Musashi.
| 4: Go near Seizo |
C - Go near Seizo to trigger an event. Seizo wants to fight Kiryu, but it's not for the bounty - he says he wants to obtain pride as a man and as a swordsman. We then get a cutscene which includes some lecture about how true pride is not found in the power of the sword and gives him a demonstration of true strength. After the cutscene, the request ends with the COMPLETE result and you also receive 10000 EXP as a reward.
NOTESteps 1 and 4 can only be triggered at Day time. However, it is actually possible to trigger Step 3 at Evening (i.e. in 12-1), contrary to the claims of the official guide. The difference is that the substory marker (you know, the green destination marker on the map that shows for some substories) only appears at Day time for this substory. But even without the marker you can still trigger 3 in Gion at Evening. But Seizo will not appear at Step 4 until Day time. Because you can trigger Step 3 outside of Day time, it is still possible to complete this request in Chapter 12 as long as you trigger Step 3 before you get locked out of Gion (again, contrary to the official guide, which states the substory can only be done at 11-2).


| 139 | Enryu the Kamaitachi |
| Available At: | 11-2 |
| Time: | Day / Evening / Night |
| Prerequisites: | N/A |
Steps
- See Enryu's poster on the notice board
- A - Speak to man and select the TOP OPTION, then walk away
- Fight Enryu
| 1: See Enryu's poster on the notice board |
Examine the notice board by the police box in Rakugai and see Enryu's poster.
| 2: Speak to man and select the TOP OPTION, then walk away |
A - There is a man standing around here. Speak to him and Kiryu asks if he's seen any suspicious guys. He says he he hasn't, but he says he's guessing if he did bump into this particular "suspicious guy" he would have been killed by him. Select the TOP OPTION to say that's right. Kiryu tells him to be careful.
Now, start walking away. Once you get a certain distance away from the man, you get a QTE prompt. The man has attacked you from behind. A fight begins immediately after the QTE.
| 3: Fight Enryu |
Enryu is a boss enemy type and fights like the ninja type. He can throw explosives and breath fire, so watch out for all of these attacks. He may have a lot of tricks up his sleeve and is good at dodging, like all the ninja enemies, but he doesn't have too much health. Use the quick attacks of the two sword style to help land some hits on this guy.
After the fight, Enryu is impressed someone managed to defeat him - no one in Edo could manage it. Kiryu summons an official who confirms this is Enryu. He gives Kiryu the promised reward of 1 Ryo. He also gives Kiryu the Twin Dragon Book (weapon recipe book). After this, the bounty ends and you receive 1500 EXP as a reward.

Chapter 12: Ganryu Island
| 12-1 | 140 | Evening | Kuroshima Raiden | > |
| 12-1 | 100 | Day / Evening / Night | Justice For All | > |
| 140 | Kuroshima Raiden |
| Available At: | 12-1 |
| Time: | Evening |
| Prerequisites: | Complete Request 60 | Complete Bounties 121 ~ 139 |
Steps
- See Kuroshima's poster on the notice board
- A - At Evening time, speak to man and select the TOP OPTION
- Fight Kuroshima
| 1: See Kuroshima's poster on the notice board |
Examine the notice board by the police box in Rakugai and see Kuroshima's poster.
| 2: At Evening time, speak to man and select the TOP OPTION |
A - Speak to the man here. He is one of Baiken's henchmen. He says they have been kicked out of their base by the Kuroshima family. Select the TOP OPTION to enter the cave.
Inside, Kiryu says he's come to collect the bounty on Kuroshima's head. The boss isn't there at first, but after Kiryu says his name, the boss comes out. He recognises the name as the mysterious swordsman who defeated Hozoin Inshun. We get a load of dialogue where Kuroshima explains why he kills so many officials - he apparently just really hates the police and has done since he was a boy. Apparently, there's a big shot among the officials and he is trying to lure this guy out, hence all the killing. Kiryu asks who this big shot is, but he refuses to give a name.
| 3: Fight Kuroshima |
The 4 henchmen are brawler types. Kuroshima himself is a boss type, but he is also unarmed. You can use your swords, but even when using them Kuroshima is no pushover. Your sword attacks do not even make the dude flinch. He will tank most things you throw at him, so you cannot go on the all-out attack or you'll get your asscheeks clapped. He is also able to counter your attacks and even block your sword attacks with his bare arms. I would take out the henchmen ASAP so you can focus solely on Kuroshima and then try to spam heat actions against him.
Interesting fact: Kuroshima has the most health of any enemy in the entire game (including Amon - the secret boss of 100 - as well as Kojiro and Tenkai in the main story final chapter).
After the fight, Kuroshima warns Kiryu: "Watch out for Amon". This is the big shot official he mentioned earlier. He tells Kiryu this Amon character is a master warrior and insanely strong. It turns out that when Kuroshima was a boy, he saw Amon kill his dad because of a wanted poster. Kuroshima, knowing that Kiryu is really Miyamoto Musashi, says he most likely has a wanted poster as well, so he needs to watch out for Amon.
Kiryu summons an official who confirms this is Kuroshima. He gives Kiryu the promised reward of 1 Ryo. He also gives Kiryu the Demon God Manuscript (weapon recipe book). After this, the bounty ends and you receive 15000 EXP as a reward.

| 100 | Justice For All |
| Available At: | 12-1 |
| Time: | Day / Evening / Night |
| Prerequisites: | Complete Requests 1 ~ 99 | Complete Commissions 101 ~ 120 | Complete Bounties 121 ~ 140 | Defeat every opponent in the Arena at least once |
Steps
- A - Speak to Okappiki
- A - At Night time, look at police box
- B - Meet Okappiki
- Fight Amon
| 1: Speak to Okappiki |
A - Once you have met the above prerequisites, speak to the Okappiki in the police box. He's impressed that Kiryu has dealt with all the wanted men. He says he has one last favour to ask of him. He cannot tell Kiryu what it is yet and will be in touch with him when the time comes.
NOTEYou cannot trigger the next step until Night time. Either proceed to 12-2 or wait until 12-5, when you can freely change the time of Day by speaking to Koetsu. If you did Step 1 at Night, you should be able to do Step 2 by leaving Rakugai and re-entering.
| 2: At Night time, look at police box |
A - Come back to the police box at Night time. The Okappiki is no longer there. Inspect the police box and then a pigeon will deliver a letter. It tells Kiryu to go to the bridge on Kawara Street at Night time.
NOTEYou are about to have an extremely difficult fight. Make sure you bring plenty of healing items. If you have any Resurrection Magatamas, now is a good time to equip them.
| 3: Meet Okappiki |
B - Go near the Okappiki to trigger an event. We learn that this guy is actually this "Amon" characters we've heard about. He says he knew Kiryu was Miyamoto Musashi right from the start but decided to use him to deal with all the other wanted men. Now they are all out of the picture, Amon wants to take down Kiryu so he can collect the bounty on his head.
| 4: Fight Amon |
This is without a doubt the toughest fight in the whole game. Amon is a BEAST. If you've played any of the other Yakuza(/Like a Dragon/Ryu ga Gotoku) games and have faught an Amon before, you'll know how challenging these can be.
Amon has a lot of health and fully resurrects 3 times in the fight. "Fully" as in he gets ALL his health back after you get it down to 0. So, in a way, this fight has 4 phases. First, he will use a single sword style. He is good at defending your attacks and can be tricky to deal with.
In the second phase (when he fully restores his health for the first time), he switches to the two sword style. This is a trickier phase because he is both good at defending and evading (he likes to dodge around to the sides and try to hit you while you are vulnerable). He also uses the same two sword combo attacks you can use.
For the third phase (fully restores for the second time), he switches to a longsword. His attacks are slower with this style, so it should be easier to keep your distance and jump in when an opportunity opens up. Admittedly, he doesn't leave himself open much, but after some of his big swings he is briefly open to attacks, especially if you dodge-roll behind him during one of his combos.
In the fourth phase (fully restores for the third time), he randomly switches between 4 different styles - three of them are the ones you've already seen in the previous phases, but now he might sometimes use a gun. If he gets the gun out, you obviously can't rely on keeping your distance or he will destroy your ass. Close him down if he brings out the gun and kick his ass until he switches to a sword, or you beat him.
After the fight, Amon declares that even though his body meets its end here, his spirit will continue to hunt Kiryu down for eternity. You receive the Teppogiri Kanemitsu (sword weapon). After this, the request ends with the COMPLETE result and you also receive 15000 EXP as a reward.


