KHHsubs
Text Walkthrough
Prologue Chapter 1 Chapter 2 Chapter 3 Chapter 4 Chapter 5 Chapter 6 Chapter 7 Chapter 8 Chapter 9 Chapter 10 Chapter 11 Final Chapter
Prologue: The Dragon of Gion
| 0-1 | Day | Gion (Arigataya) |
Speak to shopkeeper at Arigataya | > |
| 0-2 | Day | Gion (Tenguya) |
Speak to shopkeeper at Tenguya | > |
| 0-3 | Day | Gion (Koyoro) |
Speak to woman in front of the restaurant | |
| 0-4 | Day | Gion (Suiten Inari) |
Fight: Ruffians | > |
| 0-5 | Day | Gion (Ebisuya) |
Speak to shopkeeper at Ebisuya | > |
| 0-6 | Day | Gion (Gion Inari) |
Pick up key A-1 | > |
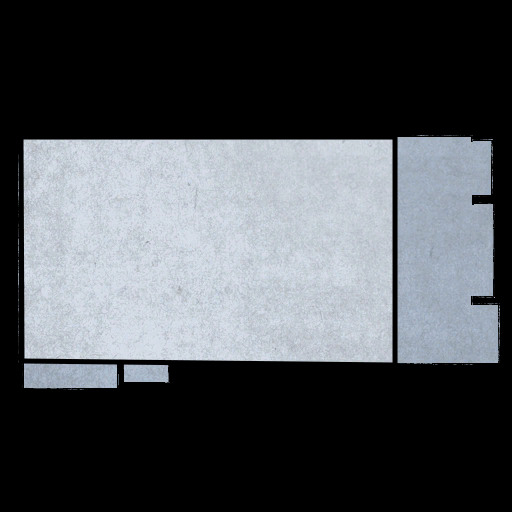
| 0-7 | Day | Gion (Storage Lockers) |
Open locker A-1 and get the money | |
| 0-8 | Day | Gion (Main Gates) |
Fight: Ruffians | > |
| 0-9 | Day | Gion (House of the Dragon) |
Speak to Ito and give him the money |
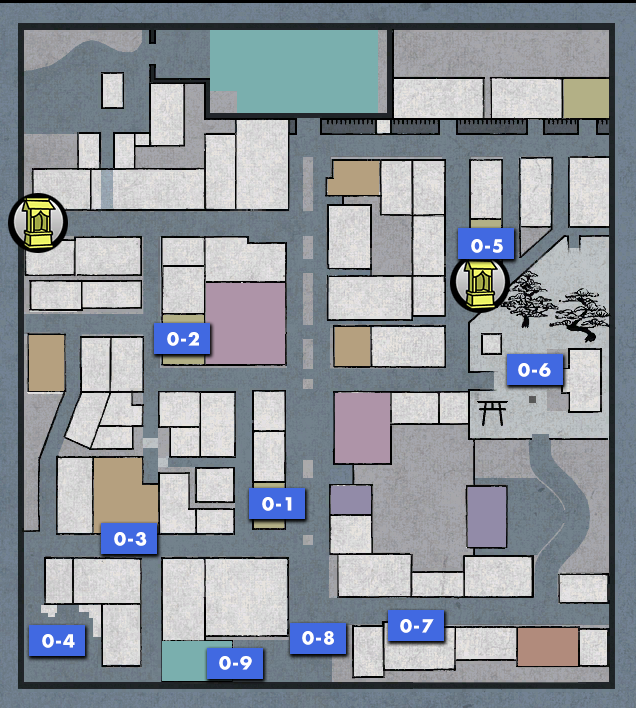
| 0-1 | Speak to shopkeeper at Arigataya |
After the opening movie, Ito asks Kiryu to help collect some money. You get a choice of two options but it makes no difference what you pick (just slightly different dialogue).
You are asked to collect money from 3 places - Arigataya, Tenguya, and Ebisuya.
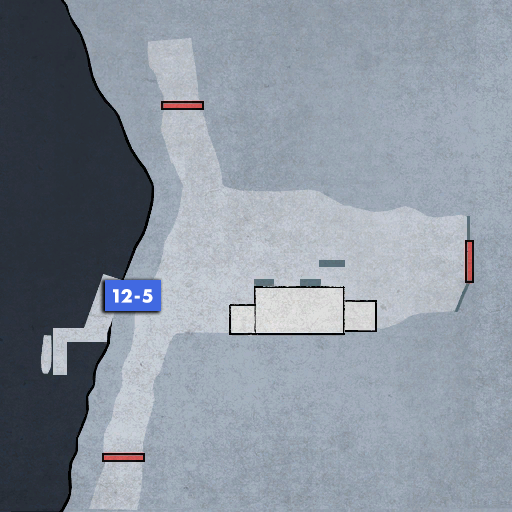
You can collect the money in any order you like, but you may as well start with the closest and most simple collection of the 3. Arigataya is just to the north of Kiryu's house. Speak to the shopkeeper in here to get the money.

Look out for the sign shaped like a gourd at the south end of Gion's main street. This is Arigataya
| 0-2 | Speak to shopkeeper at Tenguya |
After collecting the money from Arigataya, head over to Tenguya. You won't be get the money just talking to him; instead, he tells you to head to Koyoro and get the money from his apprentice.
The apprentice is actually at the Suiten Inari shrine, but he won't show up there until you speak to the woman in front of the restaurant. So speak to her first then head to the shrine.

The shopkeeper tells you to speak to his apprentice for the money. His apprentice is out doing an errand for him. Your destination is to the south of the pharmacy.
| 0-4 | Fight: Ruffians |
At the Suiten Inari shrine, you get in a fight to help the apprentice, who is being harassed for his money by some guys.
This is a tutorial fight for the brawler (unarmed) combat style and you won't receive any damage. You will learn about the following in this order: Striking, Grabbling, Weapons, gathering heat, and heat actions.
Fights in Gion will be primarily unarmed so it's a good idea to get used to using this style of fighting.
First, you will be asked to strike enemies 10 times. Use either the or buttons to do this.
Next, the tutorial wants you to grab an enemy and then strike them. Use to grab an enemy, then use either or to strike them, or to throw them. You must do this 10 times (up to you whether you use the same attack 10 times or mix and match them).
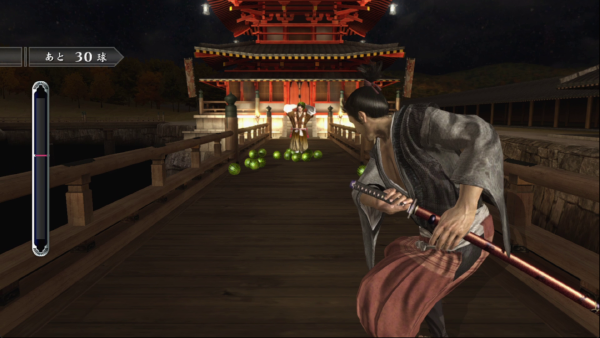
Next, the tutorial wants you to use weapons on the battlefield. Go near an object that has a red and white triangle hovering over it. This indicates that the object can be picked up with the button. Then, use the or buttons to strike the enemy with the weapon, or use the to throw the weapon. You must do this 10 times (again, it doesn't make a difference if you use one attack 10 times or use a mix of all 3).
Next, you'll learn about the heat gauge. Building up the heat gauge will put you into heat mode, which allows you to perform powerful attacks called "Heat Actions". To build up your heat gauge in this tutorial, either taunt your opponents with the button, or attack them. Regardless of which method you use (or a mix of both), continue to do this until you get into heat mode.
Now you are in heat mode, the game will ask you to perform 3 heat actions (you'll have infinite heat in this part of the tutorial - so you don't have to build up your heat gauge again). You can visit the heat actions page for details concerning all the heat actions that can be performed in this game. In the case of this tutorial, the simplest options here are to either grab an enemy and take them over to a wall, or pick up a weapon and go near an opponent. When the conditions are met, the heat action icon will appear on the screen, indicating you can perform a heat action. Press when this shows to use the heat action. It doesn't matter if you use the same heat action 3 times, it will still count.
After all that, there is nothing left to do for the tutorial, so simply defeat the enemies in whatever way you like.
After completing the tutorial and defeating the 3 guys, you will receive the money along with a Vitality Pill - High Grade item.
There is one final place from which to collect money, so head over to Ebisuya near the Gion Inari shrine.
NOTEThe heat actions you use in the tutorial count towards the completion list.

1 Tub / 2 Bucket / 3 Branch
| 0-5 | Speak to shopkeeper at Ebisuya |
Again, you won't get the money right away just by talking to the shopkeeper. The shopkeeper tells you he stored the money in the storage lockers, but has lost the key. He says he must have lost it either at the liquor store (Nakanokura) or the Gion Inari Shrine.
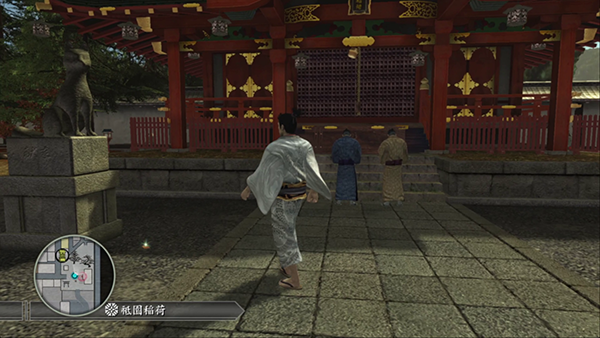
The correct location is the Gion Inari Shrine. There's no need to speak to anyone at Nakanokura, so just head straight to the shrine. It can be found to the south-east of Ebisuya.
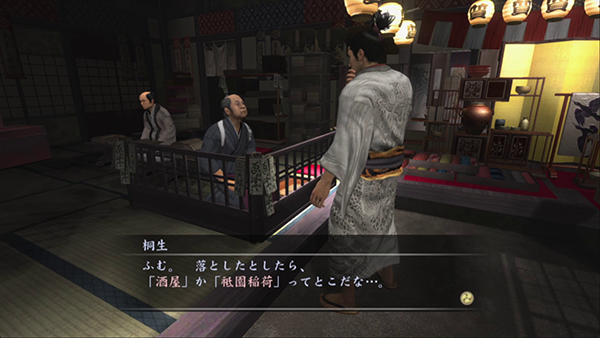
By talking to him, you learn that the shopkeeper lost his key at either Nakanokura or the Gion Inari Shrine.
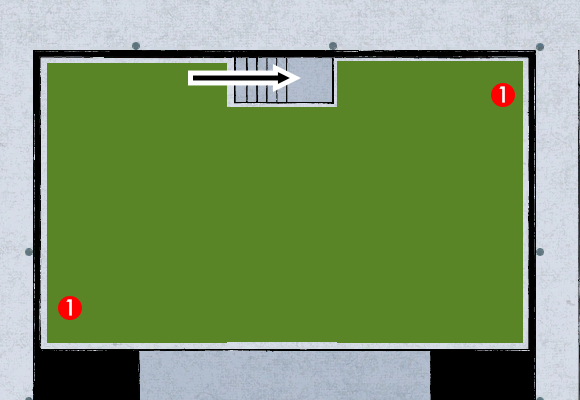
| 0-6 | Pick up key A-1 |
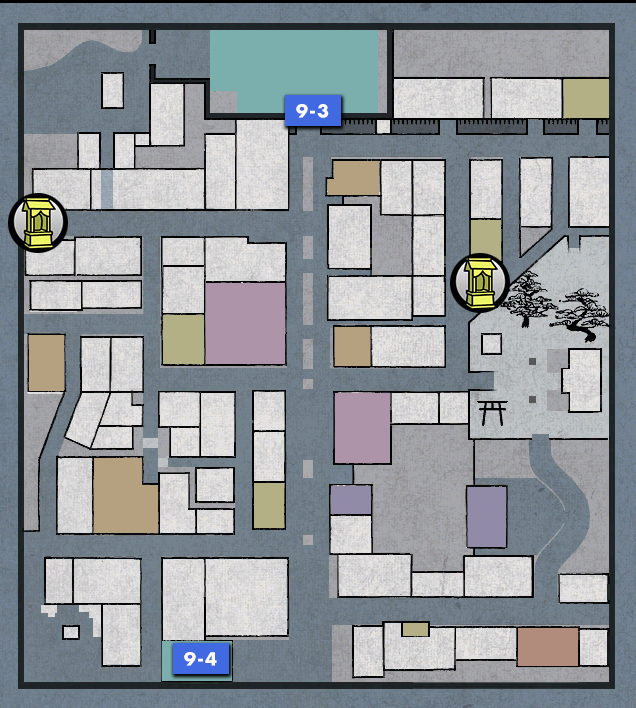
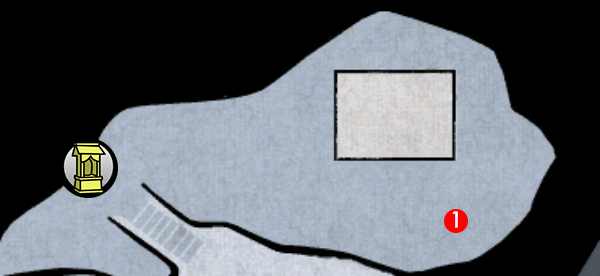
The key lost by the Ebisuya shopkeeper is found in the Gion Inari Shrine area. When facing the shrine, you will find it on the floor on the left hand side, under a guardian dog statue. Interact with the glowing light to pick up storage key A-1.
When you have the key, head to the storage lockers in Gion (down the alley to the right of the main gates). Open locker A-1 to receive the pawn shop's money.
With money collected from all 3 locations, head back to Ito in front of Kiryu's house.
The key is indicated by the glowing light beneath the dog statue. When you get close to the light, the interaction icon will show at the top-right of the screen.
| 0-8 | Fight: Ruffians |
On your way back to Kiryu's house, you'll be stopped by the guys you faught at the Suiten Inari Shrine, who want revenge. This is another battle tutorial in which you cannot take any damage. You'll learn about enemy item drops, strafing, guarding, and evading.
The first part (enemy item drops) ends when you defeat 2 enemies who are carrying items and pick up their items. However, as long as you do not collect 2 of the dropped items, enemies carrying Vitality Pills will continue to spawn. So it's a good idea here to get as many item drops as you are able to carry before you start picking them up. You won't be able to use the items you collect from chapters 1-4, but in chapter 5 you can use the item storage system (at a save point) to get them back. Just remember to collect all the dropped items before you defeat the final enemy in the tutorial.
NOTEIt's simple to tell when an enemy is carrying a droppable item because you will see a glowing gourd-shaped object on them.
After this, the tutorial will ask you to block enemy attacks 5 times. Simply face an enemy and hold to do so.
Next, the tutorial will teach you about strafing. Hold down while facing an enemy and move around. You'll notice this acts as a kind of "Lock-On" system which can be helpful to focus on an enemy (it's particularly useful when going one-on-one against bosses). You'll need to strafe for a total of 10 seconds to pass.
Next, you'll learn about evading. Use the while moving the left analogue stick in a direction to dodge in that direction. If you press with a direction on the left analogue stick again immediately after the first you will perform a dodge roll. Dodge rolling backwards is extremely useful when you need to create some space between you and your opponent, while dodge rolling to the side is useful to get behind an opponent. You must evade 10 times (each press of the button counts towards this count, so a dodge roll will be 2 dodges).
After this, there is nothing left to learn in this tutorial, so defeat the enemies in any way you want.
After the tutorial, speak to Ito in front of Kiryu's house to complete the chapter. Ito will also give you 3000 Mon. You won't be able to use any of the money or items you gain in this chapter until you reach Chapter 5.

1 Red Bucket
Chapter 1: Miyamoto Musashi
| 1-1 | Day | Miyamoto's Dojo | Teach students | > |
| 1-2 | Day | Miyamoto's Dojo | Speak to Marume and take the test | |
| 1-3 | Day | Miyamoto's Dojo | Fight: Marume Nagayoshi | > |
| 1-4 | Night | Miyamoto's Dojo (Barn) |
Speak to Marume in the barn | > |
| 1-5 | Night | Tokugawa Mansion | Fight: Majima Gorohachi | > |
| 1-6 | Night | Enemy Mansion (Garden) |
Fight: Swordsmen | > |
| 1-7 | Night | Enemy Mansion (Hall) |
Fight: Swordsmen | > |
| 1-8 | Night | Enemy Mansion (Dirt Floor) |
Speak to Majima and select the BOTTOM OPTION | |
| 1-9 | Night | Enemy Mansion (Corridor) |
Fight: Swordsmen | > |
| 1-10 | Night | Enemy Mansion (Hall) |
Head to the central bedroom |
| 1-1 | Teach students |
Marume arrives at the Dojo. Before you speak with him, you will give your students sword lessons. The lessons consist of drawing and sheathing your sword, combo attacks, guarding, kicks which break an enemy's guard, and zanshin. This covers the basics of sword combat in the game.
The first tutorial wants you to draw and sheath your sword 5 times. Use the right button on the directional pad to draw your sword. Then use the down button to sheath it.
Next, the tutorial asks you to perform a combo attack 5 times. You must perform the full 3 hit combo for it to count. Press the button 3 times to perform the combo (make sure your hits connect with the opponent).
Next, you'll learn about strong attacks. Press during a combo to perform a strong attack. (e.g. press once then immediately press ). You must hit your opponent with a strong attack 5 times to pass.
Next, you have to block against your opponent's attacks 10 times. This works exactly like it does with the brawler style - face your opponent and hold the button.
Next, you'll learn about kicking. With the sword style, press to kick your opponent. This is a particularly useful technique against enemies who are good at defending because it breaks their guard. You must do this 10 times to pass.
Finally, you'll learn about the zanshin technique, which is unique to the sword style. To perform this, use a strong attack as you have done earlier in this tutorial, however instead of simply pressing the button, you must hold it down. This puts Musashi in a stance and his sword will start glowing. This technique allows you to build up your heat gauge. Use this technique against the training dummy 5 times to pass (your attack must connect with the dummy or it won't work).
After the lessons are finished, the students will leave. Speak to Marume when that happens (select the TOP OPTION).

Zanshin is a tricky technique to use against difficult enemies. But when you can find opportunities to use it, it can be extremely helpful in a fight.
| 1-3 | Fight: Marume Nagayoshi |
Speak to Marume and select the TOP OPTION to take the test. In the battle both Musashi and Marume will fight using wooden swords. The battle will end when Musashi's health drops to 50%. But regardless of whether you manage to beat Marume or you lose enough health, the outcome doesn't change - from a story perspective, Musashi loses this fight.
Marume has a very high 2500 HP and has attacks which can easily break your guard. In addition, when Marume's health drops to a certain amount, he starts moving faster and unleashing even more powerful attacks. If you are fighting him on a new save (i.e. not new game plus mode), Musashi's ability at this stage of the game is very low, so winning this fight is extremely difficult.
When Marume hits Musashi 5 times, Musashi's health will drop to 50%. Musashi will then lose the fight and the test will end.

| Note | If you defeat Marume, you get 1000 EXP as a reward |
As mentioned, it is extremely difficult to defeat Marume on your first playthrough, due to Musashi's low ability at this stage of the game. However, when you play New Game Plus mode it's a lot easier to defeat him. Even in new game plus, you still lose when Musashi's health drops to 50%. But Musashi's health will be a lot higher so it will be harder for Marume to drop it down to 50%.
Focus on defending against Marume's attacks, and carefully get some hits in when there is an opening to chip away at his health. If you manage to beat him, you get 1000 EXP as a reward.

You will have an opening to attack right after Marume finishes a combo. However, be careful because combo attacks don't work on him.
| 1-4 | Speak to Marume in the barn |
When you next have control after the test, it will be night time. Exit the dojo and head to the barn. Speak to Marume and Musashi will ask why Marume said he passed the test. On the way to the barn you will pass a shining Jizo statue. This is the only save point you'll encounter in chapter 1.
Also, there is an overturned turtle near the barn. Once you speak to Marume, the story will proceed and you will have no way of returning to this area, so don't forgot to interact with the turtle before doing this.
1 Overturned Turtle
| 1-5 | Fight: Majima Gorohachi |
After an incident during the pre-battle meal, a fight breaks out between Musashi and Majima. Majima is very quick and loves to move around before launching an attack. When you go in for an attack, Majima tends to rapidly dodge around to get behind Musashi. You cannot block his attacks from behind so you will have to dodge roll when this happens.
Majima is most vulnerable immediately after he spins around. Use this as an opportunity to launch a combo attack for some good damage. In addition to this, sometimes when he dodges one of your attacks he will start laughing. He is vulnerable in this state, so it's another good opportunity to deal some damage.
After this fight, you get a lot more story to sit through, during which Musashi and Marume volunteer to take on a special task for the upcoming battle. Marume takes them to a separate room to explain their task - they are to assassinate a traitor to the Tokugawa army. After all the cutscenes, a long battle begins.
| 1-6 | Fight: Swordsmen |
When the battle begins, Musashi and Majima will start working their way to the central bedroom. In this initial fight, you will encounter 4 enemies. When you cross the bridge and enter the mansion, 6 more enemies appear. Once all 10 of these enemies are defeated, a way opens up which allows you to proceed in the mansion.
You will encounter a lot of enemies in the mansion, but you can take advantage of having Majima as your partner by letting him chip away at enemy health and then jumping in to land the finishing blow and get EXP.
During the fights in the mansion, you will find yourself in an area where you can execute the Secret Sword - Shadow Stab heat action. There are very few occasions to use this heat action throughout the game, so it's a good idea to do that here while you have the chance.

1 All-Purpose Pill - Special Grade
Secret Sword - Shadow Stab
| 1-7 | Fight: Swordsmen |
After entering the hall, the next objective is the dirt floor room at the top-right of the mansion. You can get to this room without needing to defeat all the enemies prior to it. However, before entering the room, you should at least pick up the Unsigned Sword in the store room at the top-left of the mansion. This sword is more powerful than the Mimasaka Sword Musashi has equipped, so picking this up and equipping it will help with the rest of the fights here.
In addition, there are spears lying around in the hall. You can perform the Thrust Mastery heat action with these. If you're going for 100% completion this is a great opportunity to tick that one off the list.
NOTEWhen you speak to Majima you will proceed to the next part. Before doing this, you can retrace your steps to get more reinforcements to show up and obtain a Silver Plate drop from them.

1 Tamahagane / 2 Unsigned Sword / 3 Vitality Pill / 4 Scrap Iron / 5 Frenzy Pill / 6 All-Purpose Pill / 7 Spear
Secret Sword - Shadow Stab
| 1-9 | Fight: Swordsmen |
When you proceed to the corridor, you will split up with Majima and proceed to the central bedroom alone. There are 2 enemies in the corridor, then when you enter the central room a bodyguard enemy will appear and use a Surprise Attack heat action. You will find yourself surrounded by some enemies, so make sure you have defeated the two enemies in the corridor before coming here so you don't have to deal with too many at once.
The bodyguard who shows up in the central hall is the swordsmaster enemy type - the most powerful non-boss sword-wielding enemy type. When he sheaths his sword (his "iaido stance"), he will start moving closer to you. When he is close enough, he will use a powerful iaido technique, so make sure you defend against this attack. In his regular stance (with his sword out) he is a lot tougher than other swordsman enemy types.
When you have dealt with all the enemies here, a way opens up to the central bedroom. Going there will end the chapter.
NOTEIt's not a good idea to attack the swordsmaster type while they are in their iaido stance. Instead, just focus on defending against their iaido technique. They are vulnerable to your attacks immediately after they execute their iaido attack.

1 Vitality Pill - Special Grade
Enemy Heat Actions
| Name | Button(s) for QTE | Conditions | Damage |
|---|---|---|---|
| Surprise Attack | Random | Will happen when you enter the central hall | 120 |
Chapter 2: The Sekigahara Setup
| 2-1 | Night | Temple | Speak to Majima after searching the area | > |
| 2-2 | Night | Temple | Fight: Marume Nagayoshi | > |
| 2-3 | Night | Temple | Fight: Swordsmen | > |
| 2-1 | Speak to Majima after searching the area |
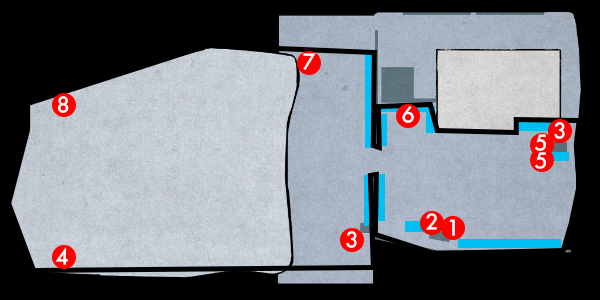
After arriving at the old temple, Majima will ask you to search the area. You can find an overturned turtle and 4 items in this area. When you have picked up everything, go back and speak to Majima.
Alternatively, you don't have to pick anything up if you don't want to do so - just go to the end of the map (gate to the temple at the end of the outside area) and then go back to Majima.
After a bunch of cutscenes, Marume shows up and fights you. Turns out this whole thing was a set up!
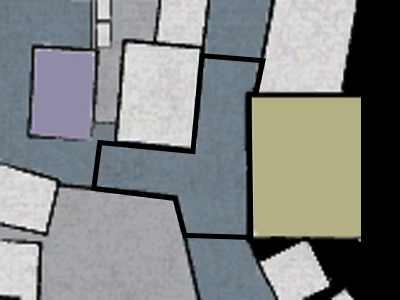
NOTEBecause of the heavy rain outside it can be difficult to spot the items on the ground. Use the provided map to help you find all the items.

1 Lapis Lazuli / 2 Frenzy Pill / 3 Temple Fragment / 4 Overturned Turtle / 5 Vitality Pill
| 2-2 | Fight: Marume Nagayoshi |
Alongside Majima you will fight 6 enemies, including Marume. First, deal with the regular enemies. Pay attention to who you target though - Majima is wearing the same armour as all the enemies so at a glance it's not necessarily easy to discern between friend and foe.
When you have taken out the other enemies and are left with just Marume, a safe strategy is to focus on defending and allow Majima to chip away at his health. Try to position yourself in such a way that Majima is positioned behind Marume and can get in easy attacks. Only Musashi can land the final blow (i.e. Majima cannot drop his health down to 0) so you will need to jump in to land the finishing blow when you have an opening.
After some more cutscenes, Sasaki Kojiro shows up with more guys. This leads to the two sword style tutorial.

| 2-3 | Fight: Swordsmen |
When Majima gets taken out of action, Musashi is left to fight a large group of enemies alone. This fight acts as the two sword style tutorial. You will learn about guarding and combo attacks using this style.
One of the key benefits of the two-sword style is its ability to defend against enemies in all directions. So it's a very useful style when surrounded by enemies. In addition, it has a wider attack span than the single sword style, so it's easier to attack multiple enemies at once.
To demonstrate the omnidirectional defending, the tutorial asks you to defend against enemy attacks 10 times. You don't have to worry about facing the enemy, simply hold down and wait for them to attack. Musashi will block strikes from any direction.
After this, the tutorial asks you to attack enemies (with , or a mix of both) 10 times WITHOUT STRAFING (i.e. without holding down ).
That's all for the two sword tutorial, so defeat the enemies in any way you want. Remember to keep an eye on enemy movement or you'll end up taking a lot of damage - focus on defending primarily and only jump in to deal some damage when an attack has ended.
After the fight, Musashi and Majima escape.

1 Rice Ball
Chapter 3: The Vow
| 3-1 | Day | Bridge | Fight: Pursuers | > |
| 3-2 | Evening | Farm | Speak to Ukiyo | > |
| 3-3 | Night | Farm | Fight: Pursuers | > |
| 3-4 | Day | Farm | Fight: Bounty Hunters | > |
| 3-1 | Fight: Pursuers |
While on the run from Tokugawa, Musashi and Majima bump into some pursuers, who Musashi has to fight along (because of Majima's injury).
At first you'll be up against 5 enemies, but reinforcements will arrive when you get down to 2. Because you'll be surrounded by enemies from both sides of the bridge, it's a good idea to use the two-sword style so you can defend against their attacks effectively. If you cross over the bridge you'll end up on a more spacious area containing a recovery item. You can use this area to spread out the enemies a bit.
Also, this is one of the few areas in the game where you can use the Throwdown Mastery heat action. This is a one-hit kill attack. To use this heat action you will need to be in the brawler style which means leaving yourself vulnerable to attacks (since you won't have a sword to defend yourself). Because of this, it's a good idea to get rid of most of the enemies before you attempt to perform this heat action.
After a cutscene in which Majima falls in the ravine along with some Tokugawa soldiers, Musashi continues on to find Majima's sister, Ukiyo, and give her the sword of her brother.

1 Vitality Pill
Throwdown Mastery
| 3-2 | Speak to Ukiyo |
Musashi tries to offer the sword to Ukiyo, but she's not interested. She storms off back to her house.
Before following Ukiyo into her house, collect the items spread around the map area. Your inventory may be full of recovery items by this point, if you haven't used them in battles. If so, you should clear out some space in your inventory so you can pick up the useful materials in this area. In addition to the materials, there is also an overturned turtle in this area.
Once you have picked everything up, enter the house and speak to Ukiyo to progress the story.

1 Quartz / 2 Gold Tortoiseshell / 3 Tamahagane / 4 Overturned Turtle
| 3-3 | Fight: Pursuers |
After Ukiyo talks about her history with Majima, a couple of pursuers will arrive. You will not be able to use the two-sword style in this fight, so you won't be able to take advantage of that style's defensive abilities. However, because there are only 2 enemies in this fight you should be able to easily avoid being surrounded and vulnerable to attacks from behind.
These enemies do have a lot of health though, so it's worth trying to build up the heat gauge using the zanshin technique and using heat actions to quickly take them out. You could also use frenzy pills, if you have any.
After the fight, Musashi decides to abadon the way of the sword and vows to stay and protect Ukiyo.

1 Rice Ball
| 3-4 | Fight: Bounty Hunters |
A year later, Musashi appears to be living a peaceful life in the farm with Ukiyo.
But suddenly a bunch of bounty hunters show up looking for Majima. This leads to a fight in which you are limited to just the brawler style. There are lots of weapons on the battlefield so make use of those, because using them means you will be able to defend against the enemy sword attacks. They will also do a lot more damage than your bare hands. When the weapon you're using breaks, pick up a new one straight away.
If you do find yourself surrounded while unarmed, you can grab and throw enemies to knock others down and clear some space to get away. The archer types will fire at you from a distance, so prioritise getting rid of them as soon as possible.
After the scenes that follow this fight, Kiryu leaves the farm and heads off into the distance.
1 Rake / 2 Hoe / 3 Rice Ball / 4 Plow / 5 Bucket / 6 Wagon / 7 Vitality Pill - Special Grade / 8 Branch
Chapter 4: A New Life
| 4-1 | Night | Mountain Gate | Fight: Bounty Hunters | > |
| 4-2 | Day | Mountain Road (Shrine) |
Change clothes, then head to Rakugai | > |
| 4-3 | Day | Rakugai (Gion Main Gates) |
Speak to the mysterious monk in front of the Gion Main Gates | |
| 4-4 | Night | Gion (Gion Information Desk) |
Ask about the yujo wearing the butterfly kimono | > |
| 4-5 | Night | Gion (Gion Main Gates) |
Speak to the mysterious monk in front of the Gion Main Gates | |
| 4-6 | Night | Gion (Gion Information Desk) |
Speak to Ito and follow him to Tsuruya | |
| 4-7 | Night | Gion (Tsuruya) |
Fight: Drunk | > |
| 4-1 | Fight: Bounty Hunters |
After leaving Omi, Musashi is confronted by some bounty hunters. You are only able to use either the single sword or brawler styles in this fight. If you use the brawler style you can perform the Heavy Drop Mastery heat action by grabbing an enemy and taking them near a stone lantern. If Musashi is level 12 or above this heat action will defeat an enemy in one hit.
However, you are dealing with quite a lot of enemies so using the brawler style will be risky. Build up your heat gauge and use heat actions to take them out quickly. Focus on using the single sword style primarily so you can defend and thin out their numbers. When you get the opportunity, try to use the Heavy Drop Mastery heat action. Use a frenzy pill or all-purpose pill to get into heat mode quickly.
NOTEHeavy Drop Mastery does a lot of damage, but if Musashi is level 11 or lower this heat action will leave the bounty hunters with a bit of health (in other words, it won't beat them in one hit)
After the fighting, more bounty hunters arrive, but a mysterious monk suddenly appears and saves Musashi. He takes Musashi to somewhere he can recover.

1 Rice Ball
Heavy Drop Mastery
| 4-2 | Change clothes, then head to Rakugai |
In the morning, the monk is gone. But he left a note telling Musashi to change clothes and meet him at the gates of Gion.
You should head to Rakugai, in accordance with the monk's advice. Change clothes here first (interact with them on the floor), then head through Mountain Road, then pass by Kiyomizudera, then through Forest Road, then you arrive in Rakugai. When here, head to the main gates of Gion and speak to the monk.
By the way, at this point in the story you will start to get random encounters while traversing the maps in the game. There are lots of reasons to get into these fights, including gaining EXP and battle rewards. It's always worth fighting rather than running past them.
NOTEThere is a substory that you can't trigger unless you have been in at least 80 random encounters (Bounty 138) and there is some training you can only do once you've been in a certain number of random encounters, so it's a good idea to start building up your encounter count now (assuming you plan on doing all the side content) rather than skipping them all.
Speak to the monk and the two of you will enter Gion.

1 Clothes
| 4-4 | Ask about the yujo wearing the butterfly kimono |
When you have control after entering Gion, head to the Gion Information Desk to acquire information. Speak to the attendant at the desk and select the MIDDLE OPTION to ask about the yujo with the butterfly kimono. You learn that the yujo you saw near the main gates is "Yoshino" from the brothel Tsuruya.
After learning this, and the conversation involving Ito (triggered when you try to leave), head back to the monk by the gates and speak to him, then head back to the Gion Information Desk and speak to Ito again.
You can explore Gion during this time if you like, but there's not really anything to buy at the moment so you may as well head straight to Tsuruya.
After speaking with Ito again (when you have the monk with you), he will lead the two of you to Tsuruya. Simply follow him and when all 3 of you arrive outside Tsuruya, it will trigger the next part of the story.
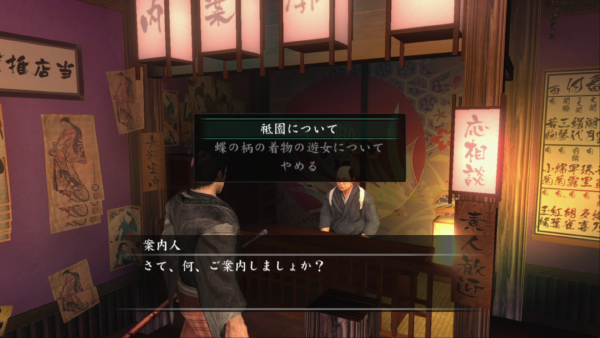
You will find the information desk down the main road of Gion, opposite Arigataya. Asking about the yujo with the butterfly kimono will progress the story.
| 4-7 | Fight: Drunk |
While talking with Yoshino, an incident occurs in Tsuruya. A drunk samurai is being violent and threatening to kill a yujo. At the employee's request, Musashi heads off to deal with the incident. You are forced to fight using the brawler style against an enemy wielding a sword. But the enemy doesn't have much health so it shouldn't be a problem to take him out using the brawler style.
If you want to play it safe, you can grab him and use strike attacks, since doing so means he can't use his sword against you. Alternatively, you can use the hibachi weapon lying around on the battlefield. Having this equipped will let you block the enemy's sword attacks.
1 Hibachi
Chapter 5: The One Ryo Request
| 5-1 | Evening | Gion (Back of Tsuruya) |
Speak to Ito | > |
| 5-2 | Night | Gion House of the Dragon |
Return to House of the Dragon | > |
| 5-3 | Day | Gion (Back of Tsuruya) |
Speak to Ito | |
| 5-4 | Day | Gion (Gion Inari Shrine) |
Learn about revelations from Shichigoro | > |
| 5-5 | Day | Gion (House of the Dragon) |
Return to House of the Dragon, then exit to Rakugai via the secret passage | > |
| 5-6 | Day | Rakugai (Checkpoint) |
Speak to the official at the checkpoint | > |
| 5-7 | Day | Rakugai (Checkpoint) |
Ask the man who appears about a permit | > |
| 5-8 | Day | Rakugai (Shopping District) |
Fight: Yakuza | > |
| 5-9 | Day | Rakugai (Narikin) |
Speak to the conterfeiter and obtain a permit | > |
| 5-10 | Day | Rakugai (Outside Narikin) |
Fight: Bodyguard | > |
| 5-11 | Day | Rakugai (Checkpoint) |
Show the official at the checkpoint your permit | > |
| 5-12 | Day | Kawara Street (Koetsu's Mansion) |
Speak to the attendant outside the mansion | > |
| 5-13 | Day | Rakugai (South-East) |
Receive the greatsword | > |
| 5-14 | Day | Rakugai (Outside Blacksmith) |
Fight: Shishido's Henchmen | > |
| 5-15 | Day | Forest Road | Enter Shishido's Cave | > |
| 5-16 | Day | Shishido's Cave (Area 1) |
Fight: Shishido's Henchmen | > |
| 5-17 | Day | Shishido's Cave (Area 2) |
Fight: Shishido's Henchmen | > |
| 5-18 | Day | Shishido's Cave (Area 3) |
Fight: Shishido's Henchmen | > |
| 5-19 | Day | Shishido's Cave (Area 4) |
Fight: Shishido Baiken | > |
| 5-20 | Day | Kawara Street (Koetsu's Mansion) |
Enter Koetsu's Mansion | > |
| 5-1 | Speak to Ito |
Requests
Commissions
We are now back to where we were by the end of the prologue, with the girl selling herself to Tsuruya for the money to pay Kiryu.
To investigate what's going on with the young girl, you'll need to speak to Ito. You won't be able to meet with him by going up to the front door, so head round to the back of Tsuruya to the north-west. There is a passage which leads back there. You'll find Ito here, so speak to him to progress the story.
NOTEThe game will have a story marker on the map telling you to go the front of Tsuruya, but you can ignore this and go straight to the back area. If you do interact with the front door, Kiryu will just say he should go round the back and the map story marker will update to point you in that direction.
Whenever you need to return to Tsuruya, you'll almost always need to head to the back again, so remember how to get here.
There are a bunch of requests available at this point in the story, but they are all the yujo requests and to complete them all you will need quite a lot of money (especially so for Asagiri) so if you are on a new save you may not be able to complete these now (unless you grind the gambling mini-games to get money, which you're welcome to try if you want to complete them all right now).

The passage leading to the back of Tsuruya is right next to one of the shining Jizo save point statues.
| 5-2 | Return to House of the Dragon |
Commissions
After the scenes at Tsuruya, Kiryu supposes there's nothing more he can do right now, so he should head back to his house. If you're trying to do all the side content, there are few substories you can do now (though the two requests are only available if you have completed all the yujo requests). When you get back home, Haruka shows up and gives Kiryu money to undertake her request to kill Miyamoto Musashi.
The next morning, Kiryu decides to start investigating this "Miyamoto Musashi" character. Speak to Ito to get his advice. He refers Kiryu to an informant called Koetsu, who lives on Kawara Street.
| 5-4 | Learn about revelations from Shichigoro |
After speaking with Ito, you will encounter the artist Shichigoro as you leave the Tsuruya back area. Shichigoro gives you pictures which are necessary in order to obtain revelations in this game. After first meeting him, you will be able to learn the Secret Sword - Sly Cat heat action. If you speak with him again, he will give you the flying squirrel picture.
He will always be hanging around at the Gion Inari Shrine, so come back here whenever you are able to obtain new pictures.

The Secret Sword - Sly Cat heat action is a single sword style heat action used when an enemy attacks you from behind. It is a very useful heat action in situations when you are surrounded.
| 5-5 | Return to House of the Dragon, then exit to Rakugai via the secret passage |
Commissions
After meeting Shichigoro, your next destination is Kawara Street. But Kiryu cannot simply walk out the front gates of Gion dressed as a samurai, or rumours of his true identity might start spreading. The secret passage in Kiryu's house acts as a way of travelling between Gion and Rakugai.
The next task is to obtain a permit which will allow you to freely enter Kawara Street.
After this point, the game really opens up a lot. Lots of new shops, substories, training, etc. will become available to you.
| 5-6 | Speak to the official at the checkpoint |
After exiting to Rakugai, your objective is the official at the top-left of the map, blocking the way to Kawara Street. Before speaking to him, there are a few more substories available at this point, as well as all the horse archery training. Completing the horse archery training will upgrade your heat gauge, so that is a useful one to do now on a new save.
| 5-7 | Ask the man who appears about a permit |
To get to Koetsu's mansion, you need to get to Kawara Street via the checkpoint at the north-west of Rakugai. However, you will not be allowed to pass without a permit. After being told you can't pass, move away (backtrack a little bit, east on the map) and a nearby civilian will speak to you about getting a permit.
When speaking with him, select the FOURTH OPTION to ask him about permits. You will learn that a master counterfeiter can be found in the shopping district area. He could make you a permit.

The other dialogue options when speaking with the civilian give you some other bits of information regarding other things (Gion, Rakugai, and Koetsu - from top to bottom)
| 5-8 | Fight: Yakzua |
Head to the shopping district to seek the conterfeiter. When you do, you end up in a fight with some yakuza. There are 6 of them, but they don't have much health. Only thing to watch out for in this fight is the martial artist enemy type. He can grab and throw you. You can't move while grabbed or if you are on the ground so this enemy type can leave you vulnerable to attacks from other enemies if you aren't careful. If you get grabbed, repeatedly press to break free of the hold.
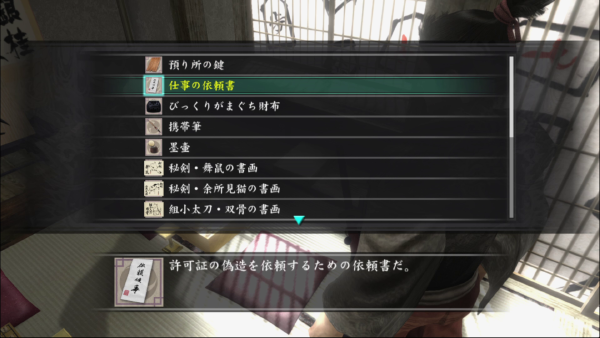
When you defeat them, you will receive a formal request for work. If you give this request for work to the counterfeiter he will produce a permit for you, which will allow you to enter Kawara Street.

1 Bucket / 2 Wooden Box / 3 Medicine Pot / 4 Pot
| 5-9 | Speak to the conterfeiter and obtain a permit |
Speak to the counterfeiter and select the TOP OPTION to give him something.
You will have to select the request for work from your inventory list. Use the picture provided here for reference, so you know what it looks like.
After receiving the permit, leave Narikin.
| 5-10 | Fight: Bodyguard |
When you leave Narikin after getting the permit from the conterfeiter, you will be confronted by the yakuza from earlier. This time they have brought a bodyguard with them. There are less enemies than before, but the bodyguard, being the swordmaster enemy type, makes the fight more difficult.
Usually in these situations you would want to take out the small fry first and deal with the swordmaster last. However, if you focus on the other enemies there is a good chance the swordmaster will keep using iaido techniques on you, constantly knocking you to the ground. Because of this, you're better off dealing with the swordmaster first.
You already encounterd a swordmaster type back in chapter 1. Again, you can defend against iaido attacks with your sword, which you must do if you don't want to end up on the floor (or at least you should evade out the way).

1 Stone 1 / 2 Stone 2 / 3 Pot
| 5-11 | Show the official at the checkpoint your permit |
Invention
After the fight, head back to the official at the top-left of the map. Speak to him and select the TOP OPTION to show him your permit. You can now freely enter Kawara Street.
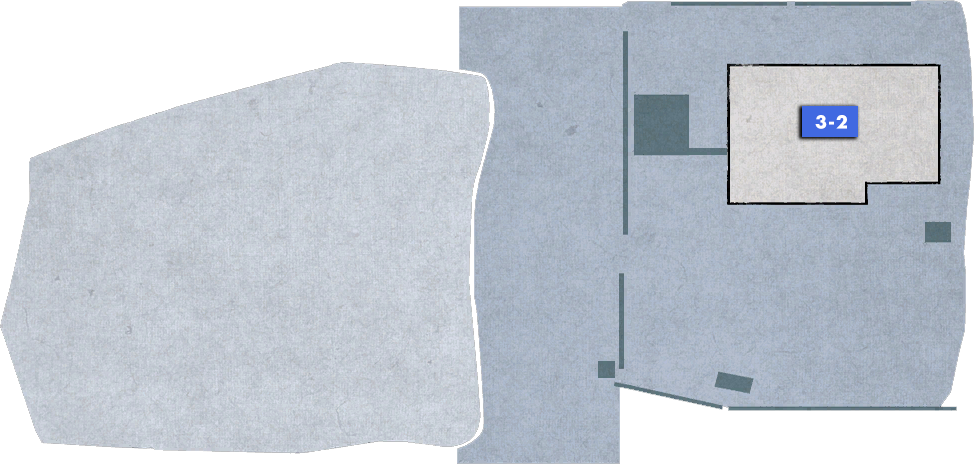
| 5-12 | Speak to the attendant outside the mansion |
Requests
Now you are in Kawara Street, the objective is to speak to the attendant standing around outside the mansion in the middle of the map. Before doing this, there are a couple of new substories available for you to complete.
When you meet with Koetsu, he asks Kiryu to do a job for him and in return he will give him the information he desires (information concerning Miyamoto Musashi). A thief called Shishido Baiken has stolen a treasure from him and he wants Kiryu to get it back.
| 5-13 | Receive the greatsword |
After leaving Koetsu's mansion, you need to head to the cave on Forest Road (to get there, exit via the south-east of Rakugai - it's the same area where you can do the horse archery training). But as you head towards this exit, the local blacksmith will stop you and ask you to try out his new sword he created. Apparently no one can lift it, but Kiryu seems strong enough to manage. Select the TOP OPTION to test it out.
Inside the smithy, you will receive an Iron Greatsword. The game will ask you to equip this weapon. In the pause menu, go to your equipment (SECOND OPTION), then select the third item in your equipped weapon list, then switch to the "greatsword" category and select the iron greatsword. Use the picture below to help point you in the right direction

| 5-14 | Fight: Shishido's Henchmen |
After the blacksmith explains the greatsword to you, some of Shishido's henchmen will show up, leading to a fight against them outside. There are 3 enemies and all of them are armed with an arquebus - the first of this enemy type you encounter in the game. This fight acts as the greatsword style tutorial. You will learn about how the greatsword weapons (includes clubs) have the ability to defend against bullets.
The tutorial ends when you block 6 shots (face the enemies and hold ). After that, defeat the enemies. You are forced to finish off the enemies using the greatsword style, so you will also learn how slow Kiryu moves when you are using this style. Your best opportunity to get close to the enemies is when they are reloading their gun.
NOTERemember: After shooting, the arquebus enemy types must reload before they can fire another shot. This is when they are at their most vulnerable.
| 5-15 | Enter Shishido's Cave |
After the tutorial, the blacksmith gives you the Treasured Sword Book, a weapon recipe book. You are now able to refine and craft weapons. See the weapons page of this guide for full weapon and crafting details. If you leave the smithy, then re-enter and speak to the blacksmith again, he will give you the Ancient Manuscript - this is technically classed as a weapon recipe book, but it doesn't actually give you any weapon recipes. Instead, it tells you what you need in order to complete the Yatsuka Blade crafting path.
Now you can head to Shishido's cave on Forest Road. When you enter the cave, you'll get a short cutscene followed by a long battle against Shishido's men. Before doing so, there is another substory you can do now (request 20 doesn't really count - you can trigger it now but you can't do anything about it until later in the game).
| 5-16 | Fight: Shishido's Henchmen |
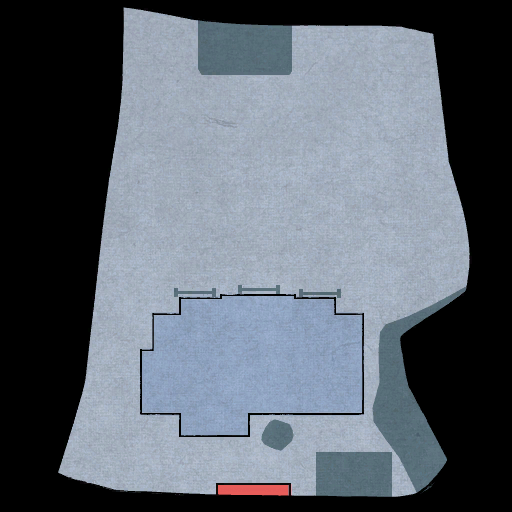
After entering the cave, you will get into a fight with Shishido's henchmen. At first you will be up against 5 enemies, but more reinforcements will show up. The only enemies you will come up against in this area are brawler and brigand types, so they aren't too much of a threat. You could use the greatsword style to deal lots of damage to lots of enemies at once to get through them quickly.
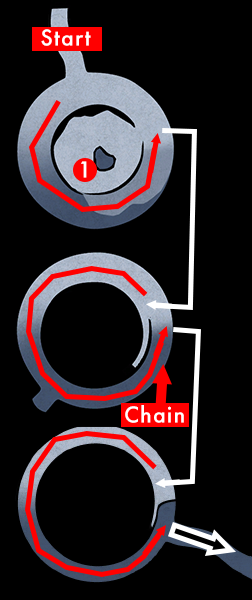
Once you have defeated all the enemies in this area, destroy the chain near the gate to proceed to the next area. You will encounter more chains, as well as other obstacles in the battlefield as you progress. All of these can be destroyed with weapons. The greatsword will destroy these objects faster than any of the other styles.
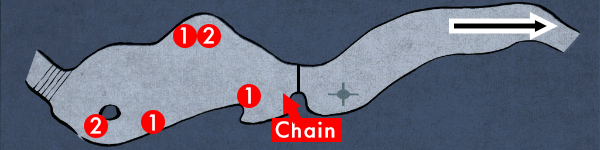
1 Stone / 2 Wood
| 5-17 | Fight: Shishido's Henchmen |
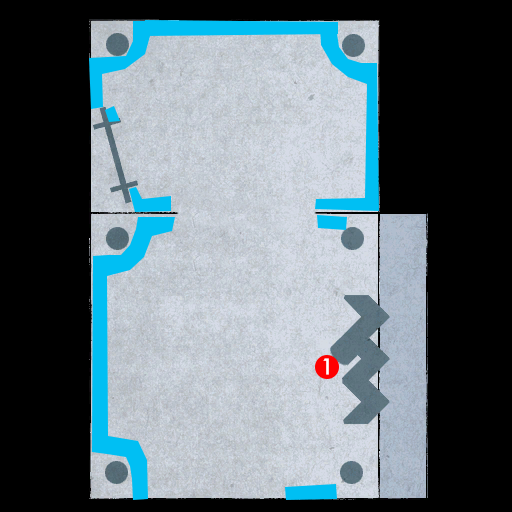
There are 2 paths you can take here to get to the next area. I'd recommend taking the north path so you can obtain a couple of weapons. There are 15 enemies in total in this area, but you don't have to defeat them all in order to proceed.
The first thing you need to do here is destroy the chain to open the gate. You will need to destroy obstacles in this area, but be careful when you do this - you will be vulnerable to enemy attacks while you try to destroy objects on the battlefield, so you should take out nearby enemies before trying to take out obstacles, just to be safe.
Also, watch out for the archer and arquebusier enemy types that show up in this area. They can easily catch you off your guard by attacking while they are off-screen.
NOTEYou will find the cast metal club and tessaimaru weapons in the small area with the wagon.

1 Vitality Pill / 2 Stone / 3 Wagon / 4 Tessaimaru / 5 Wood / 6 Cast Metal Club / 7 Frenzy Pill - Special Grade
| 5-18 | Fight: Shishido's Henchmen |
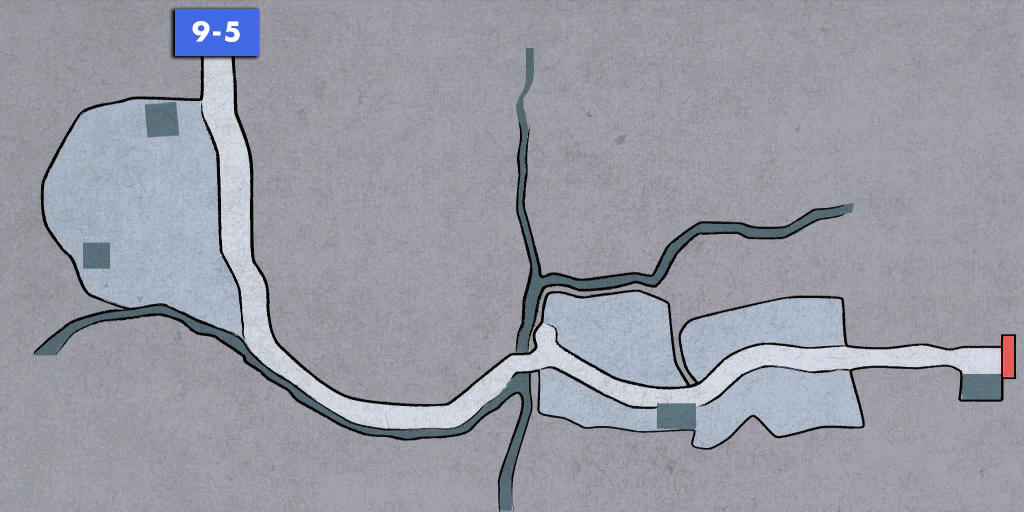
In this area, you will need to ascend a spiral passage in order to proceed. The passage is narrow and the enemies will send large fireballs down to hinder you. You cannot destroy these fireballs and you will take damage if you come into contact with them. You'll have to watch how they are moving and do your best to move left or right to stay out of their way. It can be difficult to avoid them all, but it is possible. Also, you need to be careful not to move too far to the left of the passageway, or you will fall all the way down to the bottom.
On the way up to the top, you'll encounter a chain. If you destroy it, you will stop the fireballs from coming down. There are 3 archer type enemies here, but you don't have to defeat them to proceed to the next area.
1 All-Purpose Pill - Special Grade
| 5-19 | Fight: Shishido Baiken |
When you enter the final area of the cave, you will fight Shishido Baiken. Shishido uses a sickle and chain weapon, which allows him to attack you from a distance. Shishido is also extremely agile and can move around the battlefield very quickly. Watch out when he does move around, because if he gets behind Kiryu he will launch a fast attack on him. You could use the two sword style to allow you to defend regardless of the direction from which Shishido attacks you. A good opportunity to deal some damage is right after he uses a combo attack - defend against each hit, then quickly launch a few attacks of your own.
If Kiryu stands close to one of the pillars in this area, Shishido will use the Cave Collapse Attack heat action. The QTE to avoid taking damage is the button. In addition, when Shishido's health gets below 30%, he will use the Sickle and Chain Attack heat action. You will take damage for each QTE button you fail during this heat action. The QTE buttons change depending on whether you are using the single sword or two sword style.
NOTERemember: When up against such fast-moving enemies like Shishido, the two sword style is the best way of defending yourself. This is because of its fast and wide attacking range and its ability to defend against attacks from all directions.

1 Vitality Pill / 2 All-Purpose Pill - Special Grade / 3 All-Purpose Pill / 4 Vitality Pill - Special Grade
Enemy Heat Actions
| Name | Button(s) for QTE | Conditions | Damage |
|---|---|---|---|
| Cave Collapse Attack | When Kiryu is near a pillar | 150 | |
| Sickle and Chain Attack (Single Sword) | > > | When Shishido has less than 30% health and Kiryu is using the single sword style. Sickle and Chain Attack (either version) can only occur once. | 100 - 200 |
| Sickle and Chain Attack (Two Swords) | > > | When Shishido has less than 30% health and Kiryu is using the two swords style. Sickle and Chain Attack (either version) can only occur once. | 100 - 200 |
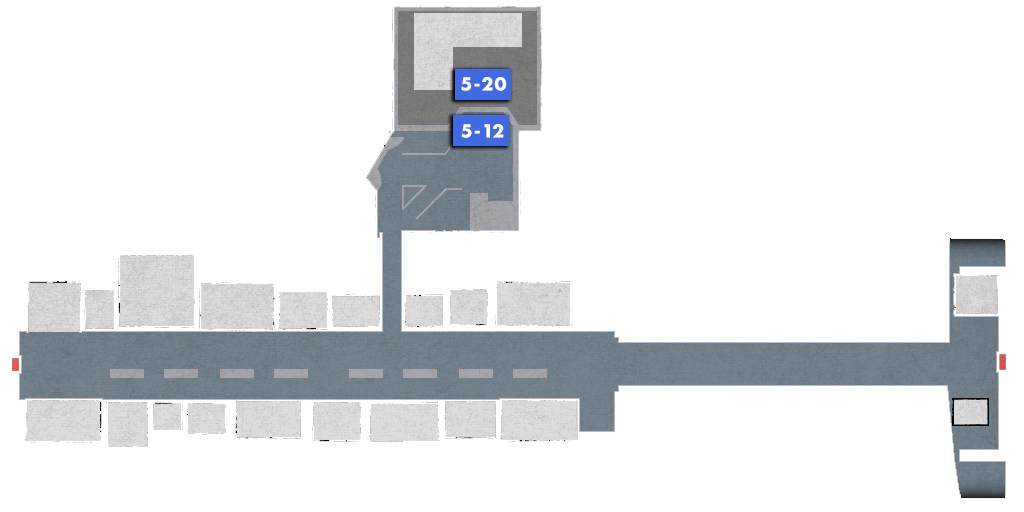
| 5-20 | Enter Koetsu's Mansion |
Requests
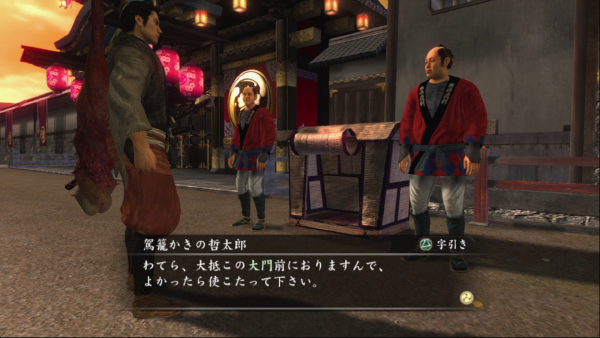
After retrieving the treasure and leaving the cave, Kiryu finds one of Shishido's henchment threatening some palanquin bearers. After Kiryu arrives on the scene, the henchman leaves. The palanquin bearers will transport Kiryu to the front of the main gates of Gion. After this, you can freely use the palanquins to fast travel.
After being dropped off in Gion, head north-west to Kawara Street, then to Koetsu's mansion. When you enter the mansion, a conversation begins with Koetsu and you will learn some information regarding the other Miyamoto Musashi.
At first you will only be able to fast travel between 3 locations in Rakugai, but as you progress through the story more fast travel locations in different areas will become available.
Chapter 6: Yoshioka Dojo
| 6-1 | Night | Gion (House of the Dragon) |
Collect 2 Ryo | > |
| 6-2 | Night | Gion (Well) |
Speak to Ito, who will bring out Gion Toji | > |
| 6-3 | Day | Rakugai (Zanki Dojo) |
Speak to Shibusawa Zankisai and do some training | > |
| 6-4 | Day | Kawara Street (Koetsu's Mansion) |
Speak to Koetsu | > |
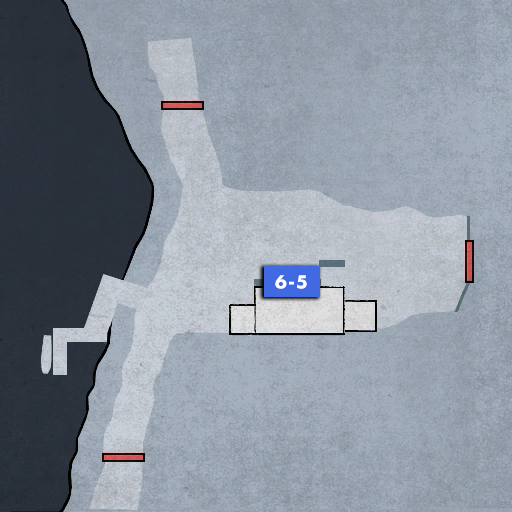
| 6-5 | Day | Riverside Tea House | Buy mugwort dango | > |
| 6-6 | Day | Kawara Street (Koetsu's Mansion) |
Give Koetsu the mugwort dango and do the scarecrow training | > |
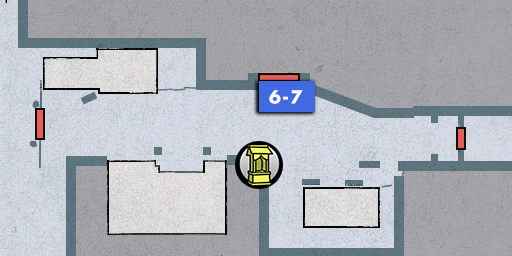
| 6-7 | Day | Yoshioka Dojo | Speak to Toji | |
| 6-8 | Day | Yoshioka Dojo | Fight: Ueda | > |
| 6-9 | Day | Yoshioka Dojo | Fight: Yoshioka Seijuro | > |
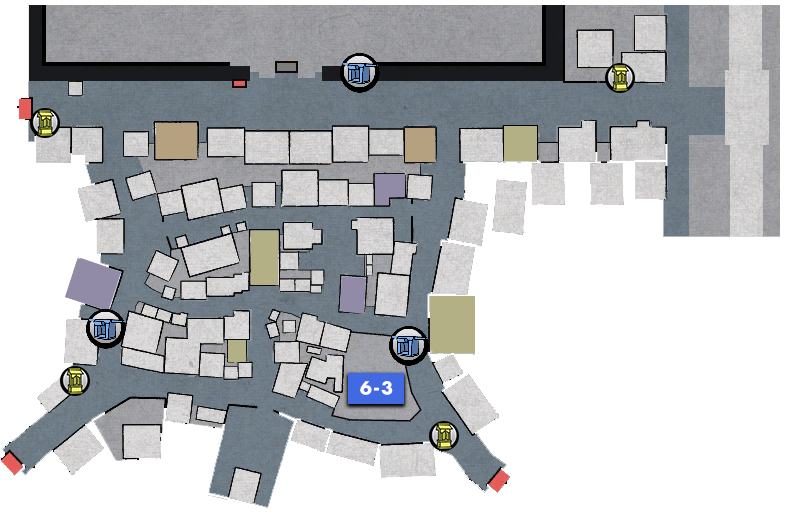
| 6-1 | Gather 2 Ryo |
Requests
Commissions
You will need 2 Ryo in order to bribe Gion Toji. If you already have 2 Ryo, you can head straight to the back of Tsuruya right away. If you do not have enough money, as you can see from the list of available substories above there are plenty of opportunities to make money right now.
Besides substories, you can also sell items at the pawn shop or play the gambling mini-games to make money.
NOTEFrom this point in the story, the first time you go near the police box at the top-left of Rakugai, you will trigger an event which both begins the bounty substories and spawns the Doshin who patrols Rakugai. See bounty 121 for details.

A quick way of getting 2 Ryo is to complete Request 29 since you get 2 Ryo as a reward.
| 6-2 | Speak to Ito, who will bring out Gion Toji |
Once you have 2 Ryo ready, head towards the back of Tsuruya and speak to Ito. He will bring Gion Toji out to meet you and promises to get you an opportunity to take the Yoshioka Dojo initiation test.
NOTEAfter this encounter the time of day will change to Day. Some of the substories available in 6-1 can only be done at night time, so if you're aiming to complete all the substories in your playthrough you should complete all of them before going to Tsuruya. Check the substory timing triggers on the requests/commissions/bounties pages.
When you speak to Ito when you have at least 2 Ryo, you will lose that 2 Ryo because you use it to bribe Gion Toji. But this bribe gets you the opportunity to take the Yoshioka Dojo initiation test.
| 6-3 | Speak to Shibusawa Zankisai and do some training |
Requests
- Request 27 can now be completed
- 33 - The Town Doctor
- 34 - The Imposter
- 35 - How to Make Delicious Candy
- 36 - The Chili Pepper Girl's Father
- 37 - Return of the Shady Merchant
- 38 - Today's Excuse
- 39 - Sujitaro 1
- 40 - Water from the Ladle #2
- 41 - Wish-Granting Sword
- 42 - Enchanted Sword – Senraibo
- 43 - Enchanted Sword – Kanekuimushi
Revelations
Training
Inventions
You will need to do some training before you can take the Yoshioka Dojo intitation test. As part of the main story, you will be required to go to the Zanki dojo and train there. Speak to Shibusawa in his dojo and he will accept you as a student. Here, you will learn the Zanki Style - Boulder Slice technique. To perform this technique, hold then press while pushing the left analogue stick in a forward direction (as in, forward from Kiryu's perspective, relative to the camera). After using the technique a few times against Shibusawa, the training ends.
For now, you can only learn this one technique. But from 7-5 you can learn more.
| 6-4 | Speak to Koetsu |
Your next training is found at Koetsu's mansion, in his underground area. However, before Koetsu allows you to use his training facilities, he asks you to get him a mugwort dango. This dango is not sold at the nearby tea house outside Yoshioka Dojo. Instead, you'll have to go all the way to the Riverside Tea House.
After your conversation with Koetsu, head to the south-west of Rakugai and go past the checkpoint to get to River Road. Pass through River Road to get to Riverside Tea House.
It is unfortunately quite a journey to get to Riverside Tea House from Koetsu's mansion. But on the bright side, once you get there and buy the mugwort dango you can use the palanquin at Riverside Tea House to fast travel back to Rakugai, which saves a little time.
| 6-5 | Buy mugwort dango |
Speak to the woman at the tea house and buy the mugwort dango for 15 Mon. See the picture below to help you find it on the menu.

Remember, now you have visitied this area you will be able to use the palanquin for fast travel. Use this to get back to Rakugai to save you having to travel all the way back through River Road.
| 6-6 | Give Koetsu the mugwort dango and do the scarecrow training |
Blacksmith
After giving the mugwort dango to Koetsu (Kiryu will automatically give it to him when you speak to him), you can begin the training. In this scarecrow training exercise, you have to destroy the scarecrow as they pop up from the ground. This first scarecrow training session only has regular scarecrow types which can all be destroyed with a single attack. Using a attack or combo attack will slow you down - only use as many hits as are necessary to save time. A single attack is the fastest way to destroy them.
Besides scarecrows, spears will sometimes come out from the ground. Be careful because if they hit you it will cost you valuable seconds. You get a heads up when the spears are coming because the tips will briefly appear out of the ground before the full spear follows. Keep an eye on the ground and make sure you don't get caught by them.
If you aren't able to complete the training on your first time, try to remember the pattern (where the scarecrows and spears pop up) and use that knowledge to improve your time efficiency next time you try.
With both the Zanki Dojo and Scarecrow training completed, you are now able to take the Yoshioka initiation test. Speak to Toji standing outside Yoshioka Dojo to trigger the next part of the story.

There is no need to waste time by using a attack when a single will destroy them and is a much quicker attack.
| 6-8 | Fight: Ueda |
Your opponent for the initiation test is Ueda, who is quite effective at defending your attacks. A good strategy here is to wait for him to attack you, evade out of the way and get a couple of hits in from the side or behind while he is vulnerable. If you use the attack against him, it might trigger the Sword Lock heat action. If you lose the clash, you will take damage. But if you win, you will deal 150 damage. Ueda is a good defender so it's worth trying to trigger the Sword Lock heat action so you can get in some decent damage.
Enemy Heat Actions
| Name | Button(s) for QTE | Conditions | Damage |
|---|---|---|---|
| Sword Lock | (rapid press) | When you use the attack and Ueda counters | 100 |
| 6-9 | Fight: Yoshioka Seijuro |
After the fight against Ueda, Yoshioka Seijuro himself shows up to challenge Kiryu before they accept him into the dojo.
Rather than being a good defender like Ueda, Seijuro prefers evading attacks. If you attack him head on he loves to evade your attack and then counterattack. Be aware of that when you go in for an attack. If you're quick, you can avoid his counterattack and attack him.
When Seijuro goes into a defensive stance, where he holds the sword with one hand, be careful because if you attack him while he's in this stance he will parry Kiryu's attack and cause him to lose his footing. If this happens, you will have to rapidly press to regain your footing. While you are doing this you are completely vulnerable to Seijuro's attacks so you'll need to be quick. While he is in this stance, you can use the kick attack.
NOTERemember: It is not possible to harm Seijuro with sword attacks while he is in his defensive stance. However, as long as he remains in this stance he will not attack Kiryu. You can use your kick attack to deal some damage to him while he uses this stance because he won't counter this.
After the fight, Kiryu finally gets accepted into the dojo.
Enemy Heat Actions
| Name | Button(s) for QTE | Conditions | Damage |
|---|---|---|---|
| Sword Lock | (rapid press) | When you use the attack and Seijuro counters | 100 |
Chapter 7: Ablaze
| 7-1 | Evening | River Road | Fight: Ito, the Kakemawari | > |
| 7-2 | Evening | River Road | Speak to Ito | |
| 7-3 | Night | Rakugai (Gion Main Gates) |
Arrive at the gates of Gion, then enter Gion | > |
| 7-4 | Night | Gion (Back of Tsuruya) |
Speak to the Tsuruya attendant | > |
| 7-5 | Day | Kawara Street (Koetsu's Mansion) |
Enter Koetsu's Mansion | > |
| 7-6 | Day | Gion (Tsuruya) |
Speak to the Tsuruya attendant | > |
| 7-7 | Day | Gion (Back of Tsuruya) |
Go to the back area of Tsuruya | |
| 7-8 | Evening | Gion (House of the Dragon) |
Enter Kiryu's house and speak to Ito | > |
| 7-9 | Night | Gion (Back of Tsuruya) |
Get to the back area of Tsuruya without being seen by the officials | > |
| 7-10 | Night | Gion (Tsuruya 4th Floor) |
Fight: Mysterious Swordsmen | > |
| 7-11 | Night | Gion (Tsuruya 3rd Floor) |
Fight: Mysterious Swordsmen | > |
| 7-12 | Night | Gion (Tsuruya 3rd Floor) |
Fight: Mysterious Swordsmen | > |
| 7-13 | Night | Gion (Tsuruya 3rd Floor) |
Fight: Mysterious Swordsmen | > |
| 7-14 | Night | Gion (Tsuruya 3rd Floor) |
Head to the 2nd Floor | > |
| 7-15 | Night | Gion (Tsuruya 2nd Floor) |
Head to the Great Banquet Hall | > |
| 7-16 | Night | Gion (Tsuruya 2nd Floor) |
Fight: Mysterious Warrior | > |
| 7-17 | Night | Gion (Tsuruya 1st Floor) |
Fight: Ninja | > |
| 7-1 | Fight: Ito, the Kakemawari |
At the start of the chapter, you will get into a fight with Ito. He is a solid defender and slashing aimlessly at him won't achieve very much. His attack animations are quite long, so after defending an attack you can quickly get a hit in to deal some damage.
Also note that Ito will resurrect twice in this fight (i.e. when you get his health down to 0 he regens his health and gets up again). The first time you get his health to 0, he will be restored with 1000 health. The second time, he will be restored with 500 health. Each time he resurrects, his defence improves and his attacks become more frequent.
In addition to this, in his final resurrection he will be in heat mode and there is a chance he will use the Killing Blow heat action. Ito will only use this heat action if Kiryu is using the single sword style. Because of this, you might prefer to play it safe and use the two sword style when Ito revives for the 2nd time, so there's no chance of messing up the QTE and taking damage from the heat action.
After the fight, before speaking to Ito you can find an overturned turtle nearby. After speaking with Ito (a lot of dialogue during which we find out he has a history with Sasaki Kojiro as well. We learn that Kojiro is arriving in Gion shortly for a big banquet at Tsuruya), the two of you head back to Gion together.
NOTEIto has great defence. There is even a chance that Kiryu's attacks will bounce off him while he is defending. You're better off waiting for Ito to attack and then countering with your own hits.

1 Overturned Turtle (will only appear on the map after the fight)
Enemy Heat Actions
| Name | Button(s) for QTE | Conditions | Damage |
|---|---|---|---|
| Killing Blow | or | (After Ito's 2nd revival) When Kiryu is using the single sword style and is close to Ito | 230 |
| 7-3 | Arrive at the gates of Gion, then enter Gion |
You'll be making your way back to the main gates of Gion from here. Ito will fight alongside you if you get into any random encounters. Note that you cannot use palanquins during this part of the game. You also cannot trigger any substories.
Ito and Kiryu part ways once they arrive at the gates of Gion, then Kiryu will need to enter Gion alone via his passage. Once you've parted at the gates, things get back to normal (you can use palanquins and trigger substories). After returning to Gion, your next destination is the back area of Tsuruya.

Whenever you travel with a companion, you cannot use palanquins. If you speak to a palanquin bearer while you have a companion, you will be told that they cannot transport 2 people.
| 7-4 | Speak to the Tsuruya attendant |
Bounties
Training
After splitting with Ito, you need to check up on Haruka. Speak to the attendant at the back of Tsuruya, who will bring her out to see Kiryu. It doesn't last long though, because the mistress of Tsuruya shows up and tells Haruka to get back to work. Kiryu will go home after this scene.
| 7-5 | Enter Koetsu's Mansion |
Requests
- Request 36 can now be completed
- 49 - The Dream White Snake
- 50 - The Shady Merchant Tanaka Returns Again
- 51 - Temple School Homework (Abacus)
- 52 - Weight of Responsibility
- 53 - Temple School Homework (Essay)
- 54 - Master and Apprentice
- 55 - The Flavour of Candy #3
- 56 - Blacksmith Turmoil
- 57 - The Painter
- 58 - Cat Hunt
- 59 - Cat Koban
- 60 - Mysterious Piece of Paper
Commissions
Bounties
The next morning, it's time to meet with Ito and Koetsu. Go to Koetsu's mansion when you are ready to progress the story. Before doing that, you may want to do one of the many new substories available now. You can also do all the zanki dojo training at this point (assuming you have the money for all of it).
| 7-6 | Speak to the Tsuruya attendant |
After the scene inside Koetsu's mansion, it is decided that Kiryu will arrange to have a room tonight at Tsuruya, one from which they can keep an eye on the banquet - and, more importantly, keep an eye out for Kojiro. First, you must speak with the attendant standing outside the main entrance of Tsuruya. Next, you need to enter the back area of Tsuruya to trigger an event with the mistress, who agrees to arrange a room for Kiryu for the night.
| 7-8 | Enter Kiryu's house and speak to Ito |
Requests
Bounties
Now that a room has been arranged, the stage has been set for the big night. Return to Kiryu's house, where you will find Ito. When you are ready to progress the story, speak with Ito and select the BOTTOM OPTION to tell him you are ready.
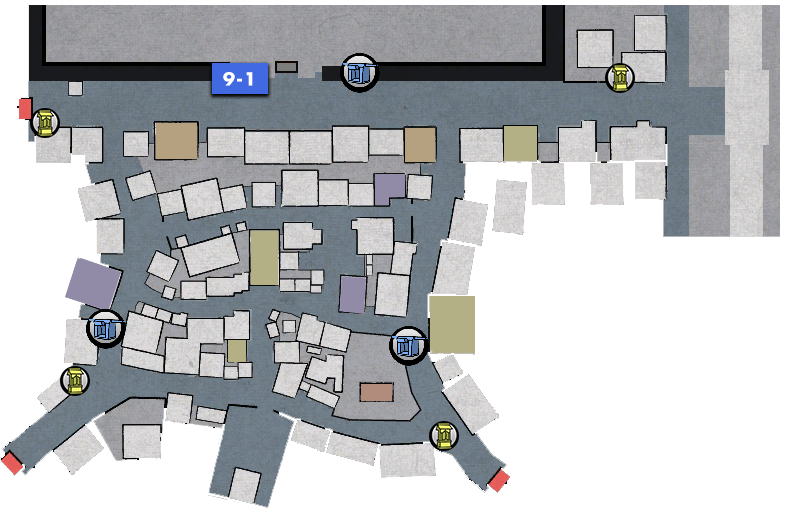
| 7-9 | Get to the back area of Tsuruya without being seen by the officials |
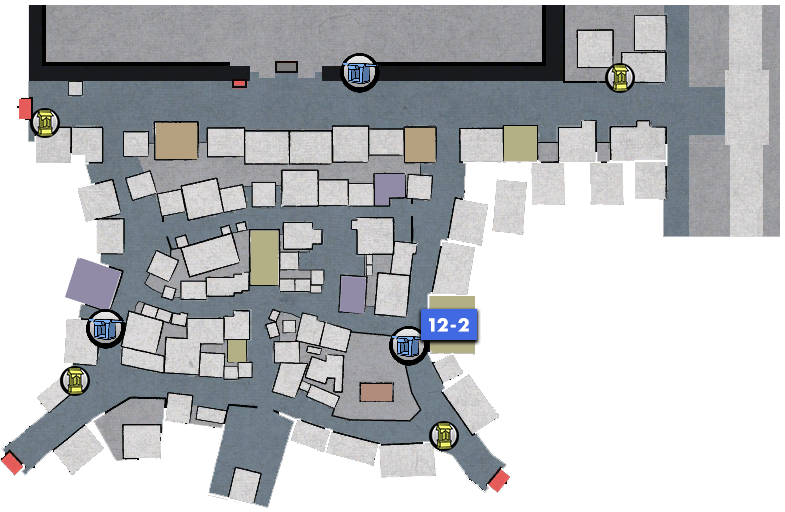
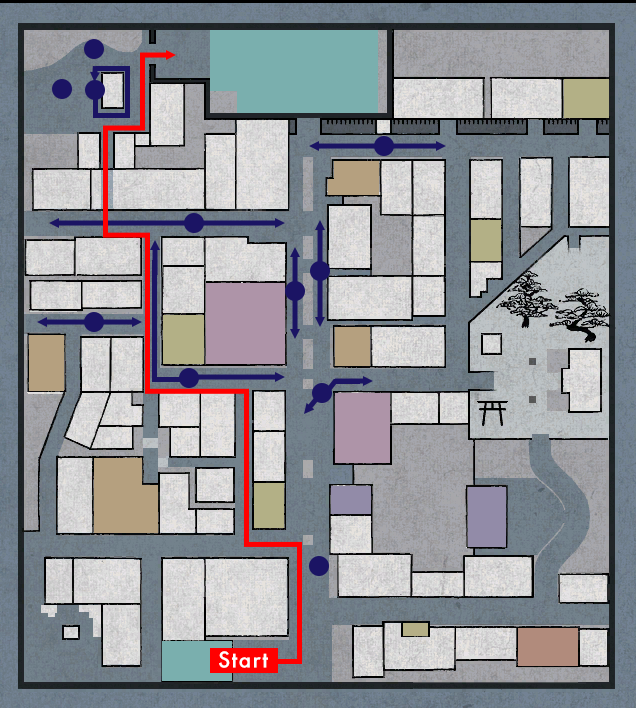
After speaking with Ito in Kiryu's house, you will need to infiltrate Tsuruya. You will need to get to the back of Tsuruya from Kiryu's house, but there are officials patrolling across Gion acting as security (they are doshin - like the one who patrols Rakugai). If you get caught by one of them, you won't get into a fight but you will have to start again from Kiryu's house.
The way the officials move is quite similar to random encounter enemies - they will either patrol a particular path or stand still. Also like random encounters, it's possible to run past them as long as you don't get too close to them.
The first official you encounter is stationary. When he's looking away run past and head left - this route is safer than running down the main street. Use the map provided here as a reference. The blue dots are the doshin. The blue arrows show their patrol route (if they have no arrows, they are stationary). The red line shows the suggested route.
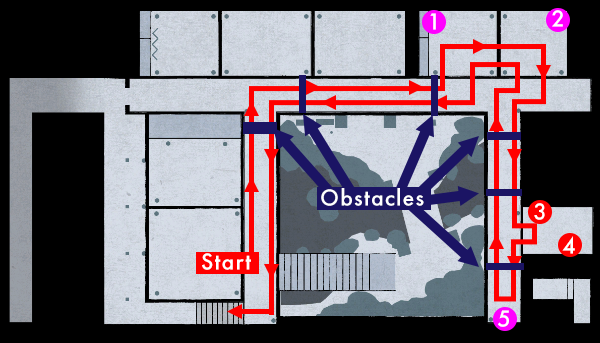
| 7-10 | Fight: Mysterious Swordsmen |
When you enter Tsuruya, Itakura (the Kyoto Shoshidai - an administrative office within the Tokugawa shogunate) leaves with Haruka and a fight sequence begins as Kiryu heads off to save her. You start off on the 4th floor, where you will encounter 19 enemies in total, but you don't have to defeat any of them - you can simply head straight to the third floor. There are a few recovery items on this floor, but if you already have a decent collection of those items there's probably no point picking these up.
However, there are a few environmental heat actions available on this floor (see map). All of these heat actions can be performed elsewhere, so it's not essential, but if you haven't already done them it's worth doing that now (assuming you are aiming for full completion).
NOTEDuring the long battle at Tsuruya, there are a bunch of trapped yujo you can save (see map as a reference - pink dots indicate yujo location). You don't have to save them (ignoring them all makes no difference to anything in the story), but if you do save them, they will reward you with items. They will always be trapped behind debris, so you'll need to destroy the debris to free them and get the item reward, which does take a bit of time. Later, there is a time limit to escape in this long battle and if you're running low on time you may prefer to skip the yujo and get to the end as quickly as possible.

1 Rice Ball / 2 Vitality Pill - Special Grade / 3 Frenzy Pill - Special Grade
A Secret Sword - Shadow Stab / B Certain Death - Tatami Flip / C Throwdown Mastery
| 7-11 | Fight: Mysterious Swordsmen |
The fighting continues on the third floor. You'll encounter 6 enemies. When you defeat them, the way forward will open up. The battle areas here are quite confined so it can be difficult to fight, especially if enemies surround you. Use the two sword style to help you defend against enemy attacks from all directions. There are no items to find here, so defeat the enemies and move on.

| 7-12 | Fight: Mysterious Swordsmen |
Still on the third floor, when you enter the banquet room the way forward will close off and you'll get into a fight with 3 swordsman type enemies and a martial arts expert type. The martial arts expert is effective at countering your attacks so using heat actions is a good way to deal with him. Once you have dealt with these enemies, proceed down the corridor towards the next battle area.
There are 3 archer types enemies directly opposite this corridor. You cannot reach them but you can defeat them by throwing the plates found in this corridor. Hitting them with the plates is a lot harder than it sounds since it is very difficult to aim them properly, so you might prefer to ignore them and run ahead to the next area.

1 Plate
Certain Death - Tatami Flip
| 7-13 | Fight: Mysterious Swordsmen |
When you enter this battle area, the way forward will close off and you'll get into a fight again. The battle area here is quite confined and you're dealing with a relatively large group of enemies, so it can be difficult to avoid enemy attacks. As always in these situations, the two sword style is the safest bet.
The most dangerous of the enemies you'll encounter here is the martial arts expert type. You'll be temporarily immobilised if he grabs you, so try to keep your distance from him while you deal with the other enemies. After beating all the enemies here, the way forward will open.

Certain Death - Tatami Flip
| 7-14 | Head to the 2nd Floor |
After defeating the last enemy in the banquet room, Tsuruya will really start falling apart. From this point, you'll have a 15 minute time limit to get to the end of the chapter, or the whole place burns down and you get a game over. There will be a gauge on the screen to indicate how much time you have remaining.
You can find a lot of items in this area. There is also a lot of debris, so you'll need to use the greatsword to break them down quickly so you don't waste too much time. In addition, there are some yujo (pink dots on the map) trapped by debris. You will receive an item for rescuing them. Though if you're not interested in the items and/or would rather leave the yujo to burn to death, you don't have to save them and can head straight to the 2nd floor.
NOTEIf you're going for 100% completion, make sure you pick up the Ancient Seven-Branched Sword weapon in this area. This is the only opportunity in the main story to obtain this item, so if you miss it you cannot get 100% weapon completion. The only other place in the game to get this weapon is in storage locker A-1 in Kyoto Tour Mode (premium adventure mode).
The red line on the map provided here shows the route to take if you want to get everything on this floor (e.g. find the sword and save the yujo), but as mentioned you can simpy head south from the starting point and go up the stairs right away to move on if you're not interested.
1 All-Purpose Pill - High Grade / 2 Ultimate Tamahagane / 3 Nishikinagashi / 4 Ancient Seven-Branched Sword / 5 Silver Steel
| 7-15 | Head to the Great Banquet Hall |
As you proceed to the great banquet hall, parts of the building will fall from above, attempting to hinder your progress. When a part of the building falls, you will get a QTE button prompt. The button varies depending on where it falls (see map). If you press the correct button in time, you avoid damage and are able to proceed to the banquet hall. If you fail the QTE, not only do you take 150 damage but you will also have to destroy the debris that just fell before you are able to proceed. The buttons on the map provided here show the location of the QTE (and the button you need to press).

1 Vitality Pill - Special Grade / 2 Millennium Ice Stone / 3 Agate
| 7-16 | Fight: Mysterious Warrior |
When you enter the great banquet hall you will fight a mysterious warrior. This enemy is wearing armour, which means when you attack him his armour will absorb the damage. This means that you won't deal any damage to him until you destroy his armour. The exception to this is heat actions, which will still damage him. The greatsword style is effective at destroying armour.
The warrior uses a club weapon. This means his attacks are very slow, so it's not only quite simple to evade his attacks but also to get behind him and deal some damage. Watch out for when he gets near to one of the pillars in the room, because he will use the Power Cannon heat action. He cannot use this heat action on the same pillar twice, so after he has done it once you could try keeping the fighting focused around that destroyed pillar so he doesn't use it again.
After the fight, you need to head downstairs.
1 Vitality Pill - Special Grade
Certain Death - Tatami Flip
Enemy Heat Actions
| Name | Button(s) for QTE | Conditions | Damage |
|---|---|---|---|
| Sword Lock | (rapid press) | When you use the attack while equipped with either the single sword style or greatsword style and the warrior counters | 100 |
| Power Cannon | or | When Kiryu is using either the single sword style or two sword style and the warrior is near a pillar | 170 |
| 7-17 | Fight: Ninja |
When you arrive on the first floor, you will fight some ninja type enemies. They are skilled at avoiding Kiryu's attacks by jumping out of the way. They will avoid your single sword style attacks relatively easily, so you're better off using the faster two sword style, which has the added bonus of allowing you to defend yourself from all directions - handy in this fight since the ninja can easily surround you if you're not careful.
The ninja will occasionally throw caltrops to the ground near you. If you stand on them, they don't do any damage to you but they will temporarily stop Kiryu's movement. So, watch out for them or you'll find yourself at the mercy of their attacks. Also, one of the 3 ninja you fight here is the ninja boss. Even though he is using a greatsword weapon, he still moves just as fast as the others. In addition, he will also throw shuriken and stun you with smoke bombs and immediately plant an explosive to damage you. All of this makes him a dangerous enemy. The best course of action would be to quickly take care of the 2 other ninja before focusing on the boss in a 1-on-1 fight.
NOTEWhen the boss hits you with a smoke bomb, get out of that area ASAP because his explosive will go off shortly after and you don't want to be in the blast radius.
After the fight, you'll see the final cutscene of the chapter. Kiryu confronts Marume, who successfully escapes Tsuruya, and then Kiryu and Haruka meet. But it seems Haruka is disturbed by the bell on Kiryu's sword.

1 Tuna (when this breaks, it becomes Tuna Sashimi)
Chapter 8: Hozoin
| 8-1 | Day | Gion | Speak to the Kamenoya employee | > |
| 8-2 | Day | Kawara Street (Koetsu's Mansion) |
Enter Koetsu's mansion | > |
| 8-3 | Day | Gion | Speak to Yoshino | |
| 8-4 | Day | Gion (House of the Dragon) |
Enter Kiryu's house, where Koetsu will tell you how to get to Hozoin | > |
| 8-5 | Evening | Hozoin | Speak to the gatekeeper at Hozoin | > |
| 8-6 | Evening | Hozoin | Speak to the old man | |
| 8-7 | Evening | Hozoin (Inei's house) |
Fight: Hozoin Inei | > |
| 8-8 | Night | Hozoin | Speak to the gatekeeper and enter Hozoin, then do the training with En no Ozuma | > |
| 8-9 | Evening | Hozoin | Speak to receptionist and participate in the tournament | |
| 8-10 | Evening | Hozoin (Arena) |
Fight: Tachibana Benimaru | > |
| 8-11 | Evening | Hozoin (Arena) |
Fight: Yamatobo Gonzen | > |
| 8-12 | Evening | Hozoin (Arena) |
Fight: Hozoin Inshun | > |
| 8-1 | Speak to the Kamenoya employee |
Requests
Commissions
Bounties
Revelations
Training
After the opening scenes, Kiryu decides to check in on Haruka, who is temporarily staying at the brothel Kamenoya while Tsuruya gets repaired. But Yoshino comes out and tells Kiryu that Haruka doesn't want to see him, saying something about a bell. After this scene, Kiryu says he should head to Koetsu's mansion, because Koetsu said he had something to discuss.
| 8-2 | Enter Koetsu's mansion |
Enter Koetsu's mansion and Koetsu will talk about some new information he has discovered concerning Miyamoto Musashi. It seems there is a rumour going around that Musashi is going to show up at Hozoin Temple soon. After this meeting, Kiryu wants to try meeting with Haruka again. Speak to Yoshino outside Kamenoya and she will bring out Haruka. We learn why she's obsessed with the bell. It seems the bell was on the sword of the man who killed her family, so she accuses Kiryu of being Miyamoto Musashi. Kiryu promises he will explain everything about the bell and tells her he has heard Miyamoto Musashi will be going to Hozoin soon, so he'll be heading there to investigate.
| 8-4 | Enter Kiryu's house, where Koetsu will tell you how to get to Hozoin |
After speaking with Haruka, return to Kiryu's house and prepare to head to Hozoin. You will only be able to fight using the single sword style, make sure you have learned the single sword style abilities you can. If you haven't already done so, complete the Zanki Dojo training. If you have the money, you can do all the training in one go.
Koetsu will be sat in Kiryu's house and tells you how to get to Hozoin when you enter.

Once you have entered Hozoin, you will not be able to exit the area until you have completed the chapter. Make sure you are well prepared (e.g. recovery items) before you go there.
| 8-5 | Speak to the gatekeeper at Hozoin |
Requests
A quick and easy way of getting to Hozoin Temple is to fast travel to Riverside Tea House, then exit via the south path. Once at Hozoin, speak to the gatekeeper, who refuses to let you in without a letter of recommendation. Immediately after this, speak to the old man nearby. He says he can get Kiryu a letter of recommendation and takes him to a hut where he tests out Kiryu's skill.
| 8-7 | Fight: Hozoin Inei |
Inei uses a sojutsu style and fights with a long spear weapon.
You are forced to use the single sword style in this fight - you cannot even use the brawler style, so you won't be able to grab Inei in this fight. When the battle starts, focus on defending and getting used to Inei's attack patterns and animations. Your best opportunity to deal damage is right after Inei finishes an attack, so it's helpful to get used to his attack patterns.
Inei doesn't have many attacks in his repertoire, and his "combo" attack is only 2 hits, so it should be straightforward.

| 8-8 | Speak to the gatekeeper and enter Hozoin, then do the training with En no Ozuma |
With Inei's letter of recommendation in hand, speak to the gatekeeper again, who will now let you in. Proceed past the entrance for a short while and you will be stopped by En no Ozuma and will do some special mental training. The only training you can do at this point is "Zeal Special Training [Wild Boar]", which teaches you the "Mysteries of the Sword - Dry Leaf Smash" ability.
Even if you fail in this mini-game, you can always learn the ability later. However, the ability you learn can only be used in the upcoming fight against Hozoin Inshun. It cannot be used in any other fight in the game. So if you don't learn it now, you miss your chance to ever use it (and will miss out on the full heat action completion). En no Ozuma does not make any particularly difficult throws in this exercise, such as curves, so it should be straightforward to pass.
After the training, speak to the receptionist and select the BOTTOM OPTION to participate in the tournament.
Don't worry if you don't pass the training - you can retry as many times as you like. Even if you choose to give up, you can still speak to him and try again before you participate in the tournament.
| 8-10 | Fight: Tachibana Benimaru |
When you speak to the receptionist and tell him you are ready to participate, the tournament will begin. Your health will be fully restored at the start of the tournament, so don't worry if you took damage against Inei and didn't heal before starting. Speaking of health, note that you cannot use recovery items in the tournament.
Your first opponent is Tachibana Benimaru. His fighting style is similar to that of the brigand enemy type. He's not particularly tough, but it's probably still a good idea to focus on defending his attacks and launching your own attacks when he finishes. This is because after the fight your health will only recover by 1/3 of your max health - so you don't want to take too much damage here.
NOTEBenimaru doesn't have many attacks and his combo is only 2 hits, so it should be simple to defend against him.

| 8-11 | Fight: Yamatobo Gonzen |
This fight begins right after your fight against Benimaru. Gonzen uses a spear weapon and is much tougher than Benimaru. His attacks are quick and even if you charge in with a barrage of attacks you'll likely end up being hit by him. Don't rush things - be patient and wait for a good opportunity to attack.
If Gonzen strikes with a side-attack technique, if the angle of your defensive stance is wrong, you're going to take damage. When defending, make sure you are facing him head-on. The best opportunities to launch your own attacks are immediately after he launches a 3-hit combo, or after he uses a thrust attack.
NOTEHis spear weapon gives him good attack range, but he tends to get close to you to do his combo attacks. Try to stay as close to him as you can in this fight, to make launching your own attacks easier.
| 8-12 | Fight: Hozoin Inshun |
Your final opponent in the tournament is Hozoin Inshun, whose fighting style is very similar to that of Inei's. However, Inshun has a wider variety of attacks and is also faster than Inei. You can defend against most of what he throws at you if you are facing him head-on. One thing to watch out for: one of his combos involves him jumping to the side to get behind Kiryu. If he does this, you won't be able to defend against the latter part of the combo. In addition, when Inshun's health gets low, he often tries to get behind Kiryu, so watch out for that.
It can be difficult to find an opening in which to get in some good damage against Inshun. The two best opportunities would be immediately after he uses a thrust attack, or immediately after he finishes a combo attack.
NOTEWhen Inshun tries to get in behind Kiryu, be ready to dodge with because you won't be able to defend against him. Also, though his attack range is large because of his spear, he does tend to move in close to Kiryu when doing a combo attack. This is why the moment he finishes a combo is a great opportunity to counter with your own attacks.
After the tournament, Kiryu meets with Marume and demands some answers. Unfortunately, things don't become much clearer for him and Marume just says he wants Kiryu to protect Haruka without going into much detail as to why.
| Heat | Mysteries of the Sword |
If you completed the training in 8-8 you will have the chance to use the Mysteries of the Sword - Dry Leaf Smash heat action in this fight. In order to execute this heat action, Inshun must use his Spear Deathblow heat action. He will only use this heat action when he has less than 10% health remaining. When you successfully complete the QTE for this heat action, you will immediately be able to use the Mysteries of the Sword - Dry Leaf Smash heat action.

If you are not in heat mode when the opportunity to use the heat action comes, you will be able to mash the button until you have enough heat to use it. When you are in heat mode, you then get a button prompt to press to use the heat action.
Enemy Heat Actions
| Name | Button(s) for QTE | Conditions | Damage |
|---|---|---|---|
| Spear Deathblow | > > > > | When you are close to Inshun while he has less than 10% health remaining. | 150 |
Chapter 9: The Duel
| 9-1 | Day | Gion (House of the Dragon) |
Leave Hozoin and return to Gion | > |
| 9-2 | Day | Yoshioka Dojo | Speak to Gion Toji | > |
| 9-3 | Evening | Gion (Tsuruya) |
Speak to the Tsuruya employee | > |
| 9-4 | Night | Gion (House of the Dragon) |
Rest at Kiryu's house | > |
| 9-5 | Day | Rendai Field | Go to Rendai Field | > |
| 9-6 | Evening | Rendai Field | Fight: Yoshioka Seijuro | > |
| 9-7 | Night | Rendai Field | Fight: Yoshioka Students | > |
| 9-8 | Night | Various Locations | Head to Sanjusangendo | > |
| 9-9 | Night | Sanjusangendo | Fight: Gion Toji | > |
| 9-1 | Leave Hozoin and return to Gion |
Bounties
Revelations
Training
After all the events that transpire at Hozoin, you will need to make your way back to Gion. From this point in the story, you may freely take part in tournaments in the arena here at Hozoin. If you win tournaments in the arena, you are rewarded with prize money, so this could be an effective way to make some extra money if you need it. In the higher level tournaments you can also obtain some rare items for winning, so it's well worth participating. See the arena section of this guide for details.
After arriving at Kiryu's house, exit into Gion to trigger a scene first involving Gion Toji, then Haruka and Yoshino. Toji wants to speak with Kiryu at Yoshioka Dojo while Haruka asks Kiryu to visit her at Tsuruya tonight. After this scene, you will need to speak to Toji outside Yoshioka dojo.

Tournaments in the arena follow the same process as the story - you must win 3 rounds in order to win overall. You can win a lot of prize money here so keep fighting here to grind for money, if you need the extra cash.
| 9-2 | Speak to Gion Toji |
Requests
Inventions
Blacksmith
Speak to Toji outside Yoshioka Dojo to trigger a scene inside the dojo. The dojo has been challenged to a duel by Miyamoto Musashi but it seems Yoshioka Seijuro refuses to fight. Toji wants Kiryu to take Seijuro's place in the duel because the younger brother, Denshichiro, is a surprisingly weak fighter and won't be able to win.
| 9-3 | Speak to the Tsuruya employee |
Commissions
Speak to the employee outside the main entrance of Tsuruya. Kiryu says he is here as a customer to see Haruka, then Kiryu gets taken to a room. Haruka and Kiryu catch up on things, like Maruma and the upcoming duel with Yoshioka Dojo (and how Kiryu is stepping in for them to fight Miyamoto Musashi).
| 9-4 | Rest at Kiryu's house |
After the events at Tsuruya, you will need to return to Kiryu's house and rest. After entering Kiryu's house, when you try to leave you will have the option to rest. If you select "Yes", the story progresses. If you select "No", you can freely walk around and do things like substories. Note that resting here will change the time of day to Day, so if you want to do any Night-only side content now is the time to do it. When you are ready to progress the story, say "Yes" when asked if you would like to rest.
NOTEIf you want to leave without progressing the story, select the TOP OPTION and then the BOTTOM OPTION

When you are ready to progress the story, select the BOTTOM OPTION when you try to leave Kiryu's house.
| 9-5 | Go to Rendai Field |
Requests
Commissions
The next day, Koetsu shows up and tells Kiryu how to get to Rendai Field. As you can see above, a lot of new substories are avaialable now, so you might be interested in completing these before heading to your destination. Head west past Yoshioka Dojo and pass through the farms, exiting via the north path to trigger the next part of the story.
| 9-6 | Fight: Yoshioka Seijuro |
A battle against Yoshioka Seijuro awaits you at Rendai Field. He has a wide variety of attacks in his repertoire and has a very unique way of fighting. In particular, he tends to use an attack where he will strike you with his sword while twisting his body to the right, evading and attacking at the same time. His fighting style can make him challenging to attack head-on as he is effective at evading and countering your attacks. When he changes to a defensive one-handed stance, if you attack him he will parry your sword. However, he cannot parry a greatsword attack, so when he uses this stance you should switch to the greatsword style.
When Seijuro's health gets low, he will sometimes use an ability where he runs around the battlefield - you cannot damage him while he is doing this. Instead, focus on defending when he's in this mode. Seijuro also has 2 heat actions he may use. One of those is the Dharma Eye Kill heat action, which he may use when Kiryu is using the single sword or two sword style. He may also use the Sword Lock heat action like the last time you battled him. If you want to avoid any chance of this heat action occurring, fight using the two sword or greatsword style.
NOTERemember: You don't have to worry about Seijuro's parry techniques if you are using the greatsword style. Switch to this when he uses his defensive stance.
Also note that if you fail the QTE for Dharma Eye Kill you will take 230 damage. If you want to avoid any chance of Seijuro using this heat action, stick to the greatsword style.

Enemy Heat Actions
| Name | Button(s) for QTE | Conditions | Damage |
|---|---|---|---|
| Sword Lock | (rapid press) | While using the single sword style, when you use the attack and Seijuro counters | 100 |
| Dharma Eye Kill | or | While using the single sword or two sword style, when you are close to Seijuro | 230 |
| 9-7 | Fight: Yoshioka Students |
After the battle with Seijuro, you are ambushed by a load of Yoshioka dojo students and need to escape from Rendai Field. There are lots of enemies spread across Rendai Field, but the only enemies you actually need to defeat in order to proceed in the story are the enemies at Rendai 6 (see map below). For enemies at the other locations, you can just run past them if you like. Might be worth fighting them if you want the EXP.
By the way, all the "Rendai 4" locations on the map isn't a mistake - they are all the same location, which you can access from a variety of different starting points.

The red dots on the Rendai Field minimap represent the swordmaster enemy type. They will frequently use iaido techniques so be ready to defend often.

1 Branch / 2 Rock / 3 Rice Ball / 4 Fake Sword
| 9-8 | Head to Sanjusangendo |
After escaping Rendai Field, you must head straight to Sanjusangendo to save Denshichiro. There are no random encounters during this part of the game, however you will bump into Yoshioka students patrolling the streets (in a similar way to random encounter enemies). Much like regular random encounters, if they see you (and you get too close to them) you end up fighting them. But also like random encounters, you can run past them. Having said that, because of the places where they are stationed they are more difficult to avoid than regular random encounters. This is especially true of the guy patrolling the bridge on Cliff Road. Also, if you do fight any of these students you don't get any rewards like money or items for beating them. However, you do get more EXP from these fights than regular random encounters. If you want to get more EXP then it's well worth fighting the students on the way. Blue dots on the maps below show the location of the Yoshioka students.
You will not be able to go to any location besides the ones you see in the maps below. You also cannot use palanquins to fast travel during this part of the story. Probably goes without saying you also cannot trigger any substories either. The only things available to you during this part are the two tea houses, the melon cutting minigame, and save points.

It is difficult to get past the student on Cliff Road without getting into a fight. The timing for this is to wait until his back it turned to you and he is looking off to the side - that's your chance to run past his blind spot.


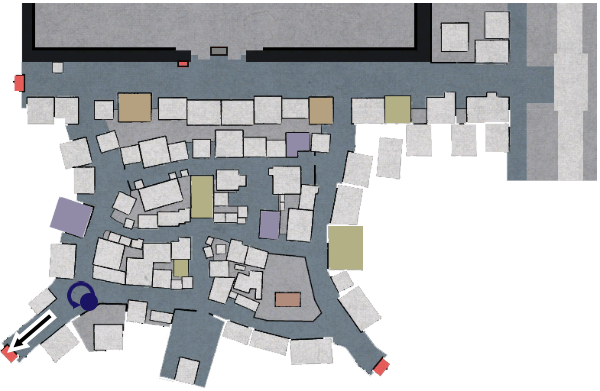

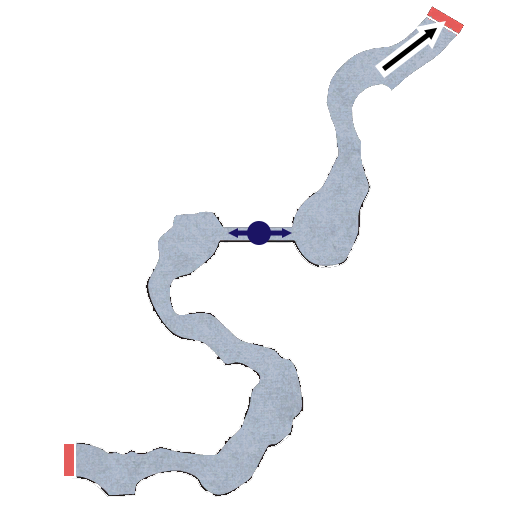
| 9-9 | Fight: Gion Toji |
When you arrive at Sanjusangendo, you will fight the mastermind behind the Yoshioka betrayal - Gion Toji. Toji does not have the skill of Seijuro, however he is still a dangerous opponent due to his underhanded tactics. Notably, he will use a blinding attack which temporarily stuns Kiryu and prevents him from moving. In addition, if Toji is at a certain distance from Kiryu, he will throw a shuriken. It is possible to defend against a shuriken throw using a sword, so be ready to block if Toji starts throwing things.
When Toji gets low on health, he will summon 2 waves of Yoshioka students to help him. These students are relatively weak swordsmen type. However, the real danger here is that while you are mixed up fighting the students, Toji will throw shuriken at you. These will be difficult to block while you are busy fighting. If you get stunned while surrounded by students, you're gonna get your ass beat, so get rid of the students ASAP.
Further to this, Toji may also use a heat action which makes use of his reinforcements. With the Full Student Assault, students near to Kiryu will pin him down while Toji goes in for a killing blow. If you successfully complete the QTE, Toji will instead kill one of the Yoshioka students by mistake. But if you fail the QTE you will receive 250 damage. When you are fighting and surrounded by students, be ready to mash the button for the QTE so you can avoid taking any damage.

Secret Sword - Swallow's Dance
| Heat | Playing Possum |
When Toji's health gets down to 0, the battle doesn't end. Instead, he will use the Playing Possum heat action. If you complete the QTE, you counter him and the battle ends. If you fail the QTE, then Toji recovers 1000 health and you fight him once more. The button for this heat action's QTE is always so when you get his health down to 0 you may as well mash this button to ensure you don't miss it. There is no punishment for mashing the button before the QTE pops up on the screen.

Enemy Heat Actions
| Name | Button(s) for QTE | Conditions | Damage |
|---|---|---|---|
| Sword Lock | (rapid press) | While using the single sword style, when you use the attack and Toji counters | 100 |
| Full Student Assault | (rapid press) | When Toji and the students are close to Kiryu | 250 |
| Playing Possum | When Toji's health goes down to 0 | 250 |
Chapter 10: The Old Fox's Request
| 10-1 | Day | Riverside Tea House | Eat dango | > |
| 10-2 | Day | Rakugai | Play Cee-Lo | > |
| 10-3 | Day | Rakugai | Fight: Mysterious Assassins | > |
| 10-4 | Day | Rakugai (Theatre) |
Watch a show | > |
| 10-5 | Day | Rakugai (Whitesnake Udon) |
Eat udon | > |
| 10-6 | Day | Rakugai (Narikin) |
Play shogi | > |
| 10-7 | Day | Rakugai | Fight: Mysterious Assassins | > |
| 10-8 | Evening | Rakugai | Go to the gates of Gion | |
| 10-9 | Evening | Gion | Return to Kiryu's house, then exit to the gates of Gion | > |
| 10-10 | Evening | Gion (Tsuruya) |
Speak to the Tsuruya employee | |
| 10-11 | Night | Kiyomizudera | Head to Kiyomizudera | > |
| 10-12 | Night | Kiyomizudera | Fight: Shishido's Henchmen | > |
| 10-13 | Night | Kiyomizudera | Use explosives to destroy the wall | > |
| 10-14 | Night | Kiyomizudera | Fight: Shishido's Henchmen | > |
| 10-15 | Night | Kiyomizudera | Fight: Shishido's Henchmen | > |
| 10-16 | Night | Kiyomizudera | Defend against the fireball | > |
| 10-17 | Night | Kiyomizudera | Fight: Shishido Baiken | > |
| 10-1 ~ 10-6 | Kyoto Tour |
You start the chapter by giving a mysterious old man a tour of Kyoto. In 10-1 you take him to eat dango. In 10-2 you play Cee-Lo with him. In 10-4 you take him to see a show. In 10-5 you eat udon with him. In 10-6 you play shogi with him. Depending on exactly what you do in these 5 steps, the amount of money the old man will pay Kiryu varies. Each activity creates "points" and the amount of points you earn by the end determines your reward. 1 point corresponds to 1 Ryo, so try to get as many points as you can if you need the extra cash.
Note that when you are travelling with the old man, you cannot use palanquins. The doshin who patrols Rakugai also does not appear.
Also, for 10-6 when you enter Narikin to play shogi with him you'll get a dialogue choice. The TOP OPTION tells the old man you are good at Shogi while the BOTTOM OPTION tells him you are bad at shogi. Check the table below to see the different outcomes based on this choice.
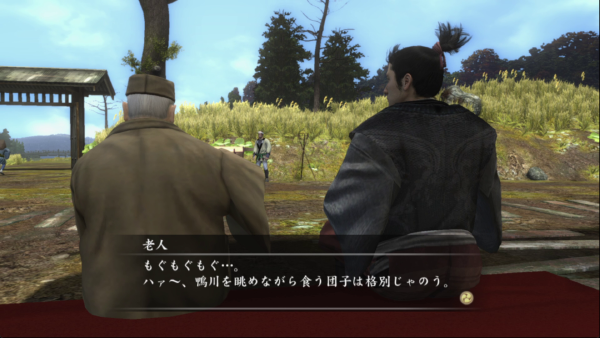
Even though generally speaking 1 point corresponds to 1 Ryo, if you receive the maximum of 13 points you will receive 15 Ryo as a reward.
Tour Points
| Chapter | Details | [Points] Option |
|---|---|---|
| 10-1 | Eat dango | [3] Order a dango at Riverside Tea House [2] Order a dango at Nonaka Tea House [0] You don't have enough money to buy a dango [0] Order anything else |
| 10-2 | Play Cee-Lo | [3] Kiryu and the Old Man win [1] Either Kiryu or the Old Man wins [0] Kiryu and the Old Man either draw or lose [0] Don't have enough money to play |
| 10-4 | Watch a show | [2] Watch the Snake-Eating Woman show [1] Watch any other show [0] Don't have the money to watch a show |
| 10-5 | Eat udon | [2] Order Tempura Udon [1] Order any other udon [1] You have no money [0] Order anything besides udon |
| 10-6 | Play shogi | TOP OPTION | [3] Kiryu wins TOP OPTION | [1] Kiryu loses BOTTOM OPTION | [1] Kiryu wins BOTTOM OPTION | [1] Kiryu loses |
| 10-3 | Fight: Mysterious Assassins |
After playing Cee-Lo with the old man while you show him around, a mysterious assassin appears and a fight begins. The most dangerous of these assassins is the swordmaster type. This guy loves to strike with an iaido technique right as Kiryu gets up after being knocked down. If you do get knocked down, be ready to guard as you rise from the ground or you'll just end up on the floor again.
In addition, the battlefield is quite confined and it is easy to find yourself surrounded by enemies. The two sword style is useful to use in this situation, to ensure you can defend against all attacks.
After the fight, you continue to show the old man around - the next stop is the theatre.
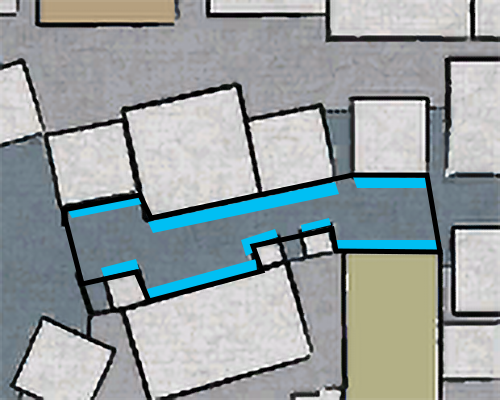
| 10-7 | Fight: Mysterious Assassins |
After playing shogi with the old man while you show him around, once again some mysterious assassins will appear and fight you. Even though this time there are only 3 enemies, you are up a dangerous combination of a swordmaster type and 2 ninja types. The ninja type moves fast and can easily get in behind Kiryu. Because of how quickly they move, combined with the fact they can easily get in behind you, it's a good idea to use the two sword style here.
After the fight, your next destination is the main gates of Gion.
1 Stone 1 / 2 Stone 2 / 3 Pot
Gion Martial Arts - Bowl Crusher
| 10-9 | Return to Kiryu's house, then exit to the gates of Gion |
Training
You will separate with the old man at the gates (he goes in the main gates while Kiryu needs to enter via the secret passage in his house). The goal is to go into Kiryu's house via the passage, then exit out to Gion. When you head to the main gates within Gion, you will trigger a scene where you find the old man with Shishido, who has come to Gion to see Kiryu. Speak to the employee standing outside the main entrance of Tsuruya and the three of you will be shown to a room.
A lot of story plays out here and, ultimately, Shishido falls off the roof and regains his memory. In an attempt to lure Kiryu out of Gion to face him, he kidnaps Haruka and takes her to Kiyomizudera - your next destination.
| 10-11 | Head to Kiyomizudera |
Requests
Bounties
Training
Inventions
- Shirikenzan or Silent Sandals (back in 7-4 when both became available, you were only able to create one of them due to both requiring the same item and you only have access to one of that item at that point in the game. Now, in 10-11 you can get hold of that item and create the one you didn't make)
- Red Bat
- Strong Bat
- Pinzoro Tag
A whole bunch of side content is available to you now, which I always find funny because in the story this is supposed to be an urgent moment where you have to rush off to save Haruka, but you can spend ages dicking around with a bunch of substories and inventions. Thankfully, Majima and his men are very patient and will happily wait for you to arrive in your own time. Doesn't matter that Haruka is tied up somewhere right now, we'll get to her eventually.
Anyway, when you're ready, head to Kiyomizudera to trigger a long battle against Majima/Shishido and his men.
NOTEYou don't get any random encounters at this point in the story. Also, once the fighting starts at Kiyomizudera you will not be able to save, so make sure you arrive prepared and save beforehand.
| 10-12 | Fight: Shishido's Henchmen |
As soon as you arrive you start fighting Shishido's henchmen. You'll have a lot of guys to deal with here, but the battlefield is quite spacious so you can run around to spread out the enemies and avoid being surrounded. After beating 16 guys in this area, the Archer Ambush heat action will trigger. After that, you'll need to defeat 4 archer enemy types. Remember you can defend against arrows with your sword, so block their shot then rush up to them and take them out.

Enemy Heat Actions
| Name | Button(s) for QTE | Conditions | Damage |
|---|---|---|---|
| Archer Ambush | or | After defeating 16 enemies | 150 |
| 10-13 | Use explosives to destroy the wall |
After dealing with the henchmen at the entrance, you'll find your path forward is blocked by a stone wall. You can destroy this wall using explosives - speak to the nearby man to get some. When you have explosives on you, pressing the up directional button will deploy the explosive. After deployment, it will explode after a few seconds, so get out of range as soon as you drop it off or you will take damage.
Be careful - if you are shot by a flaming arrow while equipped with an explosive, it will blow up while you are carrying it.
There are 6 walls that can be destroyed in this map, but you only need to destroy the first and last wall in order to progress. Feel free to ignore the others.

| 10-14 | Fight: Shishido's Henchmen |
This is a spacious battlefield with 18 enemies to fight, but you don't have to defeat any of them in order to progress the story. However, there are a few obstacles on the path which you must destroy in order to proceed. If you don't defeat the enemies they'll attack you while you try to destroy those obstacles, so you're better off defeating them all anyway. Remember, the fastest way to destroy obstacles on the battlefield is to use the greatsword style.

1 Rice Ball / 2 Hoe / 3 Log
Secret Sword - Swallow's Dance
| 10-15 | Fight: Shishido's Henchmen |
After entering this battlefield, the gate closes and you get into a fight with more henchmen. You will encounter the brute enemy type here, who will use the Power Cannon heat action if they are near a rock wall. This heat action can only be used on each wall section one time. In addition to dealing with the Brute, you'll have archers firing at you from a distance. It's a good idea to take these enemies out first so you don't have to worry about their arrows. Leave the Brute enemy type last, so you can face him one-on-one.
After defeating all the enemies in this area, the gate opens again and you can go back and grab another explosive to destroy the wall blocking your path forward.
Incidentally, if you do arrive at this battlefield with an explosive already equipped and you are quick enough to deploy it at the wall, you can actually get past this section without fighting anyone.

1 Log
Enemy Heat Actions
| Name | Button(s) for QTE | Conditions | Damage |
|---|---|---|---|
| Power Cannon | or | When Kiryu is using either the single sword style or two sword style and the brute is near a pillar | 170 |
| 10-16 | Defend against the fireball |
After destroying the wall and proceeding up the stairs, you get a QTE where an enemy jumps out and attacks you. The button for this QTE is but regardless of whether or not you succeed with this QTE, the enemy disappears and you don't have to fight them.
As you make your way through a passageway, an enemy will launch a fireball at you. You won't be able to get around it, but you can avoid taking any damage by blocking.
Finally, after exiting the passage and proceeding up the stairs you'll get another enemy attack QTE. The button for this QTE is .

In the passage, hold to avoid taking any damage from the fireball. After colliding with Kiryu, the fireball will disappear.
| 10-17 | Fight: Shishido Baiken |
When you reach the top section of Kiyomizudera, you will fight Shishido Baiken. He is a tough enemy who now moves even faster than he did back when you fought him in chapter 5. He has more attack variety as well. In particular, one of his attacks will now target Kiryu's feet with his sickle and chain. Even when using the two sword style, you cannot defend against this attack. So, it's important to dodge roll out of the way ( twice) when he goes in for an attack. Having said that, the greatsword is able to defend against that foot attack, so if you're using that style you'll be okay.
Shishido will sometimes jump up to a high platform. When he does this, you cannot reach him with any of your attacks. Once he is up high, he will launch himself at Kiryu. When he lands (and assuming you avoid getting hit), that is a great opportunity to deal some damage to him as he'll be temporarily defenseless against your attacks.
After all the fighting, you may as well grab a drink and some popcorn because you're about to watch the longest cutscene in the game. It's a colossal amount of story progression, but in the end the old man promises to meet with Kiryu an explain everything that is going on.
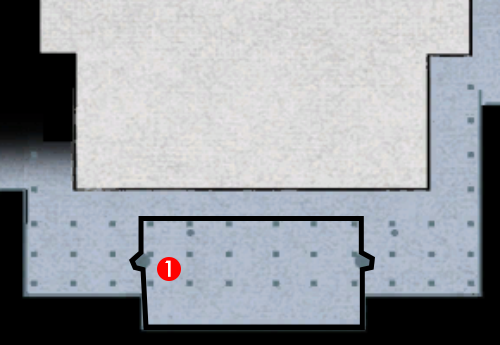
1 Rice Ball
| Heat | Mysteries of the Sword - Escape Strike |
Baiken will use one of his Sickle and Chain Attack heat actions, depending on what weapon Kiryu has equipped. Each version of this heat action has different button prompts for the QTE. You were only able to trigger one of these heat actions back in chapter 5, so now is your chance to trigger the other one if you'd like. However, if you use the two sword style, and you learned Mysteries of the Sword - Escape Strike back in 10-11, you will be able to perform that heat action immediately after completing the Sickle and Chain Attack QTE. This is the only opportunity you'll have all game to perform this heat action, so if you're going for 100% you need to use the two sword style here. Note that this enemy heat action can actually trigger 2 times in this fight (whereas back in chapter 5 it would only trigger once), so in theory it is possible to get both versions of the Sickle and Chain heat action.
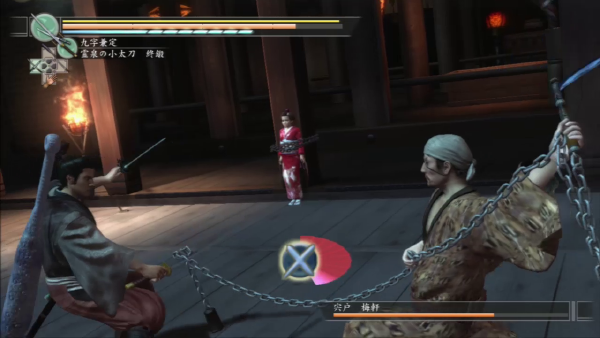
Enemy Heat Actions
| Name | Button(s) for QTE | Conditions | Damage |
|---|---|---|---|
| Sickle and Chain Attack (Single Sword) | > > | When Shishido has less than 30% health and Kiryu is using the single sword style. Sickle and Chain Attack (either version) can occur twice. | 100 - 200 |
| Sickle and Chain Attack (Two Swords) | > > | When Shishido has less than 30% health and Kiryu is using the two swords style. Sickle and Chain Attack (either version) can occur twice. | 100 - 200 |
Chapter 11: The Truth
| 11-1 | Evening | Gion (House of the Dragon) |
Rest at Kiryu's house | > |
| 11-2 | Day | Kiyomizudera | Head to Yagyu Village | > |
| 11-3 | Night | Yagyu Village | Fight: Yagyu Students | > |
| 11-4 | Night | Yagyu Village | Fight: Marume Nagayoshi | > |
| 11-1 | Rest at Kiryu's house |
After all the opening cutscenes, which involves Kiryu and Haruka meeting with the old man and learning his identity as Tokugawa Ieyasu (and that Haruka is his grandaughter), Kiryu will need to head to a place called Yagyu Village to find out the truth about Sekigahara. You won't be travelling there until the next day, so rest at Kiryu's house to progress the story. You can chose not to rest when given the option, for example if you want to do some side content. After resting, you will receive Ageha's Rice Ball - an item which fully restores your health when consumed.
NOTEIf you want to leave without progressing the story, select the TOP OPTION and then the BOTTOM OPTION

When you are ready to progress the story, select the BOTTOM OPTION when you try to leave Kiryu's house.
| 11-2 | Head to Yagyu Village |
After resting and progressing to the next day, Ito will explain how to get to Yagyu Village. As part of the story, you will leave out the front gates of Gion, but you can go back inside Gion if you like.
Something important to note here is that once you go to Yagyu Village, you stay there until the end of the chapter. In other words, if there's anything you need to do in Chapter 11, do it before going there. Especially in Gion - this is the very last opportunity in the story to be in Gion during Day time. You get to spend some time in Gion in the last chapter, but only during Evening and Night. If there is anything limited to Day time in Gion you must do it now or you lose your chance in this playthrough.

You get to Yagyu Village by going down a side path at Kiyomizudera. Once you enter the path, you are automatically transported to your destination.
| 11-3 | Fight: Yagyu Students |
When you arrive at Yagyu Village, you get into a fight with some students. At first, you'll be up against 7 enemies, but when you get the swordmaster enemy down to 50% health, 3 more guys will show up as reinforcements. Because of this, it's probably a good idea to focus on getting rid of the other enemies before you damage the swordmaster.
The Yagyu Retainer, who arrives with the reinforcements, is wearing armour. Take out the other enemies first. You cannot harm the retainer until you have destroyed his armour (heat actions still damage him though). Use the greatsword style to destroy it quickly.

1 Notice Board / 2 Coal Sack / 3 Stone 1
Heavy Drop Mastery
| 11-4 | Fight: Marume Nagayoshi |
After meeting with Yagyu Sekishusai, you will fight with Marume Nagayoshi. Marume is a top class swordsman who excels at defending. His defending is so good that Kiryu's attacks may sometimes bounce off his guard, leaving Kiryu vulnerable. However, his combo attacks are not particularly fast do you don't have to worry too much about follow up attacks after a bounce. Nevertheless, because of his defending ability, you're better off waiting for Marume to attack, then counter as soon as he finishes.
On that note, it's worth knowing that Marume's attacks possess a lot of attack force, meaning he can break your guard quite effectively. Having said that, because of the gaps between his attacks you shouldn't need to worry about having your guard broken (especially if you have learned the Zanki Style - Chagrin Knowledge ability).
NOTEWhen Marume gets into heat mode, your attacks do not phase him. He will still take damage, but he won't be stunned or interrupted by your hits. Concentrate on your defence when he is in heat mode.

1 Stone 1
Chapter 12: Ganryu Island
| 12-1 | Evening | Gion (Tsuruya) |
Speak to Tsuruya employee | > |
| 12-2 | Night | Rakugai (Blacksmith) |
Pick up Ito's sword | |
| 12-3 | Night | Gion (House of the Dragon) |
Speak to Ito and choose to head to Ganryu Island | > |
| 12-4 | Day | Kawara Street (Koetsu's Mansion) |
Speak to Koetsu | |
| 12-5 | Day | Riverside Tea House | Speak to the boatman and board the boat | |
| 12-6 | Day | Ganryu Island (Shore) |
Fight: Sasaki Kojiro | > |
| 12-7 | Day | Ganryu Island (Shore) |
Fight: Tenkai's Army | > |
| 12-8 | Day | Ganryu Island (Entrance) |
Enter the fortress and meet the Five Demons | > |
| 12-9 | Day | Ganryu Island (Swamp) |
Fight: Five Demons, Yellow Demon | > |
| 12-10 | Day | Ganryu Island (Mine 1) |
Examine the stone wall, then use explosives to destroy it | > |
| 12-11 | Day | Ganryu Island (Mine 2) |
Fight: Five Demons, White Demon | > |
| 12-12 | Day | Ganryu Island (Mine 3) |
Fight: Tenkai's Army | > |
| 12-13 | Day | Ganryu Island (Old Mining Site) |
Fight: Five Demons, Black Demon | > |
| 12-14 | Day | Ganryu Island (Wharf 1) |
Fight: Tenkai's Army | > |
| 12-15 | Day | Ganryu Island (Wharf 1) |
Fight: Five Demons, Blue Demon | > |
| 12-16 | Day | Ganryu Island (Wharf 1) |
Fight: Tenkai's Army | > |
| 12-17 | Day | Ganryu Island (Large Tea Room) |
Fight: Five Demons, Red Demon | > |
| 12-18 | Day | Ganryu Island (Wharf 2) |
Fight: Tenkai's Army | > |
| 12-19 | Day | Ganryu Island (Rocky Area) |
Fight: Nankobo Tenkai | > |
| 12-1 | Speak to Tsuruya employee |
Requests
Bounties
After the opening cutscenes, we learn that in the time Kiryu was gone, Haruka suddenly disappeared. Kiryu has searched everywhere but there is no sign of her. Also, Kiryu is buying Yoshino's freedom and a big farewell feast is being prepared at Tsuruya to say goodbye to her. Speak to the employee at the main entrance of Tsuruya and select the BOTTOM OPTION to enter and progress the story.
After the scenes inside Tsuruya, Kiryu goes outside to the well and we get a lot more story. Kojiro shows up and says Haruka is at Ganryu Island, where he'll be awaiting his arrival. Ito overheard all this. You get a couple of dialogue options but it doesn't matter what you say. As you walk away, Ito calls out to Kiryu and offers his sword to him to help him in the upcoming battle. The sword is currently with the blacksmith in Rakugai, so head there now to pick up the sword (speak to the blacksmith to receive it).
NOTEIf you've completed all the Gion Dojo and Zanki Dojo training at this point in the story, it is now possible for you to learn the secret Gion Martial Arts - Sword Reversal heat action. In 12-2, before picking up the sword from the blacksmith, first speak to Komaki in his dojo and select the TOP OPTION, you'll then get 3 dialogue options. I don't think it really matters what you pick, but I can confirm that picking the TOP OPTION again works. Komaki talks about Shibusawa, who was one of his former students. After this scene, go to the Zanki dojo. Outside are some of Shibusawa's students. Speak to them to trigger a scene. After the conversation, head to Sanjusangendo to trigger an event between Komaki and Shibusawa. After witnessing this event, Kiryu learns the Gion Martial Arts - Sword Reversal heat action.
| 12-3 | Speak to Ito and choose to head to Ganryu Island |
After learning that Haruka was kidnapped by Kojiro, Kiryu decides to set off to Ganryu Island. After picking up Ito's sword from the blacksmith, at his request, you will find him in Kiryu's house. In the dialogue with him, select the BOTTOM OPTION to tell him you are ready to go to Ganryu Island.
NOTEWARNING: Once you tell Ito you are ready to go, you cannot return to Gion again in this playthrough. If there's anything you need to do in Gion, tell Ito you are not ready yet.
After leaving Gion for the last time, you will need to speak with Koetsu at his mansion, who will tell you how to get to Ganryu Island. When you walk away after speaking with Koetsu, he calls out to you and reminds you to deal with whatever you need to before heading to Ganryu Island and says Kiryu can make use of his mansion to rest. You can now freely change the time of day by speaking to Koetsu - select the BOTTOM OPTION to do so. If there are any time-sensitive substories you still need to complete, you can change the day in order to complete them (though if any of them involve Gion, you are out of luck since you cannot return there).
When you are ready, you will need to speak to the boatman at Riverside Tea House to get to the final section of the game. This is the last point of no return - once you speak to the boatman and select the BOTTOM OPTION there is no turning back for any further preparations, or to complete any outstanding side content.
Remember, this is your last chance to explore Gion. Make sure you've done everything you want to do before you tell Ito you are ready to leave.
| 12-6 | Fight: Sasaki Kojiro |
After speaking to the boatman at Riverside Tea House and getting on the boat (BOTTOM OPTION), you arrive at Ganryu Island and end up fighting Kojiro. His fighting style is much like Marume's style in chapter 11, but Kojiro is a lot faster and he wields a long-bladed sword which has a bigger attack range. When you want to go in for an attack, you'll want to do it quickly - dodge-rolling towards him ( twice) is effective. Not only does it get you close to him quickly, but the rolling animation has some invincibility-frames (i-frames) so you should be able to avoid taking damage if he attacks you.
When Kojiro goes into heat mode, there is a chance he will use his True Swallow Counter heat action (fun fact: the Swallow Counter, or "Tsubame Gaeshi", was Kojiro's signature technique in real life). After the QTE for this heat action, you will immediately be able to perform Mysteries of the Sword - Swallow Drop (assuming you have learned this ability). Even though there are 6 buttons for the True Swallow Counter QTE, you only need to successfully press the final button in order to perform the Swallow Drop heat action. Obviously, you'll take damage for each button you miss though so you should try to successfully press them all. He will only perform the True Swallow Counter if Kiryu is using the two sword style, so if you don't want to miss the chance to use Swallow Drop make sure you are using two swords when he is in heat mode.
NOTEMuch like Marume in chapter 11, when Kojiro is in heat mode he is not phased by your attacks. He still takes damage but you won't be able to stun him. Focus on your defence when he is in heat mode.

1 Wooden sword made from an oar
Enemy Heat Actions
| Name | Button(s) for QTE | Conditions | Damage |
|---|---|---|---|
| Sword Lock | (rapid press) | When Kiryu is using a greatsword or club and you use the attack and Seijuro counters | 100 |
| Sword Lock | (rapid press) | When Kiryu is using the single sword style and you use the attack and Seijuro counters | 100 |
| True Swallow Counter | > > > > > | When Kiryu is using the two sword style and is close to Kojiro while Kojiro is in heat mode | 0 ~ 600 |
| 12-7 | Fight: Tenkai's Army |
After the battle with Kojiro, Tenkai shows up and orders his army to surround Kiryu. While in the battle, the battlefield will be surrounded by soldiers armed with spears. If you come into contact with these spears, you won't take any damage but it does stun Kiryu for a moment, leaving you vulnerable to attack. So, try to stay in the centre of the circle as often as you can, to be safe.
You will have to fight a huge number of enemies in this section - more than any other section of the main story. Wave after wave of enemy will fight you and there are no breaks between any of the waves. Among the reinforcements are a wave of arquebusier enemies who will use the Arquebus Ambush heat action. This will happen 2 times during the fight. Both times the button for the QTE is so when the screen changes for that heat action, mash that button to ensure you get it in time. After the QTE, take out the arquebusier enemy types as soon as possible, because they can stun you with their shots while you are surrounded by enemies, leaving you vulnerable to getting your ass handed to you quite quickly.
In the second half of the fight, armoured warrior types will start showing up. They use spears or clubs, both of which have a long attack range. On top of that, as usual you have to destroy their armour before you can damage then (but heat actions still damage them, as usual). Because of the added challenge with these types, your best course of action is to stay away from them and take care of all the other enemies first, then deal with the armoured enemies last. Run around the battlefield (while keeping away from the edges of the battlefield, to avoid the spears), try to get an armoued warrior alone and switch to your greatsword to quickly deal with his armour.

1 Vitality Pill - Special Grade / 2 All-Purpose Pill - Special Grade / 3 Frenzy Pill - Special Grade
[Note: You cannot collect these items until after the battle is finished]
Enemy Heat Actions
| Name | Button(s) for QTE | Conditions | Damage |
|---|---|---|---|
| Arquebus Ambush | After defeating 28 enemies and the arquebusier reinforcements show up | 200 | |
| Arquebus Ambush | After defeating 48 enemies and the arquebusier reinforcements show up | 200 |
| 12-8 | Enter the fortress and meet the Five Demons |
After taking care of things on the beach, head to the entrance of the fortress. Here, you will encounter the "Five Demons" and they will launch their "Five Demons Combo" heat action. Regardless of whether you fail the QTEs or succeed, the QTE will continue through to the very end (in other words, it doesn't stop part-way through if you fail one of the button prompts). You can take up to 500 damage, depending on how many of the button prompts you fail.
You don't get into a fight with them after the QTE - they will disappear and you can proceed to the next area.
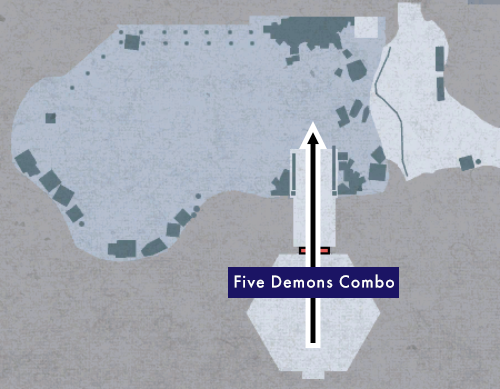
Enemy Heat Actions
| Name | Button(s) for QTE | Conditions | Damage |
|---|---|---|---|
| Five Demons Combo | > > (rapid press) > > | When you encounter the Five Demons | 0 ~ 500 |
| 12-9 | Fight: Five Demons, Yellow Demon |
After Tenkai destroys the bridge, drop down into the area below (you won't take any damage, even though it is a long fall). In this area you will bump into the Yellow Demon (you'll encounter him to the left of this area - near the pillars), who immediately attacks with the Yellow Demon Ambush heat action. Even though this guy is huge, he moves like the ninja enemy type. This includes the throwing of shuriken when Kiryu is a certain distance away. You can block these with your sword as usual, but watch out because this guy can teleport behind you after throwing one and surprise attack you. While defending against these attacks, be ready to dodge roll out of the way if he teleports.
Also, when he is near one of the pillars, he may use the Power Cannon heat action. If you want to avoid any chance of this happening, keep the fighting to the right of the battlefield, where there are no pillars.
After defeating the Yellow Demon, pick up the key he drops (interact with his body), then interact with the gate to the right of this area to unlock it - TOP OPTION to pick up the key, then BOTTOM OPTION to unlock the gate when you interact with it.
NOTEWhen smoke starts appearing around the Yellow Demon, that means he is about to teleport behind you. When you see it, be prepared to dodge-roll out of the way quickly.

1 Frenzy Pill - Special Grade / 2 Vitality Pill - Special Grade / 3 Frenzy Pill
Enemy Heat Actions
| Name | Button(s) for QTE | Conditions | Damage |
|---|---|---|---|
| Yellow Demon Ambush | When you encounter the Yellow Demon | 180 | |
| Sword Lock | (rapid press) | While using either a single sword or club, when you use the attack and the Yellow Demon counters | 100 |
| Power Cannon | Random | When Kiryu is using either the single sword style or two sword style and the Yellow Demon is near a pillar | 200 |
| 12-10 | Examine the stone wall, then use explosives to destroy it |
You will only encounter archer enemy types in this area, who will fire at you from across the cliff. You cannot reach any of them, so you cannot defeat these enemies. Keep running in this area to avoid being hit by their flaming arrows.
In order to proceed you must destroy the wall using explosives. First, you must interact with the wall. Next, head over to the east side of this map area where you will find explosives. When armed with an explosive, go back to the wall and deploy it. The path to the next area will open up once the wall is destroyed.
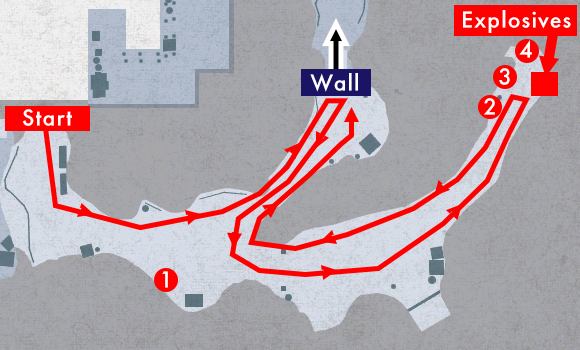
1 Wooden Box / 2 Piece of Wood / 3 Spade / 4 Vitality Pill - Special Grade
| 12-11 | Fight: Five Demons, White Demon |
After proceeding past the wall after destroying it with an explosive, you will get into a fight with the White Demon. Straight away, he will use the White Demon Ambush heat action. The White Demon wields a greatsword with great speed, as if it were a regular sword. Although he does not have that much health, when he has a white aura he doesn't take much damage from your attacks. If you keep attacking him while he has his white aura, it will disappear eventually.
The White Demon is not particuarly strong. The biggest danger in this fight is that you have to put up with the archers firing flaming arrows at you from the opposite side of the cliff. Getting hit by these arrows will stun Kiryu and leave him vulnerable to the White Demon's attacks. To avoid this problem, keep the fighting to the central area of the battlefield where there is a barrier which will protect you from arrows.
Just like with the Yellow Demon fight, after winning interact with the White Demon's body to pick up the key and then interact with the door ahead to use unlock it using the White Demon's key.

1 Stone 1 / 2 Piece of Wood / 3 Spade / 4 Frenzy Pill - Special Grade
Enemy Heat Actions
| Name | Button(s) for QTE | Conditions | Damage |
|---|---|---|---|
| White Demon Ambush | When you encounter the White Demon | 180 | |
| Sword Lock | (rapid press) | While using either a single sword or greatsword, when you use the attack and the White Demon counters | 100 |
| White Demon Finishing Blow | N/A (not possible to avoid this heat action) | When Kiryu in on the ground | 200 |
| 12-12 | Fight: Tenkai's Army |
In this area, you will again need to use explosives to destroy a wall in order to proceed. However, this time you do not need to inspect the wall before you can grab explosives. So go ahead an pick up the explosives first then drop them off at the wall. However, you should at least take care of all the enemies before grabbing any explosives. If the archers hit you with their flaming arrows while you are carrying an explosive, it will explode and deal a lot of damage to you. In addition, if you don't get rid of the archers now they will fire at you in your next Demon battle.
If you haven't already done the Thrust Mastery heat action, you can grab the Tengu Staff in this area and use that to perform that heat action. Also, you have the opportunity to use the Stair Mastery heat action here, if you haven't already done it.
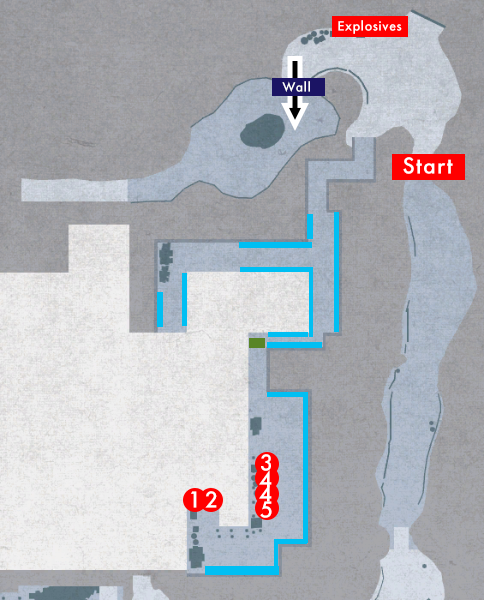
1 Tengu Staff / 2 Wagon / 3 Log / 4 Pot / 5 Wooden Box
Stair Mastery
| 12-13 | Fight: Five Demons, Black Demon |
After proceeding past the barrier, you will get into a fight with the Black Demon, who will begin with the Black Demon Ambush heat action. The Black Demon fights exactly like the Wrestler enemy type. He is able to block your sword attacks with his arms. When he is close to Kiryu, the Black Demon will use an unblockable throwing technique, just like other Wrestler types. Also, if the Black Demon is a certain distance away from Kiryu, he might use a running thrust attack. He can be difficult to damage because of his blocking and the fact that getting close to him will end up with a throw to the ground. A good course of action would be to wait for him to attack, then dodge around him and get a few hits in on him.
NOTEBe careful: When the Black Demon's health is low and Kiryu is running near the edge of the cliff, he might use the Cliff Drop heat action. If you fail the QTE, you get an instant game over.
As with the other demons, after beating him, pick up his key and use it on the door up ahead.
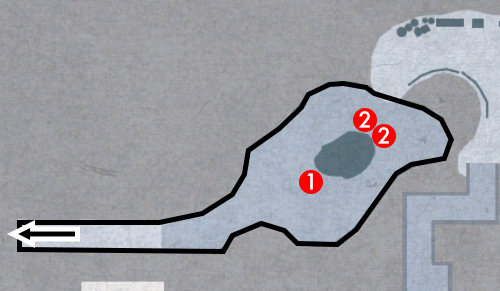
1 Wagon / 2 Wooden Box
Enemy Heat Actions
| Name | Button(s) for QTE | Conditions | Damage |
|---|---|---|---|
| Black Demon Ambush | (rapid press) | When you encounter the Black Demon | 180 |
| Cliff Drop | (rapid press) | When Kiryu is running near the edge of the cliff, while Kiryu's health is less than 50% and the Black Demon's health is less than 25% | Instant Death |
| 12-14 | Fight: Tenkai's Army |
In the next area, in the Wharf, you will encounter more of Tenkai's army. Spread around the central area are spearmen. Just like in the first Tenkai's army fight on the beach, if you touch any of these spears you will be stunned temporarily so be careful. In this area you will also fight ninja type enemies, who are good at avoiding Kiryu's sword attacks. If you put all your focus into fighting these guys, you allow the distant archer and arquebusier types to fire at you. Take out these ranged attackers first, then deal with the ninja types.
After defeating all enemies in this area, head in the direction of the boats and you will trigger an encounter with the Blue Demon.

1 Vitality Pill - Special Grade / 2 All-Purpose Pill - Special Grade / 3 Spade / 4 Wooden Box / 5 Frenzy Pill - Special Grade / 6 Log
| 12-15 | Fight: Five Demons, Blue Demon |
When you encounter the Blue Demon, he will immediately use the Blue Demon Ambush heat action. The Blue Demon uses a spear weapon and fights like Hozoin Inshun from Chapter 8. However, unlike Hozoin, when the Blue Demon is a certain distance from Kiryu he will throw shuriken.
When the Blue Demon goes into heat mode, there is a chance than when he hits a stab attack with his spear, it will trigger the Blue Demon Spear heat action. There is no QTE for this heat action, so the damage cannot be avoided. Your only choice is to defend against his spear attacks to ensure this heat action does not trigger.
A gimmick of this fight is that sometimes the Blue Demon will use his spear to leap to the opposite dock. When he does this, he opens up distance between himself and Kiryu and will throw shuriken. When this happens, defend against his shuriken throws while making your way over to the other side (you'll have to go around on foot - you can't leap over like he does).

Enemy Heat Actions
| Name | Button(s) for QTE | Conditions | Damage |
|---|---|---|---|
| Blue Demon Ambush | When you encounter the Blue Demon | 180 | |
| Blue Demon Spear Heat Action | N/A (not possible to avoid this heat action) | When the Blue Demon is in heat mode and hits Kiryu with a stab attack | 200 |
| 12-16 | Fight: Tenkai's Army |
After defeating the Blue Demon, as usual, pick up his key and unlock the door to proceed. You don't have to worry about the enemies here if you don't want to - you only need to grab the key and open the door to proceed. The enemies won't follow you through the door. Once past the door, use a greatsword to destroy the chain and open up the way forward to the next battlefield.

1 Vitality Pill - Special Grade / 2 Spirit Sword
| 12-17 | Fight: Five Demons, Red Demon |
When you enter the large tea room in this area, you will encounter the Red Demon, who will attack with the Red Demon heat action. The Red Demon fights like the ninja enemy type. Besides the use of shuriken and caltrops, he also uses a very dangerous attack where he breathes fire from his mouth. This fire attack cannot be blocked, so you'll need to use to get out of the way. However, this attack is not so easy to predict, so you might be better off forgetting about using when facing this guy and instead focus solely on evasion.
In addition, besides the two ninja types who start off fighting alongside him, the Red Demon is also able to summon 2 waves of ninja reinforcements to fight you. When a wave of reinfocements is summoned, the Red Demon disappears and will not return until you defeat all the ninja. Although the Red Demon is invisible during this bit and you cannot do any damage to him, he will still throw caltrops at you which will stun you if you walk into them.
After defeating the Red Demon, pick up his key, then destroy the chain to lower the bridge, cross the bridge, then use the Red Demon's key to unlock the door ahead to proceed.
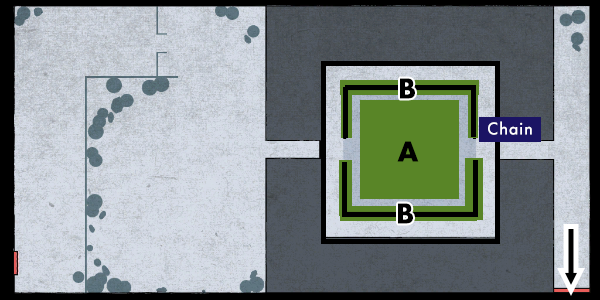
A Certain Death - Tatami Flip / B Secret Sword - Shadow Stab
Enemy Heat Actions
| Name | Button(s) for QTE | Conditions | Damage |
|---|---|---|---|
| Red Demon Ambush | When you encounter the Red Demon | 180 |
| 12-18 | Fight: Tenkai's Army |
After proceeding beyond the large tea room area, you will enter an area in which a bunch of ninja will drop down from above and fight you. In addition to these ninja, you will also have to deal with arquebusier types firing at you from a distance. Take these guys out first before you worry about the ninja types.
All of the enemies in this area will drop recovery items, so if you've gone through loads of your inventory since arriving on Ganryu Island now is a great opportunity to stock up again for the final boss fight.
After defeating all the enemies, proceed to the next area to begin the final fight of the game.

1 Wooden Box / 2 Piece of Wood / 3 Stone 1 / 4 Wagon / 5 Adamantine
| 12-19 | Fight: Nankobo Tenkai |
Beyond the wharf, you will reach a rocky area atop a cliff. Here, you will face Nankobo Tenkai. Tenkai attacks with a pistol weapon. His pistol can shoot quite fast so it's easy to take a lot of damage in one go. You can defend against the shots using the greatsword style, but when you have that equipped your movement is very slow so you won't be able to get close to him. Instead, use one of the large boulders in this area for cover. Standing behind one of them while Tenkai is shooting will protect you from damage. So, you should stand behind a rock, wait for Tenkai to rapid fire, then when he is reloading - that is your chance to launch your own attack.
Besides his pistol attacks, Tenkai might sometimes use some kind of poison mist attack. If Kiryu gets hit by this he will be temporarily stunned. But he recovers quite quickly from this so you don't need to worry much about it.
When you get Tenkai's health down to 1000, he will start to heal himself (if you played Yakuza 3 - it works like Mine's self-healing ability). He is completely defenceless while he is doing this, so jump in and attack him with everything you've got while he tries to heal.
After the fight, you have beaten the game - congratulations! Now you get to enjoy the final cutscenes of the game to see how the story wraps up. Check out the post-game section of this site to see what you unlock after beating the game.
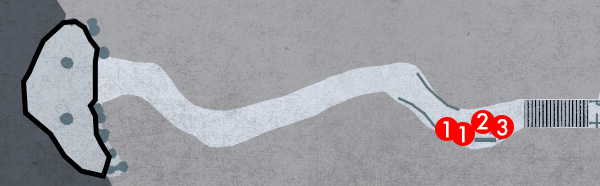
1 Piece of Wood / 2 Vitality Pill - Special Grade / 3 Stone 1