KHHsubs
Turtles
Overview
| Location | Gion |
| Available From | 5-1 |
Turtles race against each other and you bet on the outcome. It is also possible for you to develop your own turtle and enter it in the races.
Controls
| SELECT | Pause |
| START | Controls |
| Encourage turtle (only available when your turtle is racing) |
NOTEDepending on your console region, the and buttons may be swapped.

How to play
You'll find a crowd of people enjoying the turtle races in the gambling den in Gion. You can bet on the turtle who will come first, or the turtle that will come in 2nd place. It probably goes without saying, but betting on the turtle with the least chance of winning will give you the biggest payout if they go on to win. Before the race, you can look at the list of turtles participating in the race to see their stats, which you can use to help you decide on a turtle.
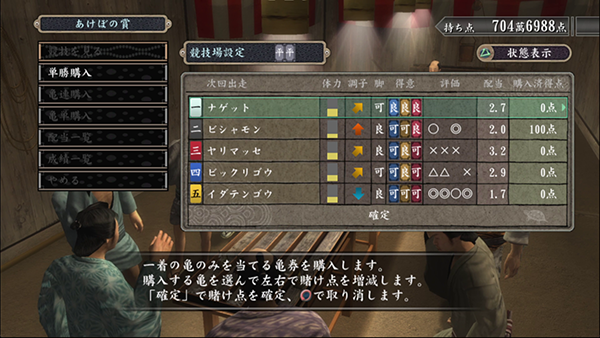
The column with the shapes shows expert evaluation of the turtle (who is likely to win). The circle with a circle inside is the best evaluation, followed by the circle, then the solid triangle, then the triangle outline. Note this is just an estimation and the evaluation won't necessarily be right. It's up to you whether you want to go along with it or use your own judgment.
Participating in races
The first thing you need in order to raise your own turtles and race them is the turtle tub. You receive this for free from the turtle seller in Rakugai. You can buy turtles from this seller, but in addition to these you can also find turtles on the ground in various areas in the game. When you feed your turtle, it will both restore stamina and also also boost stats. Note that feeding the turtle and entering it in races will age the turtle. With the exception of the Immortal Turtle, all turtles have a limited lifespan and will eventually die.
The races in which your turtle may participate is determined by the turtle's rank. You must continue to win races to increase the rank. The ranks are, from lowest to highest, Hiramaku, Komusubi, Sekiwake, Ozeki, and Yokozuna. You will need to raise strong turtles in order to win the difficult races.
Fundamentals
| Receive the turtle tub from the turtle seller in Rakugai (available from 5-6 |
| Obtain a turtle (either from the turtle seller or by picking one up from the ground) |
| With a turtle in your inventory, interact with the turtle tub in Kiryu's house to put the turtle in it (the tub can hold a maximum of 5 turtles at one time) |
| Remember, with the exception of the Immortal Turtle, all turtles have a finite lifespan and will eventually die |
| Also, note that if the turtle's trust level towards Kiryu drops to the lowest level, the turtle will abandon you |
Conditions for promotion and demotion
| Promotion Condition | Win 3 races of the same class as the turtle's current class (e.g. win 3 Hiramaku races with a Hiramaku rank turtle) |
| Demotion Condition 1 | If your turtle loses 5 races in a row, they will drop a rank |
| Demotion Condition 2 | If you lose another race after initially being demoted (as per demotion condition 1), the turtle drops another rank |
Races
In order to gain 100% mini-game completion, you must win all the turtle races. For most of the races, it's a straightforward case of developing your turtles and entering into the various ranked races until you've won them all. However, there are a few races which have special entry conditions. See the table here for the details on how to enter these races. In the case of the "Strongest Loser Cup", you'll need to enter a weak turtle into a race it has no chance of winning and let it keep losing in order to open up the chance to enter this race.
Special entry conditions
| Race | Condition |
|---|---|
| Adamantine Cup | Win all yokozuna rank races |
| Elder's Award | Only old turtles (10% or less life remaining) can participate |
| Strongest Winner Award | Only turtles who have won 10 consecutive races can participate |
| Strongest Loser Cup | Only turtles who have lost 10 consecutive races can participate |
Ability
You can see the status of your turtle (including its current abilities) by first examining the turtle tub in Kiryu's house (select the TOP OPTION), then selecting a turtle from the list of turtles who are currently in the tub. For abilities like stamina and speed, the upper limits can be increased by giving the turtle certain food. The highest level a turtle can reach in each of its abilities/stats (a turtle's max potential) is randomly determined when you obtain the turtle. But you can find turtles with high potential spread across the game (see the blue dots on the maps section of this page).

You can pay the turtle expert 10 Mon (you'll find him in Nakanokura in Gion) to look at your turtle (you don't need the turtle in your inventory to do this). He will give you an idea of how much more growth you can expect from your turtle.

| 1: Trust | The level of trust the turtle has towards Kiryu. The higher the amount of hearts, the higher the level of trust |
| 2: Name | The name you gave to the turtle. This can be a maximum of 10 characters. Once a name has been set, it cannot be changed |
| 3: Rank | Current rank, which determines the races the turtle can enter. The stars indicate how close the turtle is to the next rank (1 star = 1 win, 3 wins = a promotion) |
| 4: Condition | There are 5 condition ranks. From best to worst: Excellent, Good, Average, Poor, Very Poor. A lower condition makes a turtle more prone to accidents in races (causes them to come to a sudden stop temporarily). Condition also affects speed |
| 5: Nature | The turtle's personality. This will never change. The effects of a turtle's nature are explained below |
| 6: Stamina | This drops while a turtle runs during a race. When this gets to 0, the turtle's speed drops massively |
| 7: Speed | The turtle's base speed |
| 8: Hunger Gauge | The lower this value, the hungrier the turtle is. This goes down over time. This gauge is restored by feeding the turtle. You cannot give the turtle any food when it's at the max level |
| 9: Environment Skills | There are 3 environment types: Water, Sand, and Mud. The better these values, the faster the turtle will travel over the respective environments in race courses |
| 10: Evaluation | Evaluation points (determined by the turtle expert in Nakanokura) |
| 11: Record | The turtle's win/loss record |
Turtle condition and nature
During a race, there is a chance for a turtle to have an "accident" - this could be something like suddenly falling asleep temporarily, or bumping into the wall and stopping briefly. There are 3 factors that determine the likelihood of these accidents: Nature, Condition, and Trust. Nature will never change, but a turtle's condition will change after a fixed amount of game time. If the condition of a turtle becomes poor, wait until it becomes positive again before racing it.
Trust changes
| Winning a race will improve trust level |
| Feeding a turtle after a race will improve trust level |
| If the turtle has a "Wild" personality, encouraging it during a race will improve trust level |
| If the turtle has a "Coward" personality, encouraging it during a race will lower trust level |
| Making a turtle race when it has low stamina will lower trust level |
| Feeding a turtle something that lowers any of its stats will lower trust level |
| Ignoring a turtle for a long period of time will lower trust level |
Effect of condition
| Speed | Varies from 90% (Very Poor condition) to 120% (Excellent condition) |
| Rate of accidents | Varies from 160% (Very Poor condition) to 40% (Excellent condition) |
Effect of trust
| Rate of accidents | Varies from 130% (lowest trust level) to 70% (best trust level) |
| Food effect | Varies from 80% (lowest trust level) to 120% (best trust level) |
| Max speed when encouraging | The higher the trust level, the higher the max speed |
Effect of nature
| Nature | Rate of accidents | Effect of Hunger |
|---|---|---|
| Coward | High chance of suddenly sleeping during a race | The higher the hunger gauge, the more likely the turtle is to suddenly sleep during a race |
| Normal | Easy for the turtle to suddenly drop speed during a race | The higher the hunger gauge, the easier it is for the turtle to suddenly drop speed during a race |
| Wild | High chance of bumping into the walls | When the hunger gauge is empty, it is easier for the turtle to bump into the walls |
| Terrible | Highest chance of all kinds of accidents | When the hunger gauge is empty, it is easier for the turtle to bump into the walls |
Note: If the turtle has a "Fickle" nature, its nature's effect will randomly be one of either "Coward", "Normal", or "Wild" (changes with each race)
Development
The different kinds of food you can offer your turtles, as well as their effects, are outlined in full on the table in the "Food" tab on this page. But the efficacy of the food varies depending on 2 things: the turtle's remaining life and the turtle's growth type. See the graph below for details. There is nowhere in the game which outright tells you what your turtle's growth type is, but the turtle expert in Nakanokura gives you a clue.
Turtle growth type
| 1: Speak to the turtle expert and ask him to evaluate your turtle |
|---|
| 2: Keep an eye out for one of these comments he makes | Growth Type |
|---|---|
| 成長の具合も・・・しばらく変化なさそうじゃ | Either "Early Developer" or "Late Bloomer" |
| 成長の具合も・・・回復しそうじゃ! | Normal |
| 成長の具合も・・・悪くなるかもしれん | Random |
| 3: In order to discern between "Early Developer" and "Late Bloomer", give the turtle some food to see how much effect it has. This works best at the start of the turtle's lifespan when the difference in effect between the two growth types is very clear (see graph below) |
|---|

How to obtain special turtles
Throughout the game, you will encounter overturned turtles on the ground in various areas. Nothing will happen right away when you save them, but when a turtle you have been raising dies, they will show up at Kiryu's house (in the tub). These special turtles are better than other turtles you encounter in the game, so they will be very helpful in the races. The best turtle of all is the Immortal Turtle - this is a reward for 100% completion in the yujo category (i.e. after completing all the yujo requests and receiving their final letter). As the name suggests, this turtle will never die. In addition, this is the only turtle who is able to reach the max possible value in all abilities/stats.

These special, overturned turtles can only be found in specific locations that can only be visited once. If you forget to help them, you will not get another chance to get them.
How to get special turtles
| Name | Where to find | Ability |
|---|---|---|
| Miyamoto Turtle | Save the turtle outside Miyamoto's dojo in 1-4, then it will appear after a turtle you own dies | All abilities are high, plus its sand environment skill can be upgraded to the highest possible level |
| Temple Turtle | Save the turtle outside the temple in 2-1, then it will appear after two turtles you own die | All abilities are high, plus its water environment skill can be upgraded to the highest possible level |
| Farm Turtle | Save the turtle on the farm in 3-2, then it will appear after three turtles you own die | All abilities are high, plus its mud environment skill can be upgraded to the highest possible level |
| River Turtle | Save the turtle by the river in 7-2, then it will appear after four turtles you own die | All abilities are high, plus its speed can be upgraded to the highest possible level |
| Immortal Turtle | Complete all the yujo requests (1 ~ 7) | All abilities/stats can be upgraded to the highest possible level. Nature is "Terrible". It will never die (does not age) |
Food
| Food | Hunger Gauge | Max Hunger Gauge | Stamina | Max Stamina | Speed | Max Speed | Water Environment Skill | Max Water Environment Skill | Sand Environment Skill | Max Sand Environment Skill | Mud Environment Skill | Max Mud Environment Skill |
|---|---|---|---|---|---|---|---|---|---|---|---|---|
| Nori | 40 | 7 | 3 | 6 | 5 | |||||||
| Eel Liver | 80 | 5 | 3 | |||||||||
| Dried Roe | 120 | 10 | 5 | |||||||||
| Salmon Roe | 150 | 15 | 7 | |||||||||
| Mussel | 80 | 5 | 1 | |||||||||
| Small Clam | 120 | 10 | 3 | |||||||||
| Scallop | 150 | 15 | 5 | |||||||||
| Snail | 80 | 5 | 3 | |||||||||
| Loach | 120 | 10 | 5 | |||||||||
| Crayfish | 150 | 15 | 7 | |||||||||
| Medaka | 80 | 5 | 3 | |||||||||
| Goldfish | 120 | 10 | 5 | |||||||||
| Ayu | 150 | 15 | 7 | |||||||||
| Shrimp | 80 | 5 | 1 | |||||||||
| Prawn | 120 | 10 | 3 | |||||||||
| Lobster | 150 | 15 | 5 | |||||||||
| Dried Algae | 40 | 30 | ||||||||||
| Sludge Worm (Small) | 20 | 50 | 1 | |||||||||
| Sludge Worm (Medium) | 50 | 100 | 3 | |||||||||
| Sludge Worm (Large) | 80 | 150 | 5 | |||||||||
| Super Sludge Worm | 120 | 200 | 15 | |||||||||
| Vitality Pill | 60 | 3 | ||||||||||
| Vitality Pill - High Grade | 80 | 4 | ||||||||||
| Vitality Pill - Special Grade | 100 | 5 | ||||||||||
| Frenzy Pill | 60 | 5 | 3 | |||||||||
| Frenzy Pill - High Grade | 80 | 8 | 4 | |||||||||
| Frenzy Pill - Special Grade | 100 | 10 | 5 | |||||||||
| All-Purpose Pill | 60 | 5 | 3 | |||||||||
| All-Purpose Pill - High Grade | 80 | 8 | 4 | |||||||||
| All-Purpose Pill - Special Grade | 100 | 10 | 5 | |||||||||
| All-Purpose Pill - Ultimate | 75 | 20 | 10 | |||||||||
| Empty Stomach Pill | -100 | -20 | ||||||||||
| Sobering Pill | 5 | -10 | -2 | |||||||||
| Sesame | 40 | 8 | 6 | 1 | 2 | |||||||
| Pepper | 25 | 6 | 5 | 3 | 4 | |||||||
| Shiso | 30 | 5 | 5 | 5 | 5 | |||||||
| Ginger | 30 | 3 | 4 | 7 | 6 | |||||||
| Horse Meat | 50 | 20 | 8 | |||||||||
| Whale Meat | 255 | 18 | 5 | 17 | 4 | |||||||
| Unrefined Sake | 120 | 10 | 1 | |||||||||
| Nada Refined Sake | 140 | 8 | 11 | |||||||||
| Satsuma Shochu | 80 | 7 | 10 | |||||||||
| Mirin | 100 | 8 | 10 | |||||||||
| Itami Morohaku | 80 | 10 | 5 | |||||||||
| Itami Refined Sake | 90 | 11 | ||||||||||
| Imozake | 100 | 12 | 12 | |||||||||
| Nara Morohaku | 110 | 18 | 15 | |||||||||
| Ohagi | 230 | 6 | 3 | |||||||||
| Manju | 60 | |||||||||||
| Mugwort Dango | 200 | 8 | 7 | |||||||||
| Kyozeri | 50 | 12 | 15 | |||||||||
| Kujo Onion | 70 | 18 | 15 | |||||||||
| Canal Burdock | 60 | 17 | 15 | |||||||||
| Yaki Dango | 200 | 5 | 2 | 5 | 2 | |||||||
| Tea Dango | 200 | 4 | 1 | 7 | 3 | |||||||
| Tri-Colour Dango | 200 | 10 | 3 | |||||||||
| Mandarin | 50 | 2 | 8 | 4 | ||||||||
| Konpeito | 60 | 12 | 15 | |||||||||
| Hellfire Pill | 30 | 1 | 20 | |||||||||
| Gold Pill | 30 | 1 | 20 | |||||||||
| Foreign Pill | 30 | 1 | 20 | |||||||||
| Black Pill | 30 | 1 | 20 | |||||||||
| Chili Pepper | 30 | -50 | -10 | |||||||||
| Apricot Candy | 40 | 10 | 2 | |||||||||
| Apple Candy | 50 | 10 | 4 | |||||||||
| Turtle Candy | 80 | 20 | 5 | |||||||||
| Gold Candy | 110 | 15 | 11 | |||||||||
| Arashi Yokan | 200 | 75 | 30 | 90 | 25 | |||||||
| Dried Mackerel | 100 | 30 | 10 | |||||||||
| 5-Pepper | 10 | -15 | -10 | |||||||||
| 3-Pepper | 10 | -15 | -10 | |||||||||
| 7-Pepper | 10 | -15 | -10 | |||||||||
| Chicken Meat | 80 | 10 | 8 | |||||||||
| Leftovers | 90 | 11 | 7 | |||||||||
| Castella | 150 | 15 | 20 | 15 | 20 | |||||||
| Rice Ball | 0 | |||||||||||
| Village Tribute | 100 | 40 | 40 | |||||||||
| Tuna Sashimi | 75 | 10 | 15 | |||||||||
| Ageha's Rice Ball | 150 | 250 | 50 |
Maps
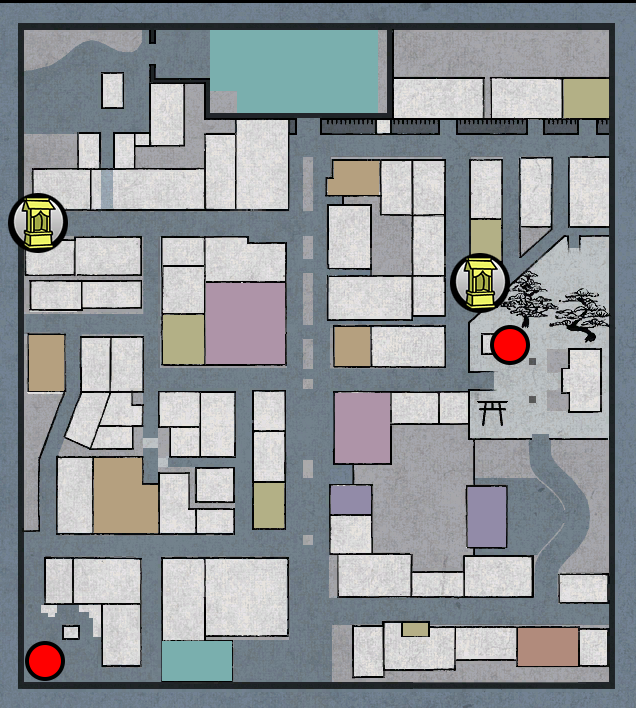
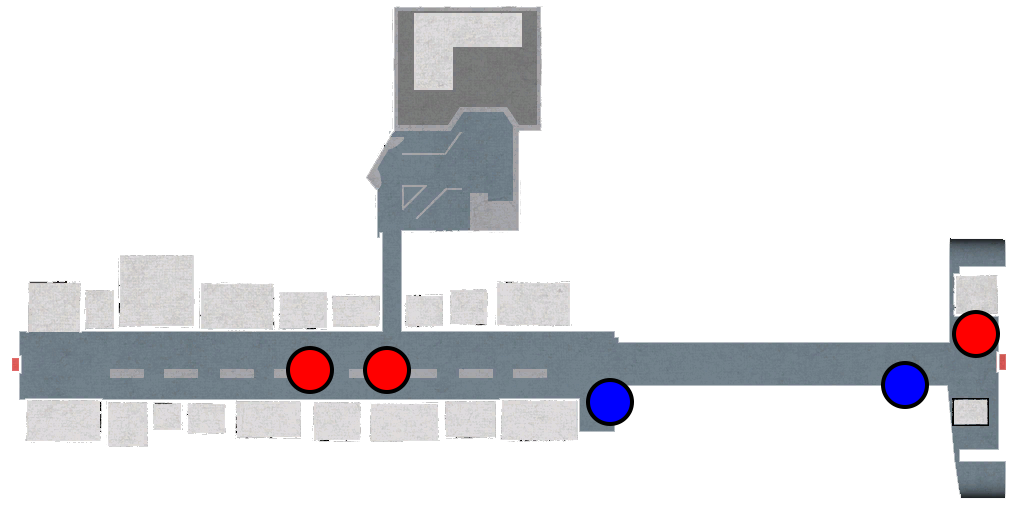
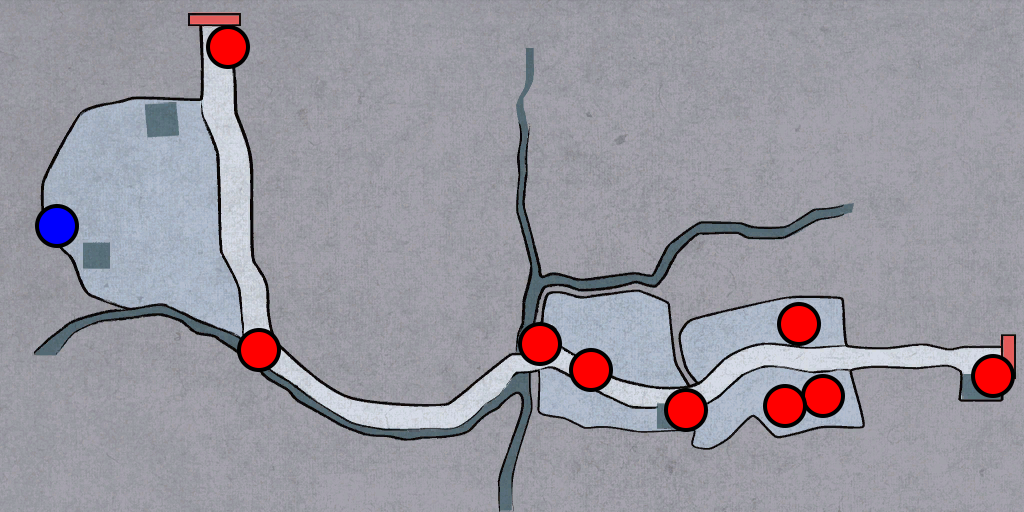
The icons on the map below indicate the location of turtles you can pick up and take back to your tub. Red icons indicate regular turtles while blue icons incidate turtles with high potential.
Gion
Rakugai

Forest Road

Mountain Road

Kawara Street
Farms
Riverside Tea House

River Road

Hozoin Temple

Cliff Road


